Best Path Lighting for Walkways: research shows
Place walkway path lights roughly 6 to 10 feet apart on straight runs, closer at steps, curves, and turns; set fixtures about 1 to 2 feet off the edge, aimed to spread light without glare. Poor placement leaves dark gaps, trip risks, and a messy look. This guide shows where to place lights by walkway shape, risk points, and fixture style.
This guide is part of our Landscape lighting guide series.
Quick comparison
The best placement choice starts with the path itself: straight, curved, narrow, wide, or broken by steps and landings. After that, spacing comes next.
| Product | Badge | Best for | Price | ||
|---|---|---|---|---|---|
 | PETLIK 5CCT Low Voltage Pathway Lights, 4-Pack 6W LEDPETLIK | Our pick | Low voltage pathway lights with remote control | $59.84 Price as of 29 Sep 2026 | View |
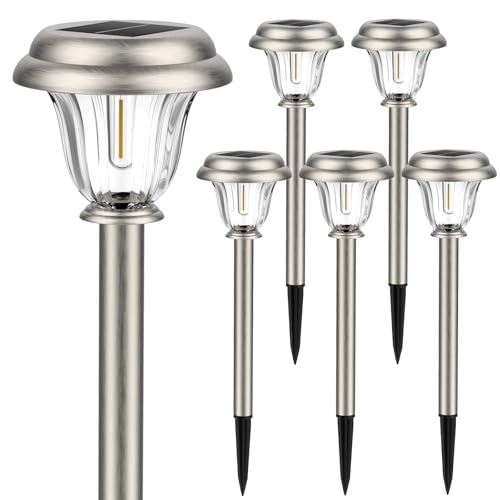 | Solar Lights Outdoor Waterproof Stainless Steel Glass SolarDERAYSION | Budget pick | Solar-powered pathway lights with stainless steel design | $39.99 Price as of 29 Sep 2026 | View |
 | ALYFC 8 Pack Low Voltage Landscape Lighting Kit, 3W MetalALYFC | Also great | Low voltage landscape lighting kit with 8 lights | $56.09 Price as of 29 Sep 2026 | View |
For most homes, shielded low-voltage path lights placed in a staggered pattern give the best balance of visibility, glare control, and output. Solar units can work on sunny, open routes, but they are less forgiving on shaded walks and long runs.
How we chose
The placement approach here puts control before brightness. A fixture that puts light on the walking surface matters more than a higher lumen number.
Glare control and beam shape came next, because unshielded sources and wide-open optics are the main reason walkways look harsh at night.
Fit for straight runs, curves, and step-adjacent sections mattered as well. A good layout changes with the hazard, not with a fixed spacing rule.
Power reliability and maintenance load also matter. Low-voltage systems handle mixed conditions better; solar is simpler, but shade and winter weather can cut output fast.

PETLIK 5CCT low voltage path lights: best for adjustable control
- Complete kit with transformer and wire
- Adjustable brightness and color temperature
- Dusk-to-dawn and timer control modes
This kit fits homeowners who want a complete low-voltage setup with dimming and color control in one box. Based on the spec sheet and owner feedback, the adjustable brightness and color temperature make it easier to tune light for a narrow front walk or a longer side path.
The strongest point is control. Dusk-to-dawn and timer modes help keep spacing choices consistent through the night, and the included transformer and wire reduce planning friction.
The drawback is that a kit like this still needs careful layout. If the fixtures are aimed too high or set too far apart, the extra controls will not fix glare or dark gaps.
DERAYSION solar pathway lights: best for simple sunny routes

- Automatic on/off with dusk-to-dawn sensor
- Durable stainless steel and glass construction
- Easy installation with no wiring required
This option suits short, open walkways where wiring is a problem and sunlight is steady. Based on specs and reviews, the stainless steel and glass build gives it a more durable feel than many budget solar lights.
Its easy install is the main draw. There is no transformer to size and no cable run to plan, so it works well for garden paths and light-use routes with clear sun exposure.
The drawback is performance consistency. Shaded paths, winter weather, and long stretches with many fixtures can produce uneven output and shorter runtimes than wired systems.
ALYFC 8 pack low voltage landscape lights: best for longer runs
- Easy 10-minute setup with complete kit
- Rust-resistant and UV-protected metal housing
- Flexible 83 ft lighting layout
This kit is a strong match for wider or longer walkways that need more fixture count and more consistent coverage. Based on the spec sheet and owner feedback, the 83-foot layout flexibility makes planning easier on paths with bends or multiple zones.
The rust-resistant, UV-protected metal housing is the practical advantage here. It suits users who want a durable wired layout without moving into a more expensive custom system.
The drawback is that a larger kit can tempt overuse. More fixtures are not better if they create a runway effect or place light where nobody needs it.
How many lights do you need for your walkway?
The right count depends on walkway width, not just length. A narrow path often needs one staggered side, a standard path may need alternating fixtures on both sides, and a wide garden path usually needs more total fixtures to keep the center from going dim.
Use one side only when the path is narrow, straight, and bordered by a wall or hedge that already reflects some light. Use both sides when the walk is wider than about 5 feet, has open edges, or includes a turn that hides one side from view.
Walkway width and fixture count
- Narrow path: 3 to 4 feet wide; often 1 side with staggered placement is enough.
- Standard path: 4 to 6 feet wide; 2 sides or a staggered single side with tighter spacing usually works better.
- Wide garden path: more than 6 feet wide; both sides are usually better to avoid a dark center strip.
How to place lights on curves, steps, and landings
Curves need closer spacing and more overlap because the walking line bends away from the beam. Steps, landings, and intersections need fixtures aimed at the change in level or direction, not at the middle of the path.
Put lights before and after each risk point so the eye sees the transition early. Tight bends, pinch points, and dark corners often need extra fixtures even when the rest of the route is covered well.
Staggered placement for curves
Stagger fixtures so each one lights the inside edge of the curve while the next one covers the outside edge. That breaks up the runway look and keeps the bend readable without a row of identical bright spots.
Steps and landings
Place lights to reveal the tread and the edge of the landing, not to wash the whole area in light. At steps, a fixture on each approach side often works better than one centered light, because it shows the height change sooner.
Placement worksheet: straight, curved, and step-adjacent layouts
This worksheet turns the layout into three usable patterns. The no-glare zone is the area where a person standing on the path should not be able to look straight into the lamp source.
| Scenario | Fixture count | Spacing | No-glare zones | Notes |
|---|---|---|---|---|
| Straight walkway, 4 feet wide | 4 to 6 fixtures over 30 feet | About 6 to 8 feet apart | Keep lights 1 to 2 feet off the edge and below eye line | One side can work if the opposite edge reflects light |
| Curved walkway, 5 feet wide | 5 to 7 fixtures over 30 feet | About 5 to 7 feet apart on the curve | Avoid aiming into the inside of the bend | Stagger fixtures to prevent dark gaps on the arc |
| Step-adjacent path, 4 to 5 feet wide | 2 fixtures before the first step, 1 to 2 after | Closer than 6 feet near the step zone | Keep direct view of the bulb blocked from approach angles | Prioritize treads, landings, and the top step edge |
Which one should you buy?
Choose PETLIK if you want adjustable color and a complete wired starter kit with control modes. Choose ALYFC if your walkway is longer, wider, or needs more fixtures and flexible layout planning. Choose DERAYSION if the path is sunny, short, and simple enough that wiring would be more trouble than the light run itself.
For shaded routes, the low-voltage kits are the safer buy. For a budget install on a bright, open path, solar can be acceptable. For the cleanest result on most homes, shielded low-voltage fixtures in a staggered pattern are the best default.
Frequently asked questions
How far apart should path lights be placed along a walkway?
Use roughly 6 to 10 feet on straight runs, then tighten spacing near bends, steps, and entries. Wider paths usually need closer spacing or a second side. If the light pools leave the center dark, shorten the distance rather than increasing brightness.
How high should walkway path lights be?
Many path lights work best at roughly 12 to 18 inches high. That range keeps the beam low enough to light the walking surface while reducing direct glare. Lower shielded fixtures usually feel less harsh than taller posts with open bulbs.
Should path lights be staggered or placed in a straight line?
Staggered placement is better for most walkways because it breaks up the runway look and gives more even coverage. A straight line can work on very narrow, symmetrical paths, but it often looks rigid and can create bright spots directly in the line of sight.
How do you light a walkway without glare?
Use shielded or hooded optics, aim the fixture downward, and keep the bulb out of direct view from the walking path. Put the light 1 to 2 feet off the edge so the beam lands on the surface instead of into someone’s eyes.
How do I light a curved path?
Place fixtures closer together on the curve and stagger them so the bend is lit from alternating sides. Keep the inside of the curve slightly brighter than the outside so the turn reads clearly without a hard line of light.
Can solar path lights work for walkway lighting?
Yes, if the route gets steady sun and the lighting demand is modest. They are weaker on shaded walks, under trees, or along long runs that need uniform output. For those conditions, a wired low-voltage system is usually the safer choice.