How to Level Soil for a New Landscape Bed: Exact Grade
Level a new garden bed with a slight slope away from the house or hardscape, then compact it and recheck after watering so it settles flat but still drains. Skip the grade and you get ponding, exposed roots, heaved mulch, and water where you do not want it. This guide shows how I mark the bed, move soil, compact it, and verify the final slope before planting.
What you’ll need

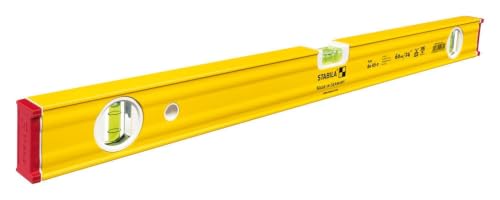


- Shovel for digging and moving soil; a spade shovel works best in tough ground
- Rake; a bed rake helps smooth larger areas
- Level; a carpenter’s level works for small beds, and a long level helps across wider spans
- Stakes and string to mark bed boundaries and keep dimensions consistent
- 2×4 board to bridge low and high spots when checking grade
- Laser level for larger beds where a long board is not enough
- Topsoil for raising low spots or correcting grade
- Compost for improving the planting mix after leveling
- Mulch for moisture retention and temperature control after planting
- Optional weed barrier fabric for weed suppression only
How uneven is too uneven for a bed?
If the area has shallow dips, it can usually be graded in place. If water sits in more than one low spot, runs toward the foundation, or hits a hard edge and rebounds into the bed, the site needs more than smoothing. On compacted native soil, that can mean a deeper cut, more fill, or a different bed type.
Choose a raised bed or berm when the ground falls too sharply, the area stays wet after watering, or the existing grade would force you to remove too much soil near roots, irrigation, or a wall. A shallow in-ground bed works best when the correction is small and the drainage path is clear.
When to switch to a raised bed or berm
If the bed would need major reshaping across the whole footprint, stop and rethink the plan. Raised beds should often be no wider than four feet, and beds against a wall or other structure should be under three feet wide. A two-foot or three-foot path also makes access easier where the bed meets hardscape.

Step-by-step: grade the bed
- Mark the bed footprint with stakes and string so the final grade stays inside the intended dimensions.
- Remove rocks, sticks, weeds, and roots, then expose the high and low spots with the shovel.
- Measure each corner and note how many inches must be cut or filled to keep the slope moving away from structures.
- Shave down high spots first; then add topsoil to low spots in thin layers so the bed does not settle unevenly.
- Blend in compost after the grade is close, especially if the native soil is tired, compacted, or low in organic matter.
- Check the surface with a 2×4 and level, or a long level for larger areas, and confirm the slope direction with a laser level when the bed spans a wide run.
- Firm the surface lightly, water it, and recheck after settling before planting.
How to check grade with a board
Lay the 2×4 across the bed, set the level on top, and look for gaps under the board. A carpenter’s level works for short spans, while a longer level or laser level can be more useful on larger beds. The goal is not a dead-flat surface against a house; the goal is even support with drainage moving away.
Use the fill-and-cut worksheet
This simple worksheet keeps the grading job measurable instead of visual. It helps identify where to remove soil, where to add it, and whether the final slope still carries water away from the structure.
| Corner | Before grade | Action | Estimated inches | After check |
|---|---|---|---|---|
| House-side left | High spot | Cut | 2 in | 1/4 inch per foot away from house |
| House-side right | High spot | Cut | 1 in | Matches adjacent corner |
| Outer left | Low spot | Fill | 3 in | No pooling after watering |
| Outer right | Low spot | Fill | 2 in | Board spans without rocking |
Before-and-after cross-section checklist
- Identify the highest corner and the deepest low spot.
- Mark how much soil to remove at each corner.
- Mark how much topsoil to add at each low point.
- Confirm the slope still moves away from the house, wall, or patio.
- Water lightly and recheck after the settling period.
Should you add compost, topsoil, or both?
Use topsoil when you need to change grade, because it holds shape better than compost alone. Add compost after the bed is level enough to plant, or mix it into the upper layer to improve soil quality. A 50/50 topsoil and compost mix is a common planting mix when the existing soil needs both lift and organic matter.
Clay soil usually needs more careful cutting and lighter fills because it seals and holds water; sandy soil drains fast and may need more compost to keep moisture; compacted native soil often needs loosening before any fill goes in. On compacted ground, perched water can sit above the tight layer even when the top looks level, so break that layer before finishing the grade.
How deep should you remove soil?
A guide may call for removing about 4 to 6 inches of soil when the bed needs a real grade correction. Use that range only where the shape demands it, and keep the final slope moving away from the structure. Near roots, irrigation, or paving, remove less at a time and recheck often.
Common mistakes to avoid

Do not pack the soil hard. Firm it enough to settle, then stop. Overcompaction can make a shallow bed hold water and can push runoff toward a foundation or retaining edge.
Do not trust the rake alone. A bed rake smooths the top, but it cannot tell whether the bed is falling the wrong way or dipping at a corner.
Do not skip the settling period. The area may need a few days to settle after leveling, and a light watering often reveals low spots before planting.
Do not use weed barrier fabric to fix bad grade. Fabric may help suppress weeds, but it is not a substitute for correcting slope, drainage, or settlement.
If that didn’t work, try this next
- Check the bed again with stakes and string stretched from the house side to the outer edge.
- Add or remove soil in 1-inch passes instead of trying to solve a deep low spot at once.
- Rewater the bed and watch where puddles form before planting.
- If water still moves toward the structure, stop and regrade the area or switch to a raised bed.
Prevention
Before each refill or cut, mark utilities, irrigation lines, and hard edges so digging stays clear of buried lines and fixed surfaces.
Frequently asked questions
how do you level ground for a garden bed
Set stakes and string, cut high spots, fill low spots with topsoil, then check the surface with a 2×4 and level. Water lightly, let it settle for a few days, and make final adjustments before mulch goes down.
how do you level ground for landscaping
Start by marking the footprint, then grade from the highest point toward the outlet side so water moves away from structures. For larger areas, use a long level or laser level, because eye-level checks miss shallow dips and reverse slopes.
what tools do I need to level soil for a new bed
Use a shovel, rake, level, stakes and string, and a 2×4 board. Add a laser level for bigger beds, plus topsoil and compost if the grade needs material added after cutting the high spots.
should I compact soil after leveling a bed
Yes, but only lightly. Firm the soil enough that it settles without sinking later, then water and recheck. Do not pack it hard, especially over clay or compacted native soil, because that can trap water above the tight layer.
how do I fix low spots before planting a new bed
Fill low spots with topsoil in thin lifts, then blend in compost after the grade is close. Water the area, wait through the settling period, and check again with a board and level before planting.
do I need compost or topsoil after leveling ground
Use topsoil to correct height, then add compost to improve the planting layer. If the bed needs both grading and soil improvement, a 50/50 topsoil and compost mix works well in the upper layer once the slope is set.