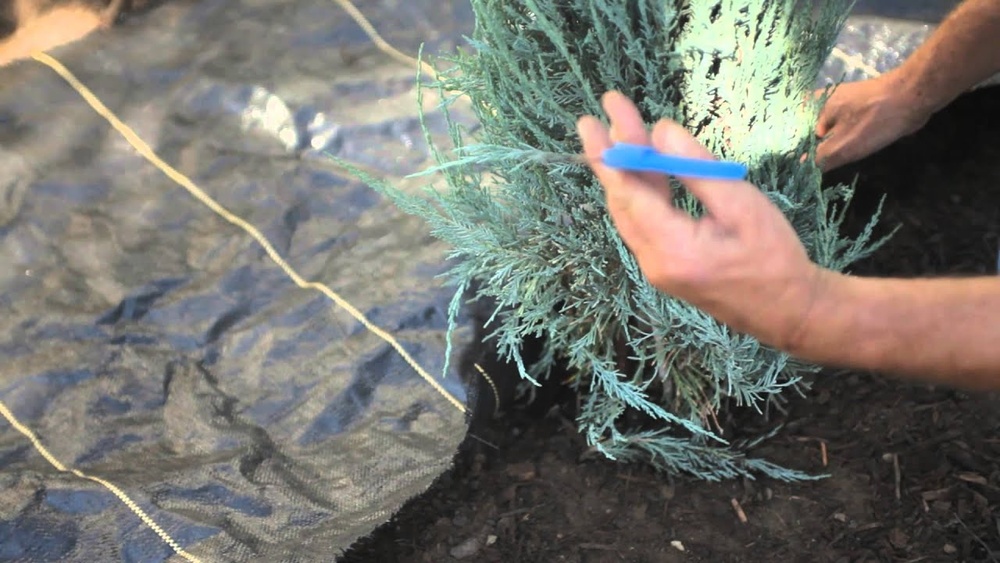

Laying landscape fabric around existing plants is both an art and a science. Many gardeners and homeowners want to suppress weeds, boost the aesthetic of their gardens, and reduce maintenance time—without sacrificing the health of their established plants. But how do you install landscape fabric without disturbing your thriving flora?
Whether you’re tackling a mature flower bed, a vegetable patch, or a well-established shrub border, understanding the right techniques can mean the difference between flourishing plants and unintended setbacks.
The process isn’t simply rolling out a sheet and hoping for the best. It involves careful planning, the right materials, and precise installation methods tailored to the unique needs of existing plants. In this comprehensive guide, we’ll walk you through every step, addressing common pitfalls, offering data-driven insights, and sharing expert advice so you can confidently revitalize your garden beds.
Let’s dig in and discover how to achieve a weed-free, beautiful landscape without harming your beloved plants.
Key Takeaways
- Landscape fabric can be installed around established plants with careful planning and the right techniques to minimize root disturbance.
- Choosing the right type of landscape fabric and tools is essential for effective weed control and long-term plant health.
- Proper installation involves cutting and fitting fabric precisely, securing it well, and providing adequate water and airflow to plant roots.
- Regular maintenance and monitoring ensure landscape fabric continues to benefit your garden without compromising plant vitality.

Credit: www.youtube.com
Understanding Landscape Fabric And Its Role
What Is Landscape Fabric?
Landscape fabric is a woven or non-woven geotextile material designed to block weeds while allowing air, water, and nutrients to reach plant roots. Available in materials such as polypropylene and polyester, it’s commonly used in both residential and commercial landscaping for beds, paths, and under hardscapes.
The design of landscape fabric is crucial: woven fabrics have tiny perforations that facilitate water and gas exchange, while non-woven types are typically needle-punched, offering a different balance of permeability and durability. Some newer products even feature UV-resistant coatings to extend their lifespan in exposed locations.
Benefits Of Using Landscape Fabric
- Weed suppression: Reduces the need for chemical or manual weed control, especially in beds prone to aggressive perennial weeds.
- Moisture retention: Helps soil maintain consistent moisture levels by slowing evaporation, which is particularly beneficial in arid climates or during drought conditions.
- Erosion control: Prevents soil loss in sloped or exposed areas, making it ideal for hillsides or raised beds.
- Cleaner beds: Keeps mulch and gravel from mixing into the soil, which helps maintain a tidy appearance and prevents unwanted soil compaction from foot traffic.
According to a study by the University of California Cooperative Extension, using landscape fabric can reduce weed emergence by up to 90% compared to uncovered soil, especially when paired with an organic mulch layer. This can translate into hours of labor saved over the growing season and healthier, more vigorous plants due to reduced root competition.
Types Of Landscape Fabric
| Type | Material | Best Uses | Durability |
|---|---|---|---|
| Woven | Polypropylene | Flower beds, shrub borders | 5-10 years |
| Non-woven | Polyester | Paths, under rocks | 3-5 years |
| Biodegradable | Coconut fiber, paper | Vegetable gardens, annual beds | 1-2 seasons |
Woven fabrics are best for long-term beds where you want to minimize disturbance, while non-woven types excel under hardscape or in areas with minimal root activity. Biodegradable options are excellent for annual beds and vegetable gardens, where you want to add organic matter and renew the soil each year.
Limitations And Considerations
While landscape fabric offers many advantages, it’s not without drawbacks:
- Can restrict root growth if installed improperly, especially if openings for plants are too tight or fabric is layered too thickly.
- May impede water infiltration over time if clogged with debris or if mulch decomposes into a dense mat.
- Not suitable for all plants, especially those that spread by runners (like strawberries or mint) or require frequent division and transplanting.
- Potential for pests: In some climates, rodents or insects may nest under fabric if mulch is not monitored.
For more on landscape fabric types and research, see the Wikipedia page on Landscape Fabric.
Preparing To Install Landscape Fabric Around Existing Plants
Assessing Your Plants And Garden Bed
Before installation, thoroughly evaluate your garden:
- Identify plant types: Note perennials, annuals, shrubs, and spreading plants. Each may have different root structures or growth habits that affect fabric installation.
- Check plant health: Remove diseased or dead material, as covering sick plants can create a breeding ground for further disease.
- Observe root spread: Some plants, like hostas or daylilies, have wide root zones that must be carefully navigated. For shrubs and trees, take note of the main trunk flare and feeder roots.
- Note irrigation and drainage: Beds with drip irrigation should have emitters marked so fabric can be placed around them, ensuring continued water delivery.
Gathering Tools And Materials
You’ll need the following:
- Landscape fabric (choose the type best suited to your garden)
- Sharp scissors or utility knife for precise cuts
- Landscape pins or staples to secure the fabric
- Mulch (organic or inorganic) for covering the fabric
- Garden gloves
- Measuring tape
- Rake and hoe for clearing and leveling soil
- Marker or chalk to outline plant bases on fabric for accurate cuts
Having all tools ready before you start reduces stress on plants from prolonged exposure and ensures a smooth workflow.
Site Preparation Steps
- Clear the area: Remove weeds, debris, and fallen leaves. For persistent perennial weeds, consider digging them out by the roots to prevent regrowth under the fabric.
- Trim plants: Prune back overgrown branches for easier access. For dense shrubs, thinning out lower branches can help fabric fit more snugly.
- Water the soil: Moist soil is easier to work with and less likely to compact. Avoid working with saturated soil, which can lead to root damage.
- Level the ground: Smooth out bumps and fill depressions for a flat base. Use a rake to create an even surface, which helps prevent air pockets under the fabric.
Real-world Example: Prepping A Mature Flower Bed
A gardener in Portland faced rampant weed growth in a 10-year-old perennial bed. By methodically pruning, clearing debris, and gently raking around the roots of established peonies and irises, she created the ideal surface for landscape fabric installation—leading to a 70% reduction in weeding time over the following season. She also noted that her plants bloomed more reliably, as less competition for water and nutrients allowed them to thrive.

Credit: www.youtube.com
Step-by-step Guide To Laying Landscape Fabric Around Existing Plants
Step 1: Measuring And Planning The Layout
- Measure the bed dimensions to estimate fabric needed, accounting for overlap (6–12 inches). Extra fabric ensures full coverage and prevents weeds from sneaking through seams.
- Plan fabric placement to minimize seams near plant bases. Try to align seams away from main stems or trunks, as these are areas where weeds most often exploit gaps.
- Mark plant locations with stakes or flags. This step helps with accurate cutting and reduces the risk of damaging roots during fabric placement.
Step 2: Cutting Fabric Openings For Plants
- Roll out the fabric alongside your garden bed and let it rest for a few minutes so it flattens, reducing wrinkles that could create gaps.
- Cut a centered X or slit at each plant’s location, making the opening just large enough for the stem and nearby roots. An X-cut allows the fabric to lay flat against the soil while accommodating stems.
- For larger plants, consider a U-shaped cut to slip the fabric around the base with minimal disturbance. This is especially useful for shrubs with multiple stems or trunks.
- Use a marker to trace irregular root flares or clusters before cutting, ensuring a custom fit.
Comparison Of Opening Methods
| Opening Type | Best For | Pros | Cons |
|---|---|---|---|
| X-Shaped | Small perennials, annuals | Easy to cut, snug fit | Can stress roots if too small |
| U-Shaped | Large shrubs, clumps | Less root disturbance | Requires more fabric manipulation |
| Custom Holes | Irregular root systems | Tailored fit | Time-consuming |
Consider the plant’s growth habit. For example, peonies or irises with rhizomatous roots benefit from wide U-shaped or custom openings, while annual bedding plants do fine with a simple X-cut.
Step 3: Fitting The Fabric Around Plants
- Gently lift plant stems or branches and slide fabric flaps underneath. Take care not to bend or snap stems, and avoid disturbing the soil excessively.
- Avoid pressing down on root crowns. Roots near the surface are sensitive and can be damaged by pressure or rough handling.
- Adjust fabric to sit flush with the soil, with openings snug around stems. Tuck fabric under existing mulch if necessary to prevent gaps.
- For spreading perennials, leave extra room for future growth. Mark these spots for future adjustment if the plants expand significantly over the season.
Step 4: Securing The Fabric
- Use landscape staples every 12–18 inches along the fabric’s edge and at seams. In windy areas or on slopes, increase staple frequency for added security.
- Place extra staples around plant openings to keep fabric from shifting. This is especially important in high-traffic beds or where pets or wildlife may disturb the fabric.
- Ensure no gaps where weeds could emerge. Overlap fabric pieces generously and stagger seams to make it harder for weeds to find a path through.
Step 5: Covering With Mulch
- Spread 2–3 inches of mulch over the fabric, keeping it pulled back 1–2 inches from plant stems to prevent rot and pest damage.
- Use organic mulch (bark, wood chips, straw) for most beds, or gravel for xeriscapes. Organic mulches break down slowly, adding nutrients to the soil over time.
- Replenish mulch annually for continued benefits. Monitor mulch depth; if it compacts or decomposes, top it up to maintain proper insulation and weed suppression.
Case Study: Installing Fabric In A Shrub Border
A homeowner in Atlanta installed woven polypropylene fabric around a row of established azaleas. By carefully measuring, using U-shaped cuts, and securing fabric with galvanized pins, she achieved a lush, weed-free border. According to her records, weeding tasks dropped by 80%, and the azaleas showed improved vigor due to consistent soil moisture. She also noted a decrease in fungal leaf spots, likely because mulch prevented soil splash during rainstorms.

Credit: www.buncombemastergardener.org
Best Practices For Protecting Plant Health
Maintaining Air And Water Flow
- Choose permeable fabric: Allows essential air and water movement, which is vital for root health.
- Avoid plastic sheeting: It blocks moisture and leads to root suffocation, resulting in plant decline or death.
- Test soil moisture regularly with a probe to ensure roots are adequately hydrated, especially in the heat of summer or in sandy soils.
Preventing Root Damage
- Cut openings generously: Err on the side of larger holes to avoid root constriction as plants grow.
- Lift, don’t drag: When moving fabric around a plant, gently lift stems and leaves rather than pulling, as this protects the delicate feeder roots near the surface.
- When working around large shrubs or trees, consider using multiple fabric pieces and overlapping them, rather than trying to maneuver a single large sheet, to minimize stress on roots and stems.
Mulch Management
- Don’t over-mulch: Excessive mulch can overheat soil, harbor pests such as slugs, or promote fungal diseases.
- Keep mulch away from trunks: Prevents disease and pest entry. For woody plants, maintain a mulch-free ring of 2–3 inches around the base.
Monitoring Plant Growth
- Inspect fabric openings each season; enlarge as necessary to accommodate stem and root expansion. Use scissors or a knife to gently widen cuts without disturbing roots.
- Remove or adjust fabric if plants begin to show signs of stress (yellowing leaves, stunted growth). If in doubt, temporarily lift the fabric and check for root health and moisture levels.
Real-world Example: Addressing Watering Issues
A community garden in Denver noticed wilting in tomato plants after installing landscape fabric. By switching to a woven, high-permeability product and increasing the size of stem openings, they restored healthy growth and reduced water runoff. This case highlights the importance of both fabric selection and ongoing observation for optimal plant health.
Common Mistakes And How To Avoid Them
Neglecting To Remove Existing Weeds
Leaving weeds under the fabric can lead to persistent problems. Always start with a weed-free bed, as even small root fragments can regenerate and eventually puncture the fabric, undermining your efforts.
Using The Wrong Fabric
- Thin, cheap fabric can tear and allow weeds through, leading to frustration and wasted investment.
- Avoid using old carpeting or plastic tarps, which impede water and air flow and can create long-term soil health issues.
- Select a fabric specifically rated for your application (e.g., heavy-duty woven for perennials, biodegradable for annual beds).
Cutting Openings Too Small
Tight openings can girdle stems and restrict root expansion, leading to plant decline. Always size cuts to accommodate future growth, and err on the side of a little extra space rather than too little.
Failing To Secure Edges
Loose fabric edges can lift in wind, inviting weeds and allowing mulch to slip underneath, exposing the soil. Always use landscape staples generously, and check edges regularly, especially after storms or heavy winds.
Skipping Mulch
Mulch not only looks attractive but protects fabric from UV degradation and temperature extremes. Without mulch, fabric can become brittle and tear more easily, reducing its lifespan and effectiveness.
Overlapping Fabric Incorrectly
Always overlap fabric pieces by at least 6–12 inches, with the upper piece overlapping the lower for effective weed blocking. In sloped beds, overlap downhill to ensure water runs over the seams, not under them.
Maintenance And Long-term Care
Regular Inspection
- Check for weeds: Pull any that emerge through openings or seams, as these can quickly establish under the protection of mulch and fabric.
- Monitor mulch depth: Replenish as needed to maintain a 2–3 inch layer, which is optimal for weed suppression and soil temperature regulation.
- Inspect fabric for damage: Look for tears, holes, or signs of shifting, especially after storms, and repair promptly.
Adjusting For Plant Growth
- Enlarge fabric openings as plants mature, using a sharp knife or scissors. This prevents root girdling and allows for natural expansion.
- Remove or adjust fabric for plants that have outgrown their space. In some cases, you may need to remove fabric entirely around vigorous perennials or shrubs to prevent root and stem restriction.
Repairing Damage
- Patch torn or worn fabric promptly to prevent weed intrusion. Use a piece of matching fabric and secure it with landscape staples, overlapping the damaged area by at least 6 inches.
- Replace mulch annually to protect the fabric and maintain appearance. Fresh mulch also improves soil health and water retention.
Soil Health Considerations
Long-term use of landscape fabric can lead to soil compaction or reduced organic matter, particularly if organic mulch is not replenished regularly. Periodically loosen soil and top-dress with compost around plant openings to maintain fertility and support beneficial soil life. Consider removing the fabric every few years to aerate the soil and add amendments if needed.
Data Table: Maintenance Tasks And Recommended Frequency
| Task | Frequency | Purpose |
|---|---|---|
| Weed inspection | Monthly | Early removal of intruders |
| Mulch replenishment | Annually | Protects fabric, suppresses weeds |
| Fabric opening adjustment | Seasonally | Accommodates plant growth |
| Soil moisture check | Bi-weekly (summer) | Prevents drought stress |
| Soil aeration/compost top-dress | Every 2–3 years | Maintains soil health |
For more on maintaining landscape fabrics, see Garden Design’s maintenance guide.
Comparing Landscape Fabric To Alternative Weed Barriers
Organic Mulch Alone
- Pros: Adds nutrients to soil, supports beneficial microbes, and enhances soil structure over time.
- Cons: Requires frequent replenishment; less effective for perennial weed suppression, as some aggressive weeds can grow through or over the mulch layer.
Cardboard And Newspaper
- Pros: Biodegradable, inexpensive, easy to install, and provides a temporary weed barrier while improving soil as it decomposes.
- Cons: Breaks down within a season, may attract pests (such as termites or slugs), and requires regular renewal.
Rubber Mulch
- Pros: Long-lasting, good for playgrounds or paths, and does not decompose, so it requires minimal replenishment.
- Cons: Can leach chemicals, is not suitable for vegetable beds or pollinator gardens, and does not improve soil health.
Landscape Fabric Vs. Alternatives Table
| Weed Barrier | Weed Control Effectiveness | Soil Health Impact | Longevity | Best Use |
|---|---|---|---|---|
| Landscape Fabric | High | Neutral/Negative (long-term) | 3–10 years | Perennial beds, shrub borders |
| Organic Mulch | Moderate | Positive | 1–2 years | Annual beds, vegetable gardens |
| Cardboard/Newspaper | Moderate | Positive | 1 season | New beds, temporary weed control |
| Rubber Mulch | High | Negative | 10+ years | Play areas, paths |
For more on the pros and cons of different weed barriers, check out the Royal Horticultural Society’s advice.
Real-world Examples And Case Studies
Flower Bed Transformation: Urban Backyard
In Chicago, a homeowner with a densely planted perennial bed struggled with aggressive crabgrass and bindweed. After consulting with a landscape designer, she opted for heavy-duty woven fabric, cut precise openings for her daylilies and coneflowers, and topped with shredded hardwood mulch. By tracking her garden maintenance over two seasons, she saw a reduction in weeding from 3 hours a week to just 30 minutes. She also noticed improved flowering and fewer pest problems, as mulch stabilized soil moisture and reduced splash-back during rain.
Community Garden Revamp
A community garden in Austin, Texas, faced relentless Bermuda grass invasion. Volunteers installed biodegradable coconut fiber fabric around established tomato and pepper plants, using large X-cuts for minimal root disturbance. The approach kept weeds at bay for the growing season and improved crop yields by 15%, as reported by the garden’s coordinator. The biodegradable fabric decomposed by the end of the season, allowing easy tilling and replanting without removal hassles.
Municipal Landscape Project
A city park in Seattle needed a low-maintenance solution for a rose border planted five years earlier. Contractors installed professional-grade woven polypropylene fabric, using custom holes for each rose bush and double-layered fabric at bed edges. The following year, park staff reported a 75% reduction in herbicide use and healthier roses, with fewer fungal problems due to improved airflow and cleaner mulch. The fabric also helped reduce soil erosion on the park’s gentle slope, maintaining the integrity of the rose beds through the rainy season.
For further reading on successful landscape fabric projects, see Gardening Know How’s project case studies.
Environmental Impact And Sustainability Considerations
Pros And Cons Of Synthetic Landscape Fabrics
While synthetic fabrics offer longevity and effective weed control, they are petroleum-based and not biodegradable. Over time, fragments can enter the soil and potentially impact soil organisms, especially if the fabric is not removed at the end of its life.
Additionally, the manufacturing and disposal of synthetic fabrics have a carbon footprint, which may concern eco-conscious gardeners.
Biodegradable Alternatives
Materials like coconut coir, burlap, or paper-based fabrics provide short-term weed suppression and break down into the soil, adding organic matter. However, they require more frequent replacement and may not be as effective against persistent perennial weeds. For gardeners seeking to maintain soil health and minimize plastic use, these materials offer a balance between weed control and sustainability, particularly in annual or vegetable beds.
Responsible Use Practices
- Choose UV-stabilized fabrics for durability, as they resist breakdown from sunlight and last longer, reducing waste.
- Remove or recycle synthetic fabric at end of life, rather than leaving fragments in the soil. Some recycling centers accept clean, used landscape fabric.
- Use organic mulches or biodegradable barriers in edible gardens to avoid introducing plastics near crops.
- For long-term beds, periodically remove fabric to assess soil health and amend as needed.
For more information on sustainable landscaping practices, visit the EPA’s Greenacres program.
Frequently Asked Questions
What Type Of Landscape Fabric Is Best For Use Around Existing Plants?
For established garden beds, woven polypropylene fabric is generally the best choice. It provides durability, allows air and water to reach roots, and is easy to cut for custom openings. For short-term or annual beds, consider biodegradable options like coconut coir or paper, which break down naturally and enrich the soil.
How Do I Cut And Fit Landscape Fabric Around Large Or Spreading Plants?
Use a U-shaped cut or create a custom opening large enough to slip around the plant’s base without damaging roots. Gently lift stems or branches and slide the fabric underneath, ensuring the opening is snug but not restrictive. Secure the fabric with staples, especially around the cut edges. For multi-stemmed shrubs or trees, you may need to piece together several fabric segments for a tailored fit.
Will Using Landscape Fabric Harm My Plants’ Roots?
Properly installed, permeable landscape fabric won’t harm roots. However, avoid plastic sheeting, which can suffocate roots. Always cut generous openings and monitor plant health. If you notice stunted growth or yellowing leaves, adjust the fabric or consider removing it temporarily. Regular inspection ensures plants have space to grow without constriction.
How Long Does Landscape Fabric Last, And How Often Should It Be Replaced?
The lifespan of landscape fabric depends on the material and installation. Woven polypropylene can last 5–10 years, while biodegradable options last one season. Inspect fabric annually for tears, clogs, or signs of deterioration, and replace or patch as needed. Covering with mulch and securing edges extends fabric life.
Can I Plant New Flowers Or Shrubs After Installing Landscape Fabric?
Yes, but you’ll need to cut new openings in the fabric for each plant. For larger additions, it may be easier to temporarily remove or fold back the fabric. Always secure the fabric and add mulch after planting to maintain weed control. For a cohesive look and ongoing weed suppression, plan bed expansions or new plantings during the off-season.
Laying landscape fabric around existing plants is a powerful way to reclaim your garden beds from weeds while preserving the beauty and health of your established plants. With careful planning, precise installation, and regular maintenance, you’ll enjoy a cleaner, more manageable landscape that supports vibrant growth.
Invest the time to do it right, and your garden—and your back—will thank you for seasons to come.