
How to Stop Landscape Lights From Flickering
Stop outdoor low-voltage lights from flickering by checking transformer voltage first, then tracing loose connections, moisture in splices, and failing lamps or fixtures. Ignoring the symptom can leave you replacing good parts, wasting time, and risking low-voltage shorts or transformer damage. This guide walks you from symptom to source, so you can find whether the problem is the transformer, wiring, moisture, or a fixture.
What you’ll need
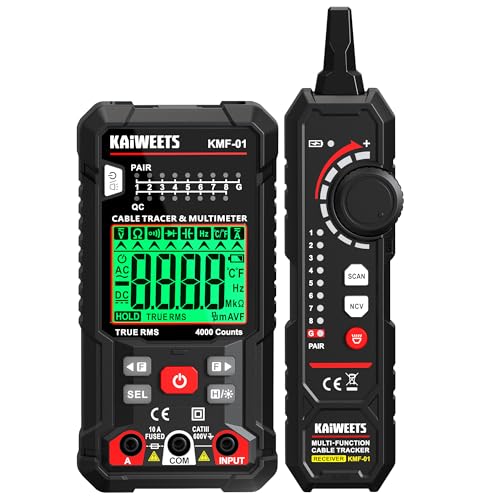


- Voltage tester or multimeter
- Screwdriver set and wire nuts or waterproof connectors
- Replacement bulbs or fixtures for comparison
- Flashlight and gloves
- Transformer label or manual for wattage and load checks
Start with the symptom pattern
Use the failure pattern to narrow the source before you replace anything. If every light on the loop blinks, start at the transformer. If only one section blinks, focus on wiring or connectors. If one fixture flickers, suspect the lamp, socket, or fixture contact first.
All lights blink together
This points upstream. A transformer overload, protection cycling, or a bad setting can affect the whole circuit at once. Check the label, then compare the transformer’s output rating and wattage capacity against the connected load before changing fixtures.
One branch blinks or dims
That pattern usually means a branch fault, not a full-system failure. Look for a loose splice, a corroded connector, or a damaged run. Long wire runs can also create voltage drop that shows up on one section before the others.
One fixture flickers on and off
One lamp flashing alone usually means the bulb, socket contact, or fixture body. An isolated flicker can come from poor bulb fit, oxidized contacts, or a failing LED driver. Swap that fixture with a known-good one only after you inspect the socket.
Flicker starts after rain or irrigation
Rain-triggered blinking is a moisture or short-circuit problem until proven otherwise. Focus on buried splices, low spots in the run, fixture housings, and any connector that may have taken splash or soak water. Do not keep cycling power through wet damage.
Suppose a 12-light path blinks every time the sprinklers run. That pattern points away from a single bulb and toward water entering a splice, connector, or socket near the irrigation zone.
Is it the transformer?
If every light on the loop blinks, the transformer is the first place to check. A low-voltage lighting transformer can have 120V input, a lower output voltage, wattage capacity limits, overload protection behavior, minimum load requirements, and timer or photocell compatibility that all affect stability.
- Turn off power at the transformer.
- The transformer label is commonly checked for input/output voltage rating, wattage capacity, minimum load, and timer or photocell setup.
- Compare the connected wattage to the transformer’s capacity.
- Restore power and watch for protective cycling, where the lights blink on and off together.
- If the circuit is LED-only, confirm the minimum load is not too high for the LEDs.
A transformer with a minimum load that is too high can make LEDs flicker or not illuminate. Mixed halogen-and-LED systems need extra care because the old load pattern may no longer match the new fixtures.
Can a loose connection make outdoor lights flicker?
Yes. A loose wiring connection can cause intermittent power loss, and it often shows up in one branch or one fixture. Loose outdoor connections can also heat up and arc, which may increase the risk of damaged insulation and repeated failure at the same spot.
- Disconnect power before inspecting wiring.
- Open the transformer output connections and the first branch splice.
- Check for loose wire nuts, weak waterproofing, or poor connector quality.
- Look for discoloration, melted plastic, or blackened copper that suggests heat or arcing.
- Re-seal any suspect splice with direct-burial-suitable, corrosion-resistant parts.
Say one path of lights flickers only when wind moves the cable. That usually means a loose connection or damaged splice that opens and closes as the wire shifts.
Why do outdoor lights flicker after rain?
Rain after blinking usually means moisture intrusion at a buried splice, fixture housing, socket, or connector. Water raises short-circuit risk and can trigger protective shutdown, especially where irrigation saturates soil or where connectors sit below grade.
- Turn off power at the transformer.
- Open the lowest splice points, fixture housings, and any low spots in the run.
- Check for standing water, green corrosion, or softened insulation.
- Dry damaged parts fully, then replace any connector or socket that no longer seals well.
- Move the splice above grade if possible and use waterproof, direct-burial connectors.
Buried wire splices need waterproofing, corrosion resistance, direct-burial suitability, and solid connector quality. If any one of those is weak, rain can turn a marginal connection into a blinking circuit.
How do LED fixtures change the diagnosis?
LED fixtures add two common fault points: driver compatibility and dimmable versus non-dimmable design. LEDs are often sensitive to voltage fluctuation, so a transformer that was fine with halogen may cause flashing or pulsing after a retrofit.
- Check whether each LED fixture is marked dimmable or non-dimmable.
- Compare the LED driver requirements to the transformer’s output.
- Test one suspect fixture with a known-compatible replacement.
- If the old halogen transformer now feeds LED heads, verify minimum load and wattage again.
If only the newer LED heads flicker while halogen lamps stay steady, the issue may be the driver, not the transformer. That distinction matters because replacing the transformer first can leave the actual mismatch untouched.
Troubleshooting matrix
| Symptom pattern | Likely cause | Quick test | Likely part to replace | Urgency level |
|---|---|---|---|---|
| All lights blink together | Transformer overload or cycling | Compare connected wattage to transformer label | Transformer | High |
| One branch blinks or dims | Loose connection or damaged splice | Inspect branch connector and tug-test wires gently | Connector or wire splice | Medium |
| One fixture flickers alone | Bad bulb, poor socket contact, or failing fixture | Swap bulb and inspect socket contacts | Bulb, socket, or fixture | Low to medium |
| Flicker starts after rain | Moisture intrusion or short-circuit condition | Open low points and check for water or corrosion | Connector, splice, or socket | High |
| LEDs flash, halogen stays steady | Driver mismatch or minimum-load issue | Check dimmable rating and transformer minimum load | LED fixture or transformer | Medium |
If that didn’t work, try this next
Move from the cheapest, most local fix to the broader system check. A bad bulb or connector is easier to correct than a transformer swap, and the symptom pattern tells you which direction to go first. Keep power off while opening any connection point.
- Replace the suspect bulb or LED fixture with a known-good one.
- Re-check the socket for oxidized contact points and poor bulb contact.
- Replace any questionable splice with a waterproof, direct-burial connector.
- Recalculate total connected wattage against the transformer capacity.
- Confirm timer or photocell compatibility if the flicker follows the on-off cycle.
A common first-timer mistake is buying a new transformer before checking one corroded connector near the first branch. That can solve nothing and leave the actual fault in place.
Common mistakes
- Replacing the transformer before checking one bad fixture or bad socket contact.
- Ignoring moisture at connectors and sockets after rain or irrigation.
- Overlooking total wattage on mixed halogen-and-LED systems.
- Using connectors that are not direct-burial suitable.
- Treating repeated blinking as harmless even when you see heat, arcing, or melted insulation.
Repeated outdoor-light pulsing can create extreme heat spikes at weak connection points. If you see scorch marks, softened insulation, or a connector that feels damaged, stop there and replace the part instead of re-energizing it.
When should you call an electrician for flickering outdoor lights?
Call an electrician when the issue is widespread, keeps returning after basic checks, or appears on the supply side of the transformer. Repeated blinking, visible heat damage, arcing, or a transformer that cycles even after the load is reduced needs a pro-level inspection.
Also call if you find 120V wiring issues feeding the transformer, not just the low-voltage side. The transformer input uses household current, so that side should not be treated like a simple lamp repair.
Frequently asked questions
Why are my outdoor lights blinking?
Blending the symptom with the location matters most. If every light blinks, check the transformer first. If one branch blinks, inspect wiring and connectors. If one fixture flickers, inspect the bulb, socket, and fixture contact before replacing larger parts.
Why do my outdoor lights flicker after rain?
Rain-related flicker usually means moisture has entered a splice, socket, or fixture housing. Open the low points in the run, dry the parts, and replace any connector that no longer seals. If the lights blink together after wet weather, check for a short-circuit condition.
Is a blinking outdoor light a transformer problem?
It can be, especially if every light on the loop blinks at once. Check the transformer output, the total connected wattage, and whether the unit is cycling on overload. If only one section or one fixture blinks, the transformer is less likely to be the source.