How to Plant Vegetables Without Seeds (Beginner Methods)
Growing your own vegetables offers a deeply satisfying connection to nature and the food on your table. However, many beginners believe that seeds are the only starting point for home vegetable gardening. In truth, you can successfully cultivate a thriving vegetable garden without ever planting a single seed.
This not only opens the door to creative gardening techniques but can also save time, money, and produce results faster than traditional seed sowing.
Whether you’re an apartment dweller with limited space, a busy professional seeking low-maintenance options, or simply curious about unconventional gardening, learning to plant vegetables without seeds unlocks a new realm of possibilities. By using kitchen scraps, cuttings, bulbs, and tubers, even complete novices can enjoy bountiful harvests with minimal investment.
This comprehensive guide will walk you through beginner-friendly methods, provide practical examples, and ensure you approach vegetable gardening with confidence and success.
Key Takeaways
- Vegetable gardening without seeds is accessible, sustainable, and often faster than traditional growing from seed.
- You can propagate many vegetables from cuttings, tubers, bulbs, and kitchen scraps with minimal tools or experience.
- Methods like regrowing kitchen scraps, using root cuttings, and dividing tubers/bulbs are beginner-friendly and cost-effective.
- Proper care and basic understanding of plant biology maximize your chances of success.
- Strategic choices of vegetables and methods ensure the best results for home gardeners.
Understanding Seedless Vegetable Propagation
Many vegetables can be propagated without seeds, using parts of the plant itself. This process, known as vegetative propagation, leverages the natural ability of plants to regenerate from roots, stems, or leaves. For beginners, understanding the science behind these methods is essential for successful gardening.
What Is Vegetative Propagation?
Vegetative propagation is a form of asexual reproduction in plants, where new plants grow from fragments of the parent plant. Unlike seeds, which require pollination and germination, vegetative parts such as stems, roots, leaves, or bulbs can give rise to genetically identical offspring, known as clones.
Common types of vegetative propagation include:
- Stem cuttings: Growing new plants from a section of stem.
- Root cuttings: Using a section of root to generate a new plant.
- Bulbs and tubers: Dividing or planting underground storage organs like onions or potatoes.
- Leaf cuttings: Rooting a section of leaf to produce a new plant.
Vegetative propagation methods have been used for centuries in both agriculture and home gardening. For example, grapevines, strawberries, and potatoes are widely propagated this way in commercial operations for their reliability and consistency. Many household plants like pothos and spider plants are also grown from cuttings, demonstrating how accessible these techniques are for gardeners of all skill levels.
Benefits Over Growing From Seeds
Propagating vegetables without seeds offers several advantages:
- Faster results: Many vegetative methods produce harvestable plants quicker than growing from seed. For example, a basil cutting may take just a few weeks to root and start producing leaves, while seeds may take longer to germinate and mature.
- Genetic consistency: Plants grown this way are clones, ensuring uniformity in taste, appearance, and growth habit. This is especially beneficial when you want to maintain a specific flavor or plant characteristic.
- Cost-effective: You can use kitchen scraps or leftover produce, minimizing waste and reducing the need to purchase seeds, trays, and specialized starting mixes.
- Easier for beginners: Eliminates the complexities of seed germination and seedling care, such as temperature control, thinning, and transplanting.
According to the Wikipedia article on vegetative reproduction, this method is not only natural for many species but is also widely used in commercial agriculture for its reliability.
Limitations And Considerations
Despite its benefits, vegetative propagation isn’t suitable for every vegetable. Some plants are less likely to root from cuttings or may be prone to diseases when not grown from seed. Additionally, repeated cloning can sometimes reduce genetic diversity and vigor over time, which may lead to lower resilience against pests and diseases.
There are also practical considerations: not all vegetables found in grocery stores are suitable for propagation. Many are treated with growth inhibitors or waxes to prevent sprouting. Always opt for organic or untreated produce when possible, as these will have the highest chance of successful regrowth.
Best practice: Select vegetables known for successful seedless propagation, and always start with healthy plant material. If possible, source from local farmers’ markets or organic grocery stores for the best results.

Credit: www.almanac.com
Top Methods To Plant Vegetables Without Seeds
Let’s explore the most effective beginner methods for growing vegetables without seeds. Each technique is tailored for simplicity, accessibility, and high success rates.
Regrowing Vegetables From Kitchen Scraps
Many common vegetables can be regrown from leftover kitchen scraps, making this method both eco-friendly and economical.
Vegetables best suited for regrowth from scraps:
- Green onions/scallions
- Celery
- Lettuce
- Garlic
- Leeks
- Bok choy
Step-by-step process:
- Save the base: After using the edible part, keep the bottom 1–2 inches of the vegetable.
- Place in water: Set the base in a shallow bowl with enough water to cover the roots.
- Provide sunlight: Place the bowl on a sunny windowsill.
- Change water every 2–3 days: Prevents rot and promotes healthy root growth.
- Transplant to soil: Once roots and new shoots appear (usually 5–10 days), transfer to a pot or garden bed.
Example: Regrowing green onions is one of the fastest and easiest options. Simply place the white root ends in water and you’ll see new green shoots in a few days.
Additional Tips: For celery and lettuce, ensure the water is only touching the root base and not submerging the top, as this can cause rot. You can also add a couple of drops of liquid fertilizer to the water once a week to encourage stronger growth, especially if you plan to keep the plants in water for a longer period before transplanting.
Propagating From Cuttings
Certain vegetables can be grown from stem or leaf cuttings. This method is particularly effective for herbs and some leafy greens.
Best vegetables for cuttings:
- Basil
- Mint
- Oregano
- Sweet potato leaves
How to propagate from cuttings:
- Cut a healthy stem: Use a sharp, sterile knife to take a 4–6 inch cutting.
- Remove lower leaves: Leave only a few leaves at the top.
- Place in water or soil: For most herbs, rooting in water works well. For greens like kale, plant directly in moist soil.
- Wait for roots: Roots typically form in 1–2 weeks.
- Transplant: Move to a larger container or garden when well-rooted.
Tip: Use transparent containers for water propagation to easily monitor root growth.
Example: Mint is particularly vigorous when propagated from cuttings. With just a few stems in water, you can quickly grow enough mint to fill a window box or outdoor bed.
Advanced Tip: For woody herbs like rosemary, dipping the cut end in rooting hormone before placing in soil can improve your chances of success. Keep the humidity high by covering with a plastic bag, but ensure there’s some airflow to prevent mold.
Dividing Bulbs And Tubers
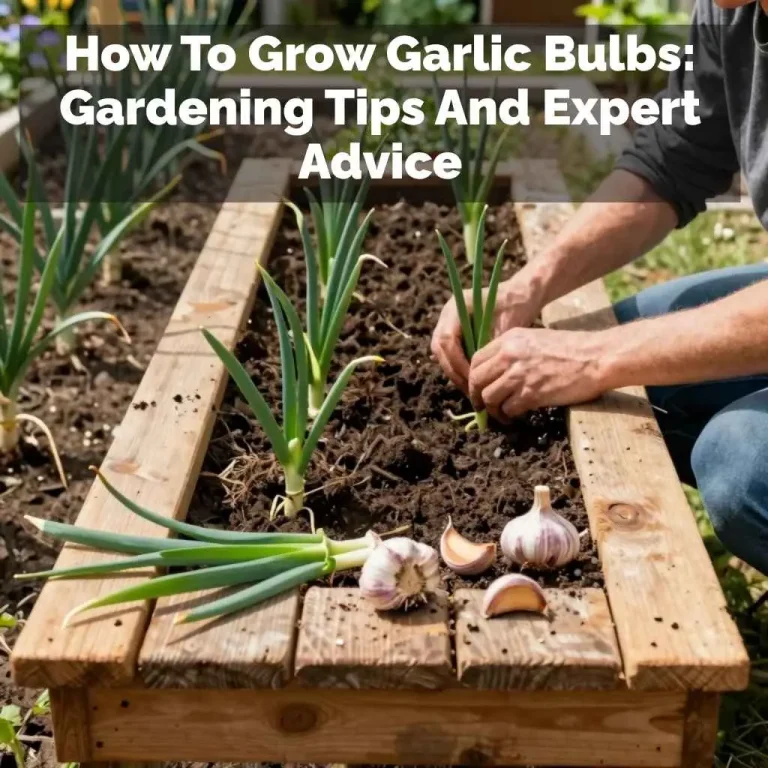
Vegetables like potatoes, garlic, and onions grow from bulbs or tubers that can be divided and replanted.
Vegetables suitable for division:
- Potatoes
- Garlic
- Onion
- Shallots
Steps for division:
- Select healthy bulbs/tubers: Avoid those with rot or disease.
- Cut into sections: Each piece must have at least one “eye” (potato) or clove (garlic).
- Allow to dry: Let cut surfaces air dry for 1–2 days to prevent rot.
- Plant in soil: Place in well-draining soil, eyes facing up, and cover with 2–4 inches of soil.
- Water regularly: Keep soil moist but not soggy.
Data Table: Success Rates for Bulb/Tuber Propagation
| Vegetable | Expected Success Rate | Time to Harvest |
|---|---|---|
| Potato | 90–95% | 10–14 weeks |
| Garlic | 85–90% | 8–9 months |
| Onion | 80–90% | 4–5 months |
| Shallot | 85–95% | 5–6 months |
Additional Advice: When planting potatoes, “hilling” the soil around the stems as the plants grow encourages more tubers to form. For garlic and onions, mulching helps retain moisture and suppress weeds, resulting in larger bulbs at harvest.
Root Division And Suckers
Root division is ideal for perennial vegetables and herbs that form clumps or send up new shoots.
Best candidates:
- Chives
- Rhubarb
- Asparagus
- Horseradish
How to divide roots:
- Dig up mature plant: Gently lift the root ball from the soil.
- Separate clumps: Use a knife or your hands to divide into smaller sections, each with roots and shoots.
- Replant immediately: Place divisions at the same depth they were growing before.
- Water thoroughly: Helps reduce transplant shock.
Additional Example: Asparagus crowns can be divided in early spring or fall. Each section should have several healthy buds and roots. After replanting, wait at least one growing season before harvesting to allow the plant to establish.
Layering And Offshoots
Layering involves encouraging a stem to root while still attached to the parent plant, useful for certain herbs and vining vegetables.
Vegetables suited for layering:
- Strawberries
- Mint
- Sweet potatoes
Layering steps:
- Select a low-growing stem: Bend it to touch the soil.
- Secure with a pin or soil mound: Hold the stem in place.
- Wait for roots: Roots will form in 1–3 weeks.
- Cut and transplant: Once rooted, sever from the parent and plant elsewhere.
Example: Strawberry plants send out “runners” that naturally root at the nodes. These can be pegged down with hairpins or small rocks until roots are established, then separated to create new plants for free.
Real-world Example: Urban Kitchen Scrap Garden
Emily, a New York apartment dweller, began saving green onion roots and lettuce bases from her weekly groceries. Within a month, she had a thriving mini-garden on her windowsill, producing fresh greens weekly with zero seeds or extra cost. She later expanded her setup by adding basil cuttings and a recycled potato tub, illustrating how even the smallest spaces can yield impressive results.
_(1).webp)
Credit: www.urbanplant.in
Best Vegetables To Grow Without Seeds (with Data Table)
Not all vegetables are equally suited to seedless propagation. The following table compares popular vegetables by propagation method, ease, and expected results for beginners.
| Vegetable | Propagation Method | Difficulty (1=Easy, 5=Hard) | Time to Harvest | Yield Potential |
|---|---|---|---|---|
| Green Onion | Kitchen Scrap | 1 | 2–3 weeks | Continuous regrowth |
| Potato | Tuber Division | 2 | 10–14 weeks | High |
| Garlic | Clove Planting | 1 | 8–9 months | Moderate |
| Lettuce | Kitchen Scrap | 1 | 3–4 weeks | Low (single regrowth) |
| Basil | Stem Cutting | 1 | 4–6 weeks | Continuous |
| Chives | Root Division | 2 | 4–6 weeks | High |
| Sweet Potato | Vine Cutting | 3 | 14–16 weeks | High |
Most Beginner-friendly Vegetables
- Green onions and lettuce: Quick regrowth, minimal care, great for windowsills.
- Basil and mint: Easy to root from cuttings, perfect for kitchen herb gardens.
- Potatoes: High yields, forgiving of mistakes, and rewarding for new gardeners.
Further Suggestions: Start with green onions and lettuce if you want fast, visible results. For those with a bit more space, potatoes and sweet potatoes offer a satisfying harvest and the opportunity to experiment with different varieties.
Vegetables To Avoid For Seedless Beginners
Some vegetables, such as tomatoes, carrots, and peppers, are not practical to propagate without seeds for beginners due to their unique growth requirements or inability to regrow from scraps.
Root crops like carrots, beets, and radishes cannot be regrown from the edible root portion. While you can sometimes sprout carrot tops in water to grow greens, you will not produce another carrot root this way.
For a full list of vegetables and their propagation methods, consult the authoritative guide from the University of Minnesota Extension.
Credit: www.etsy.com
Step-by-step Guides: Planting Vegetables Without Seeds
Getting started is simple with the right method and stepwise instructions. Here’s how to plant several popular vegetables without seeds, even if you’re a total beginner.
Green Onions From Kitchen Scraps
- Cut and Save: Keep the white root base (about 2 inches).
- Water Placement: Stand the base upright in a glass with enough water to cover roots.
- Sunlight: Place on a sunny windowsill.
- Change Water: Refresh every 2 days.
- Observe Growth: Green shoots will appear in 3–5 days.
- Transplant (Optional): Once roots are robust, move to soil for continued harvest.
Tip: After transplanting, harvest by snipping the green tops only, leaving the base intact for ongoing regrowth.
Potatoes From Tubers
- Select Seed Potatoes: Use store-bought or leftover potatoes with “eyes.”
- Cut (If Large): Halve or quarter, ensuring each piece has at least one eye.
- Cure: Let pieces dry for 1–2 days.
- Plant: Place 4 inches deep in well-drained soil, eyes facing up.
- Water: Keep soil moist.
- Hill Soil: Add soil around stems as plants grow for higher yields.
Tip: If space is limited, try growing potatoes in a large container or potato bag. This method allows you to “hill up” easily and harvest by simply dumping out the soil at the end of the season.
Basil From Stem Cuttings
- Cut a 4–6 Inch Stem: Use healthy, mature basil.
- Remove Lower Leaves: Leave top leaves only.
- Place in Water: Use a clear glass to watch root development.
- Indirect Sunlight: Avoid direct hot sun.
- Roots Form: In 1–2 weeks, transplant to soil.
Tip: Basil thrives in well-draining soil and regular pinching encourages bushier growth and more leaves for harvest.
Lettuce From Kitchen Scraps
- Save the Heart: Keep the base/core after cutting leaves.
- Place in Shallow Dish: Add water to cover the bottom.
- Bright Light: Place on a sunny windowsill.
- Change Water: Every 2 days.
- Transplant: After 10–14 days, when new leaves form, plant in soil.
Tip: You can harvest leaves as soon as they reach a few inches in length. Lettuce regrown this way typically produces smaller heads, but it’s perfect for fresh salads and sandwiches.
Sweet Potatoes From Vine Cuttings
- Take a Cutting: Snip a 6-inch piece of vine.
- Remove Lower Leaves: Leave a few on top.
- Root in Water: Submerge bottom inch in water.
- Transplant: Plant in moist soil after roots develop.
Bonus: You can also start sweet potatoes by suspending half of a tuber in water with toothpicks until “slips” form, then root the slips as you would cuttings.
Real-world Example: School Garden Project
A 5th-grade class in California launched a vegetable garden using only kitchen scraps from the school cafeteria. Within two months, students were harvesting green onions and lettuce, learning firsthand about sustainable food cycles and biology. The project sparked interest in gardening across the school, and students’ families began regrowing scraps at home, multiplying the impact.
Essential Tools And Supplies For Seedless Vegetable Gardening
While many propagation methods require minimal equipment, having the right tools increases success and convenience for beginners.
Basic Tools
- Sharp knife or scissors: For cutting stems, roots, and tubers.
- Containers or jars: Glasses, cups, or shallow bowls for rooting.
- Planting pots: For transplanting rooted cuttings or kitchen scraps.
- Potting soil: Well-draining, nutrient-rich soil is crucial.
- Water spray bottle: Helps maintain moisture without overwatering.
Recommended Supplies
- Rooting hormone: Optional but can speed up rooting for some cuttings.
- Grow lights: Useful for indoor gardening, especially in low-light seasons.
- Compost: Improves soil fertility and structure.
Additional Supplies: For those wanting to expand, consider small greenhouse domes or humidity trays for rooting more delicate cuttings, and plant labels to keep track of different varieties.
Data Table: Tool Checklist For Beginners
| Tool/Supply | Purpose | Beginner Necessity |
|---|---|---|
| Knife/Scissors | Cutting stems/tubers | Essential |
| Containers/Jars | Rooting in water | Essential |
| Pots/Planters | Transplanting | Essential |
| Potting Soil | Plant growth medium | Essential |
| Rooting Hormone | Faster rooting | Optional |
| Grow Light | Indoor light | Optional |
Real-world Example: Minimalist Balcony Garden
Jake, a college student, grew basil and mint from cuttings using only recycled glass jars, a bag of potting soil, and basic kitchen scissors. He produced enough herbs to supply his entire dorm floor, illustrating how little is needed to get started.
Tip: Repurposing household containers like yogurt cups or soup cans is a great way to expand your garden with zero additional cost.
Troubleshooting And Tips For Beginners
Even with beginner-friendly methods, challenges can arise. Here’s how to maximize your success and avoid common pitfalls.
Common Problems And Solutions
- Rotting bases: Change water regularly and avoid submerging too much of the plant. Make sure the container is clean and not overcrowded.
- Slow or no root growth: Ensure adequate light and warmth; try rooting hormone for stubborn cuttings. Low temperatures and dim light often slow rooting.
- Leggy growth: Move plants to a brighter location or use grow lights.
- Pests: Keep indoor plants clean and inspect regularly for aphids or fungus gnats. Remove any decaying organic matter promptly.
Tips For Higher Success Rates
- Start with healthy material: Avoid diseased or damaged scraps/cuttings.
- Use clean tools: Sterilize knives and scissors to prevent disease spread.
- Patience pays: Some vegetables take longer to root or regrow than others.
- Experiment: Try multiple methods to find what works best in your environment.
- Monitor moisture: Overwatering can be as harmful as under-watering, especially for cuttings and newly transplanted starts.
When To Move To Soil
Most water-rooted plants need to be transplanted once roots are 1–2 inches long. Use a gentle touch and plant in moist, well-draining soil. Maintain consistent moisture for the first week to help roots adapt.
Tip: Acclimate water-rooted plants by gradually exposing them to stronger light and drier air before transplanting outdoors.
External Resources For Troubleshooting
For more advanced troubleshooting, consult trusted sources like the Royal Horticultural Society (RHS) guide to propagation and the Gardening Know How kitchen scrap guide.
Sustainability And Benefits Of Seedless Vegetable Gardening
Choosing to grow vegetables without seeds not only benefits your wallet and time but also supports broader sustainability goals.
Reducing Food Waste
Regrowing from kitchen scraps makes use of parts that would otherwise be discarded. According to the US EPA, food scraps make up about 30% of household waste. By regrowing vegetables, you directly reduce your contribution to this statistic.
Example: A family regrowing green onions and lettuce from scraps each week can divert several pounds of food waste from landfills over the course of a year, translating to a measurable reduction in their environmental footprint.
Lowering Costs
Vegetative propagation eliminates the need to buy seeds, seed-starting trays, or specialized equipment. For families or community gardens, this can represent significant savings over time.
Further Benefit: Community gardens often utilize these methods to maximize their harvests and share resources, ensuring that everyone has access to fresh, healthy produce regardless of budget.
Accessibility And Education
Seedless methods are accessible to children, seniors, and those with limited space. School and community projects often use kitchen scrap gardening to teach biology, sustainability, and nutrition.
Example: Many urban gardening initiatives use regrowing kitchen scraps as an entry point for those new to gardening, helping build skills and interest in home food production.
Supporting Biodiversity
While cloning reduces genetic diversity, home gardeners can help by sharing divisions and cuttings within their community, preserving heirloom varieties and local adaptations.
Actionable Tip: Participate in local plant swaps or gardening clubs to expand your collection and contribute to community resilience.
External Resources
For more on sustainability and urban gardening, refer to the UN’s guide to urban gardening.
Frequently Asked Questions
How Long Does It Take To Regrow Vegetables From Kitchen Scraps?
Most vegetables begin showing new growth within a week. For example, green onions and lettuce can be ready for harvest in as little as 2–3 weeks, while others like garlic and potatoes take several months to mature.
Can I Regrow Vegetables Indefinitely From Scraps?
Some vegetables, such as green onions and herbs, can be harvested repeatedly from the same plant base. Others, like lettuce and celery, typically yield only one regrowth before quality declines. Regular harvesting and proper care will extend the life and productivity of your regrown plants.
Do I Need Special Soil Or Fertilizer For Seedless Propagation?
While many vegetables will root in plain water, transplanting to nutrient-rich, well-draining soil is recommended for long-term growth and higher yields. Adding compost or organic fertilizer can boost results. For indoor gardens, use a balanced liquid fertilizer every few weeks.
Can All Store-bought Vegetables Be Used For Regrowing?
Not all store-bought vegetables will regrow successfully. Many are treated to prevent sprouting or are too old. Choose organic or untreated produce, and avoid vegetables with signs of mold, rot, or disease. When in doubt, experiment with a small piece before committing to a larger batch.
Is It Possible To Regrow Vegetables Indoors Year-round?
Yes, many vegetables can be regrown indoors with adequate sunlight or grow lights. Herbs, green onions, lettuce, and microgreens are especially well-suited for indoor, year-round cultivation. Adjust watering and lighting to suit seasonal changes for the best results.
Planting vegetables without seeds is a practical, sustainable, and rewarding approach for beginners and seasoned gardeners alike. By leveraging kitchen scraps, cuttings, and simple propagation techniques, you can produce fresh, healthy food with minimal investment. Start small, experiment with different methods, and enjoy the journey toward a more self-sufficient and eco-friendly lifestyle.
With patience, creativity, and the right information, your windowsill or backyard can become a continuous source of nourishment and pride.