This guide will walk you through the steps. We’ll talk about what garlic needs. We’ll also look at what might be going wrong.
By the end, you’ll have a clearer picture. You’ll know how to help your garlic bulbs reach their full potential. It’s about understanding the plant and giving it the right conditions.
To grow big, healthy garlic bulbs, focus on planting in well-draining soil, ensuring adequate sunlight, providing consistent moisture, feeding the plant with nutrients, and knowing when to harvest. Proper preparation and ongoing care are key to a successful garlic crop.
Understanding What Garlic Needs
Garlic is a cool-season crop. It likes a long growing period. This means it needs to be planted in the fall in most areas.
This gives the roots time to establish before winter. Then, in spring, it really starts to grow.
Soil is super important for garlic. It loves rich, well-drained soil. If your soil is heavy clay, the bulbs might rot.
They also need good drainage. This lets excess water escape. Good drainage helps prevent disease.
Sunlight is another big factor. Garlic needs at least six to eight hours of direct sunlight each day. More sun means more energy for the plant to grow big bulbs.
If your garden spot is shady, your garlic plants will struggle.
Water is also key. Garlic needs consistent moisture. This is especially true when the bulbs are forming.
However, you don’t want to drown it. Overwatering can cause problems too. Aim for soil that is moist but not soggy.
Finally, garlic is a hungry plant. It uses up nutrients in the soil. You need to feed it.
This is usually done with compost or balanced fertilizer. This helps it produce those nice, large bulbs.
My Own Garlic Growing Struggles
I remember one year, I was so excited about my garlic crop. I had planted it in the fall, just like I read. I used what I thought was good soil.
I even remembered to water it when it was dry. But when harvest time came, I was so disappointed.
My garlic bulbs were tiny! Some were barely bigger than a large clove. It felt like all my hard work had been for nothing.
I remember feeling a mix of frustration and confusion. What did I miss? I checked online, and everyone made it sound so easy.
The problem, I later learned, was a few things. My soil had some clay in it. It didn’t drain as well as I thought.
Also, I hadn’t added enough compost at planting. And I think the spot I chose got less sun than I realized. It was a tough lesson, but it taught me to pay closer attention to the details.
Garlic Planting Essentials
Timing is Crucial: Plant garlic in the fall. This lets roots grow before winter. A good rule is about 4-6 weeks before the ground freezes solid.
Soil Preparation: Loosen soil deeply. Mix in lots of compost. Garlic loves fertile ground.
Make sure it drains well. Raised beds can help if drainage is poor.
Clove Selection: Use healthy, firm cloves from a reputable source. Don’t plant cloves that are soft or damaged. Larger cloves tend to produce larger bulbs.
Choosing the Right Garlic Variety
Did you know there are different types of garlic? This is a big deal for how they grow and taste. The two main groups are hardneck and softneck garlic.
They behave differently in your garden.
Hardneck garlic is known for its strong flavor. It also produces a flower stalk called a scape. You usually plant hardneck garlic in colder climates.
It needs that cold period to form bulbs well. Varieties like ‘Music’ or ‘Siberian’ are examples.
Softneck garlic is the kind you often see in grocery stores. It’s also great for braiding. It tends to do better in milder climates.
It doesn’t need as much cold. ‘California Early’ or ‘California Late’ are common softneck types.
Picking the right variety for your zone is important. A hardneck garlic might not thrive in a very hot climate. A softneck might not produce the biggest bulbs in a super cold place.
Check what grows well in your area. Local garden centers can offer good advice.
Soil Matters Most: Getting It Right
I can’t stress this enough: good soil is the foundation of big garlic bulbs. If your soil is poor, your garlic will be too. Let’s break down what “good soil” means for garlic.
Drainage is Non-Negotiable: Garlic hates “wet feet.” This means soil that stays soggy. When bulbs sit in water, they are prone to rot and disease. If you have heavy clay soil, you must amend it.
Adding lots of compost is the first step. You can also add coarse sand or perlite. This helps break up the clay.
Raised garden beds are an excellent solution for poor drainage.
Fertility is Key: Garlic is a heavy feeder. It needs nutrients to grow large and healthy. Before planting, work in plenty of aged compost or well-rotted manure.
This adds organic matter and nutrients. It also improves soil structure.
pH Level: Garlic prefers a slightly acidic to neutral soil pH, around 6.0 to 7.0. If your soil is too acidic, you can add lime. If it’s too alkaline, you can add sulfur.
You can get a soil test kit from a garden store to check your pH. This is an easy step that makes a big difference.
Loosen the Soil: Garlic bulbs need room to expand. Dig down at least 8 to 12 inches. This loosens the soil.
This helps the roots grow deep. It also allows the bulbs to swell without being pushed into hard ground.
Soil pH Explained
What is Soil pH? It measures how acidic or alkaline your soil is. A pH of 7 is neutral. Below 7 is acidic.
Above 7 is alkaline.
Why it Matters for Garlic: Most plants, including garlic, absorb nutrients best within a certain pH range. If the pH is off, nutrients might be locked up in the soil. They won’t be available for the plant to use.
Testing Your Soil: You can buy simple pH testing kits. Local extension offices often offer soil testing services for a small fee.
Sunlight: The More, The Better
Garlic plants need sun to make food. This food fuels their growth. It helps them produce those plump bulbs.
Aim for a spot that gets at least six to eight hours of direct sunlight every day. More is usually better.
If your garden has shady areas, avoid them for garlic. Even partial shade can slow down growth. It can also lead to smaller bulbs.
Think about how the sun moves across your yard throughout the day. Watch for spots that are bright from morning till afternoon.
Sometimes, new gardeners forget about nearby trees or buildings. These can cast long shadows. The shade might not seem like a big deal at first.
But over the long growing season of garlic, it adds up. It really impacts bulb size.
If you don’t have a perfectly sunny spot, consider container gardening. You can place large pots in the sunniest location. Just make sure the pots are deep enough.
They should also have drainage holes.
Planting Your Garlic Cloves
Planting garlic is pretty straightforward. But there are a few tricks. It’s all about giving those cloves the best start.
Remember, we’re planting them in the fall.
Prepare the Bed: Once your soil is ready (remember that compost and drainage!), you can start planting. You can plant in rows or scatter them a bit. Rows make harvesting easier.
Spacing is Important: Give your garlic plants enough room. Space them about 6 inches apart. This allows each plant enough space to grow.
It also helps with air circulation. This reduces disease risk. Leave about 12 to 18 inches between rows.
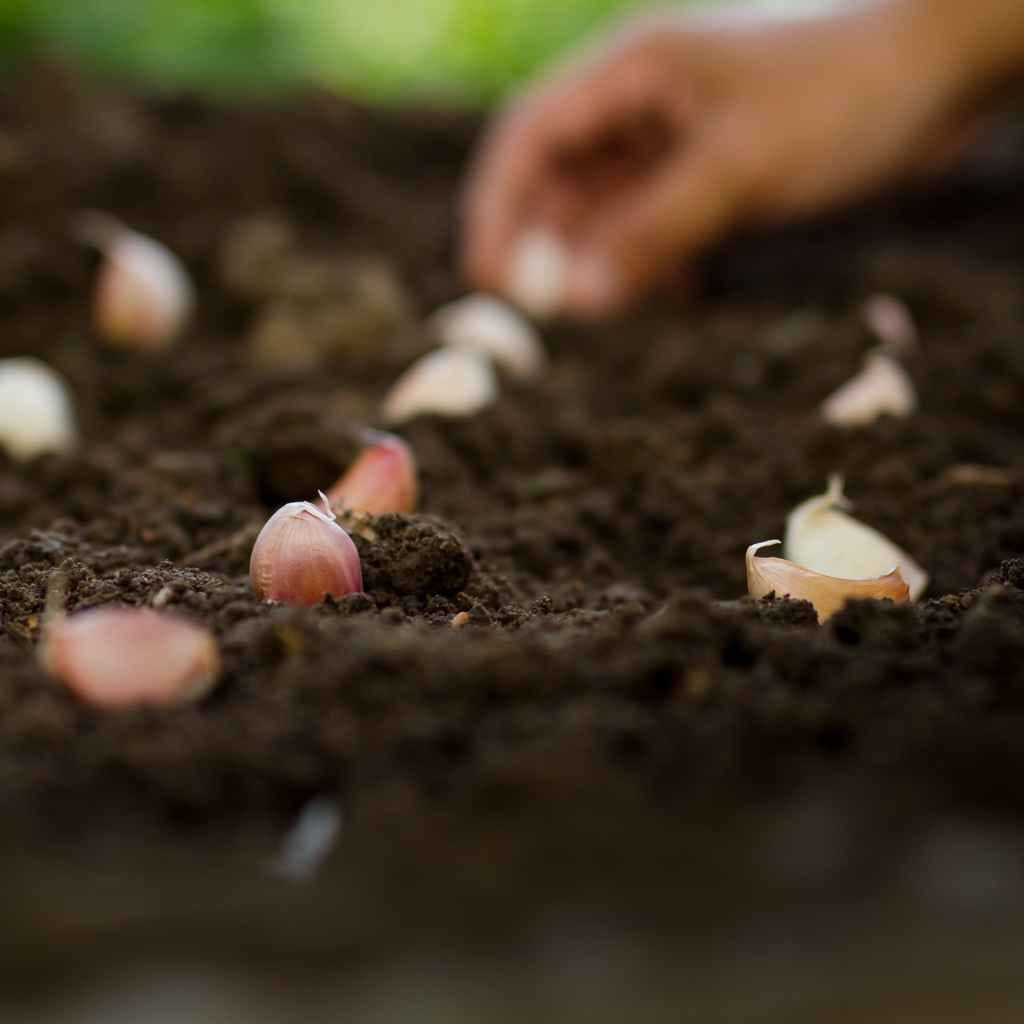
Planting Depth: Plant each clove pointed-end up. The flat or root end should be down. Bury the clove about 2 to 3 inches deep.
If you’re in a very cold climate, you might plant them a bit deeper. This adds extra protection.
Cover and Water: Gently cover the cloves with soil. Then, give the bed a good watering. This helps settle the soil.
It also makes sure the cloves have moisture to start growing roots.
Mulching: After planting, add a layer of mulch. Straw is a great choice. Pine needles or shredded leaves also work.
A layer of mulch about 2 to 4 inches deep is good. Mulch helps keep moisture in. It also suppresses weeds.
And it protects the young plants from extreme cold.
When to Plant Garlic
Fall Planting: For most of the US, fall is the ideal time. Aim for late September through November.
Regional Differences: In very cold areas, plant 2-4 weeks before the first hard freeze. In milder areas, you have a longer window in the fall.
Spring Planting: While fall is best, spring planting is possible. However, bulbs will likely be smaller. If planting in spring, do it as soon as the ground can be worked.
Watering for Bulb Development
Water is a friend to garlic, but too much is a foe. Finding that balance is key for big bulbs. Garlic plants need consistent moisture, especially during key growth stages.
When Bulbs Are Forming: The most critical time for watering is in the spring and early summer. This is when the bulbs are actually developing underground. During these months, aim for about 1 inch of water per week.
This can come from rain or irrigation. The soil should feel moist. It should not be waterlogged.
Avoid Overwatering: Soggy soil is a recipe for rot. It can also attract pests and diseases. Check the soil moisture before watering.
Stick your finger about 2 inches down. If it feels dry, it’s time to water. If it feels moist, hold off.
Reduce Watering Before Harvest: As harvest time approaches, you want to reduce watering. About two to three weeks before you plan to dig up your garlic, stop watering. This helps the bulbs dry out a bit.
It makes them cure better later on. It also helps prevent storage issues.
Consider Your Climate: Your watering needs will change based on where you live. Hot, dry climates require more frequent watering. Cooler, humid climates may need less.
Always adjust based on your local weather.
Feeding Your Hungry Garlic Plants
Garlic uses a lot of energy to create those large bulbs. That energy comes from nutrients in the soil. You need to make sure your plants have plenty of food.
Start with Good Soil: As we’ve discussed, adding compost at planting time is essential. This provides a slow release of nutrients. It also improves soil structure, helping roots access what they need.
Spring Feeding: Once the garlic starts to actively grow in spring, it’s time for another boost. You can use a balanced fertilizer. Look for one with an N-P-K ratio like 10-10-10 or something similar.
Apply it according to the package directions. Avoid fertilizers with too much nitrogen late in the season. This can lead to leafy growth but smaller bulbs.
Top-Dressing: Another good method is top-dressing. This means adding a layer of compost or aged manure around the base of the plants in early spring. This gives the plants a fresh supply of food.
Avoid Over-Fertilizing: Too much fertilizer can be as bad as too little. It can burn the roots. It can also create an imbalance that favors leaf growth over bulb growth.
Always follow the recommended amounts.
Why Nitrogen is Tricky: Nitrogen is great for leafy greens. But for garlic bulbs, you need a balance. Too much nitrogen late in the season makes the plant focus on leaves.
It doesn’t put enough energy into the bulb. That’s why switching to a more balanced fertilizer or just compost is often best for bulb development.
Nutrient Needs for Garlic
Nitrogen (N): Essential for leaf growth. Needed early in the season. Too much late can harm bulb size.
Phosphorus (P): Important for root and bulb development. Helps with energy transfer.
Potassium (K): Crucial for overall plant health. Helps with water regulation and disease resistance. Also aids bulb maturity.
Dealing with Pests and Diseases
Even with the best care, pests and diseases can sometimes show up. Identifying problems early can save your crop.
Common Pests: Onion thrips are tiny insects that feed on garlic leaves. They can cause white streaks. Aphids can also sometimes bother garlic.
Good airflow and healthy plants are your best defense.
Common Diseases: Damping off can affect young seedlings. White rot is a serious fungal disease. It causes yellowing leaves and wilting.
It also results in white mold on the bulb. The best way to prevent diseases is good soil drainage. Also, rotate your crops.
Don’t plant garlic in the same spot year after year.
Healthy Plants Resist Problems: A healthy, well-fed, and properly watered garlic plant is more resistant. It can fight off many potential issues on its own. Focus on creating the ideal growing conditions.
That’s your first line of defense.
Weed Control: Weeds compete with garlic for water, nutrients, and sunlight. Keep your garlic patch free of weeds. Mulching helps a lot with this.
You can also carefully hand-pull weeds when they are small.
Quick Pest & Disease Checks
What to Look For: Yellowing leaves, wilting, spots on leaves, fuzzy mold, tiny insects.
Action Steps: Identify the problem. For minor pests, try washing them off with water. Ensure good drainage.
Remove affected plants if disease is severe. Rotate crops annually.
The Mystery of Garlic Scapes
If you’re growing hardneck garlic, you might see a flower stalk appear. This is called a scape. It usually curls.
It grows from the center of the plant.
Why They Appear: The scape is the plant’s way of trying to reproduce. It’s making a flower and then seeds. However, for growing big bulbs, this is not ideal.
The plant uses energy to make the scape. That energy could go into the bulb instead.
What to Do: Most garlic growers remove the scapes. Cut them off when they first start to curl. This is usually in late spring or early summer.
This redirects the plant’s energy back to the bulb. Don’t throw away the scapes! They are edible and delicious.
Many people sauté them or add them to stir-fries. They have a mild garlic flavor.
When to Cut: You want to cut them before they get too woody. When they are still tender and flexible is best. This ensures the plant’s energy goes where you want it.
Knowing When to Harvest Your Garlic
This is a crucial step. Harvesting too early means smaller bulbs. Harvesting too late can mean bulbs split or rot in the ground.
You need to watch for the signs.
Yellowing Leaves: The most common indicator is the lower leaves of the garlic plant starting to yellow and die back. Usually, about a third to a half of the leaves will have turned yellow. This signals that the plant is putting its energy into the bulb and is nearing maturity.
Scape Removal Timing: For hardneck garlic, remember you removed the scapes earlier. The timing of scape removal can influence when the bulb is ready. Generally, it’s about 3-4 weeks after removing the scapes that the bulbs are mature.
Gentle Check: You can also gently loosen the soil around a few plants. Carefully expose the top of a bulb. If the papery layers around the bulb are starting to loosen and separate, it’s a good sign.
If the layers are still tight, the bulb isn’t quite ready.
Avoid Harvesting Too Soon: Resist the urge to dig them up too early. Patience is key. Waiting until the leaves are properly yellowing will ensure you get the largest possible bulbs.
Avoid Harvesting Too Late: If the leaves die back completely and the soil is very wet, the bulbs can start to split. The skins can also come off. This makes them much harder to store.
Aim for that sweet spot.
Harvesting Checklist
- About 1/3 to 1/2 of the lower leaves have yellowed and died back.
- For hardnecks, it’s been about 3-4 weeks since scapes were removed.
- Gently check a bulb; papery skins are starting to loosen.
- Avoid harvesting if the ground is waterlogged.
The Art of Curing Your Garlic
This is a step many beginners skip. But curing is vital. It’s what makes your garlic last for months.
It also develops its full flavor.
What is Curing? Curing is a drying process. It allows the outer skins to dry and tighten. It also lets any moisture in the bulb to evaporate.
This prevents rot and spoilage during storage.
Where to Cure: Find a warm, dry, and well-ventilated place. An open shed, a garage with good airflow, or even a spare room with a fan works well. Avoid humid areas like basements.
The temperature should be around 70-80°F (21-27°C).
How to Cure: Gently brush off excess soil. Do NOT wash your garlic. The dirt protects it.
Lay the garlic bulbs on screens, racks, or hang them in bundles. Make sure air can circulate freely around them. They need air from all sides.
How Long It Takes: Curing usually takes about 2 to 4 weeks. The exact time depends on the humidity and temperature. The garlic is cured when the roots are dry and brittle.
The neck should be tight and papery. The skins should be dry and rustle when touched.
Trim the Roots and Stalks: Once fully cured, trim the roots. Leave about a half-inch of the stem. You can also trim off the stalk closer to the bulb.
But leave a little bit on.
Curing Environment
- Temperature: 70-80°F (21-27°C)
- Humidity: Low
- Ventilation: Excellent airflow is key. Use fans if needed.
- Light: Indirect sunlight is fine, but avoid direct sun which can cook the bulbs.
Storing Your Harvested Garlic
Proper storage ensures your garlic stays fresh and flavorful for a long time. It’s the final step in getting the most out of your hard work.
Cool, Dark, and Dry: Store cured garlic in a cool, dark, and dry place. Ideal temperatures are around 50-60°F (10-15°C). A pantry, a cool cupboard, or a root cellar is perfect.
Good Airflow is a Must: Don’t store garlic in plastic bags. They trap moisture. Use mesh bags, paper bags with holes, or open baskets.
This allows air to circulate. This prevents mold.
Keep it Whole: Only break apart bulbs as you need them. Keeping the bulb intact helps it last longer. Once a bulb is broken, the cloves are more exposed.
What to Avoid: Don’t store garlic in the refrigerator. The cold, humid environment can cause it to sprout prematurely or get moldy. Also, don’t store it near potatoes.
Potatoes release moisture and ethylene gas that can affect garlic.
How Long It Lasts: Properly cured and stored garlic can last anywhere from 3 to 12 months. This depends on the variety and storage conditions. Hardneck varieties tend to have a shorter storage life than softnecks.
Storage Best Practices
- Use mesh bags or breathable containers.
- Store in a cool (50-60°F), dark, and dry location.
- Keep bulbs whole until ready to use.
- Avoid refrigeration.
What This Means for Your Next Garlic Crop
Growing big garlic bulbs isn’t just luck. It’s about understanding what the plant needs. It’s about giving it the best possible environment.
Reflect on Your Process: Think back to your past garlic harvests. Were your bulbs small? Did they rot?
Consider the soil quality. Did you have enough sun? Did you water correctly?
Did you feed the plants?
Focus on Fundamentals: This guide has covered the key areas: soil, sun, water, nutrients, and proper timing. By focusing on these fundamentals, you’ll see a big difference.
Don’t Be Afraid to Experiment: Try different varieties. Try different spots in your garden. Learn what works best for your specific conditions.
Gardening is a journey of discovery.
Patience is Rewarded: Garlic takes time. It’s a long-season crop. But the reward of harvesting your own plump, flavorful bulbs is absolutely worth it.
Keep at it, and you’ll get there.
Common Questions About Growing Garlic
Why are my garlic bulbs so small?
Small garlic bulbs are usually due to poor soil, not enough sunlight, inconsistent watering, or lack of nutrients. Also, planting small cloves can result in smaller bulbs. Ensure your soil is rich and well-drained, the plants get 6-8 hours of sun, and you feed them adequately.
Can I plant garlic that I bought from the grocery store?
While you can try, it’s generally not recommended. Grocery store garlic might be treated to prevent sprouting. It may also not be suited to your climate.
For best results, buy seed garlic from a reputable supplier. This ensures you get healthy, viable cloves for planting.
When is the best time to fertilize garlic?
The best times to fertilize garlic are in the fall when you plant, and again in early spring as new growth begins. Avoid heavy nitrogen fertilization late in the season, as this can promote leaf growth over bulb development.
How do I know if my garlic is ready to harvest?
Your garlic is usually ready to harvest when about one-third to one-half of its lower leaves have turned yellow and died back. For hardneck varieties, it’s typically 3-4 weeks after you’ve removed the scapes. You can also gently check the bulb’s papery skins.
What should I do if my garlic leaves are turning yellow?
Yellowing leaves can be normal as the plant matures and prepares for harvest, especially the lower ones. However, if the top leaves are yellowing, it might indicate a nutrient deficiency (like nitrogen), overwatering, or poor drainage. Check your soil conditions and watering schedule.
Can I plant garlic in pots?
Yes, you can plant garlic in pots. Use large containers with good drainage holes. Fill them with a rich, well-draining potting mix.
Ensure the pots get plenty of sunlight. This is a great option if you have limited garden space or poor soil.
Conclusion: Your Garlic Growing Success
Growing beautiful, large garlic bulbs is achievable with the right knowledge. It takes understanding your soil, providing enough sun and water, and feeding your plants well. By following these tips, you can avoid the common pitfalls.
You’ll be enjoying your own delicious homegrown garlic soon.