How to Glue Rocks Together for Landscaping (Step-By-Step)
Gluing rocks together for landscaping projects is a transformative technique that unlocks a world of creative possibilities for homeowners, gardeners, and professional landscapers. Whether you’re building a durable stone retaining wall, assembling a decorative rock fountain, or crafting a unique stepping stone path, mastering this skill allows you to create permanent, visually stunning features that withstand the elements.
Unlike traditional methods that rely solely on gravity or mortar, modern adhesives offer a blend of strength, flexibility, and ease of use, making rock assembly accessible even to DIY beginners.
However, achieving a professional, lasting result requires understanding the right materials, techniques, and safety protocols. From choosing between epoxy, polyurethane, and construction adhesives to learning step-by-step preparation and application methods, each decision impacts both the beauty and durability of your project. This comprehensive guide will walk you through everything you need to know about gluing rocks together for landscaping, including expert tips, real-world examples, and key considerations that will help you avoid common pitfalls and achieve stunning, long-lasting results.
Key Takeaways
- Choosing the right adhesive is critical for durability and weather resistance.
- Surface preparation directly impacts bond strength and longevity.
- Step-by-step techniques ensure professional, safe results for any size project.
- Real-world case studies illustrate best practices and common mistakes.
- Data-driven comparisons help select adhesives based on project needs.
- Proper curing and maintenance extend the lifespan of glued rock features.

Credit: rockstoneandpebble.com
Understanding The Role Of Adhesives In Landscaping
Landscaping has evolved from simple arrangements to complex, integrated outdoor living spaces. Adhesives play a pivotal role in constructing robust, attractive features that endure environmental challenges.
Why Use Adhesives Instead Of Mortar Or Dry Stacking?
Traditional methods like mortar or dry stacking have their merits, but adhesives offer unique advantages:
- Ease of use: Less skill and fewer tools required, making adhesive-based projects accessible to a wider range of DIYers and professionals alike.
- Speed: Faster application and shorter curing times mean you can complete projects in a fraction of the time compared to waiting for mortar to set. Many adhesives allow for repositioning within minutes, but achieve handling strength much sooner than mortar.
- Flexibility: Accommodates slight movement and expansion, which is especially valuable in climates with freeze-thaw cycles or shifting soils. This flexibility helps prevent cracking and separation over time.
- Clean look: Invisible bonds preserve natural aesthetics. Unlike mortar, which may ooze or discolor stone faces, adhesives typically remain hidden, accentuating the beauty of the rocks themselves.
A 2026 market report found that construction adhesive use in landscaping has grown by over 18% in the last five years, driven by DIY trends and improved adhesive technology (Grand View Research). This rapid adoption reflects the increasing demand for efficient, durable, and aesthetically pleasing landscape solutions.
Types Of Projects That Benefit From Adhesives
- Retaining walls: Reinforce stacked stones and boulders, increasing stability and resistance to shifting over time.
- Water features: Seal and secure rocks in fountains or ponds, preventing leaks and ensuring rocks stay in place despite water movement.
- Pathways and patios: Anchor stepping stones or flagstones, reducing wobble and movement from foot traffic, and helping prevent weed growth between stones.
- Garden edging: Build raised beds or decorative borders with rocks that stay precisely where you want them, even after seasonal changes.
- Rock sculptures: Create artistic focal points, such as cairns or animal figures, with secure bonds that withstand weather and accidental bumps.
Adhesive technology has even enabled large-scale public installations—municipal parks, botanical gardens, and corporate campuses increasingly use adhesives for both decorative and structural rock features.
Limitations And When Not To Use Adhesives
While adhesives are versatile, they’re not always the best choice:
- Extreme weight-bearing structures: Mortar or mechanical reinforcement may be required for high walls, load-bearing steps, or features supporting significant weight. Adhesives alone may not meet code for certain engineered structures.
- Below-grade or constantly wet areas: Some adhesives degrade underwater or cannot withstand constant hydrostatic pressure. For ponds or features submerged year-round, choose an adhesive specifically rated for underwater use.
- Historic or restoration projects: Adhesives may not meet preservation standards, and irreversible bonds could complicate future repairs or conservation work.
- High-temperature environments: Some adhesives lose strength at high temperatures, making them unsuitable for fire pits or areas exposed to intense sun.
Understanding these nuances ensures your project is both safe and enduring, and helps you make informed decisions during design and material selection.
Types Of Adhesives For Gluing Rocks In Landscaping
Selecting the right adhesive is the foundation of a successful landscaping project. Not all adhesives are created equal—each type has unique properties suited to specific applications, climates, and rock types. Making an informed choice will maximize the longevity and appearance of your finished work.
Epoxy Adhesives
Epoxy is a two-part adhesive known for its exceptional strength and water resistance. It’s commonly used in heavy-duty landscaping and aquatic projects where maximum bond integrity is required.
- Pros: High bond strength, waterproof, chemical resistant, excellent gap-filling for irregular surfaces, and can be tinted to match stone colors.
- Cons: Requires precise mixing of resin and hardener, higher cost per unit, limited working time (can harden quickly, so planning is essential), and may require more cleanup due to sticky residue.
Epoxy’s resistance to water and chemicals makes it ideal for fountains, waterfalls, and features exposed to fertilizers or pool chemicals. For example, landscape architects often specify marine-grade epoxies for features integrated with swimming pools or high-traffic public fountains.
Polyurethane Construction Adhesives
Polyurethane adhesives are versatile and widely available, making them popular for outdoor rock assembly and general construction.
- Pros: Flexible, weather-resistant, adheres to damp surfaces, and remains effective in a wide range of temperatures. Polyurethane adhesives often expand into tiny crevices, improving grip.
- Cons: Longer cure time (especially in cool/damp weather), can foam and expand if over-applied, and requires clamping or weighting until set. Over-expansion can create visible foam that needs trimming.
Polyurethane adhesives are a go-to for garden wall blocks, stepping stones, and general landscape assemblies where minor movement or vibration is expected.
Landscape Block Adhesives
Specifically formulated for landscape materials, these adhesives are designed for stone, brick, and concrete.
- Pros: Easy to apply (cartridge/tube), good gap filling, designed for outdoor use, and often priced affordably for large projects. Many are low-odor and easy to clean up.
- Cons: Not suitable for underwater use, moderate strength compared to epoxy or polyurethane, and may be less flexible in extreme cold.
Landscape block adhesives are the most accessible option for beginners and offer a balance between cost and performance for garden walls and edging.
Silicone-based Adhesives
Used mainly for decorative rocks in water features or aquariums, silicone adhesives provide a watertight seal.
- Pros: Waterproof, flexible, UV resistant, and safe for aquatic life once cured, making them ideal for natural-looking ponds and aquascapes.
- Cons: Lower structural strength, not suitable for heavy loads or structural projects, and can be challenging to paint or finish for color-matching.
Silicone is the best solution for gluing small decorative rocks in constant contact with water, or for minor repairs to existing pond features.
Quick Comparison Table: Adhesive Properties
| Adhesive Type | Best Use | Bond Strength | Water Resistance | Working Time | Cost |
|---|---|---|---|---|---|
| Epoxy | Heavy-duty, wet areas | Very High | Excellent | 10–30 mins | $$$ |
| Polyurethane | General outdoor use | High | Good | 20–40 mins | $$ |
| Landscape Block Adhesive | Walls, edging | Medium | Good | 15–30 mins | $ |
| Silicone | Decorative/water features | Low-Medium | Excellent | 5–10 mins | $$ |
Choosing The Right Adhesive For Your Project
Consider these factors:
- Weight and size of rocks: Heavier stones require higher bond strength, making epoxy or polyurethane preferable. For lightweight decorative rocks, landscape block adhesive or silicone may suffice.
- Exposure to water or freeze-thaw cycles: Select adhesives rated for wet or fluctuating environments to prevent bond failure.
- UV exposure: Some adhesives degrade under direct sunlight. Ensure your choice is UV stable for exposed projects.
- Ease of application and cleanup: For quick, simple projects, choose adhesives with easy dispensing and minimal mess.
- Project scale: For large-scale installations, consider cost per ounce and application method (tube, cartridge, or bulk mix).
For in-depth information on adhesive chemistry and applications, visit the Adhesive Wikipedia page.

Credit: www.youtube.com
Essential Tools And Materials For Gluing Rocks
Proper tools and materials are critical for efficient, safe, and high-quality results. Below is a checklist and breakdown of must-have items.
Tool And Material Checklist
- Adhesive (type as per your project)
- Caulking gun (for tube adhesives)
- Mixing sticks or spatula (for epoxies)
- Protective gloves (nitrile or latex)
- Safety goggles
- Wire brush and scraper (essential for cleaning stone surfaces and removing old material)
- Clean rags or towels
- Bucket with water (for cleaning and emergency spills)
- Clamps or weights (to hold rocks during curing; bricks or bags of sand work well for larger stones)
- Level and measuring tape (ensure proper alignment and spacing)
- Sandpaper or small grinder (for roughening smooth stone surfaces)
- Masking tape (to protect visible areas from adhesive overflow)
- Plastic drop cloths (to protect landscaping and lawn from drips)
Personal Protective Equipment (ppe)
Always wear gloves and goggles when handling adhesives, especially epoxies and polyurethanes. Many adhesives emit fumes or can irritate skin. For projects in enclosed spaces, a respirator mask is recommended.
Preparing Your Workspace
- Choose a well-ventilated area to minimize inhalation of fumes.
- Protect nearby plants and surfaces with drop cloths to avoid accidental adhesive spills.
- Lay out all tools for easy access before starting to minimize adhesive cure time issues.
- Ensure rocks are dry and free from mud, moss, or debris—moisture and organic matter can compromise the bond.
Recommended Brands And Where To Buy
- Loctite PL Premium: Known for superior strength and durability, suitable for most stone and concrete projects.
- Gorilla Heavy Duty Construction Adhesive: Excellent for DIYers, widely available, versatile and easy to apply.
- Quikrete Advanced Polymer Construction Adhesive: Especially suited for large outdoor projects, highly weather-resistant.
- PC-7 Epoxy: Trusted for underwater and heavy-duty applications.
These products are widely available at Home Depot, Lowe’s, and specialty stone suppliers. For more detailed reviews, check Consumer Reports.

Credit: www.wikihow.com
Step-by-step Guide: How To Glue Rocks Together For Landscaping
Mastering the step-by-step process is key to achieving a lasting, attractive result. Here’s a detailed workflow suitable for most landscaping scenarios.
Step 1: Planning And Layout
- Visualize the project: Sketch or use design software to finalize rock placement. Consider the finished look, natural light, and how the feature integrates with the rest of your landscape.
- Dry fit: Arrange rocks in their final positions without adhesive to ensure proper fit and balance. This is especially important for curved walls or multi-level features.
- Mark alignment points: Use chalk or tape for precise positioning. Take photos or notes to remember the arrangement.
A thorough layout reduces errors and saves time during assembly.
Step 2: Surface Preparation
- Clean the rocks: Use a wire brush, water, and mild detergent to remove dirt, algae, or oil. For stubborn grime, soak rocks briefly or use a pressure washer.
- Dry thoroughly: Even “damp-tolerant” adhesives bond best on dry surfaces. Allow rocks to air dry fully, or use a towel for smaller pieces.
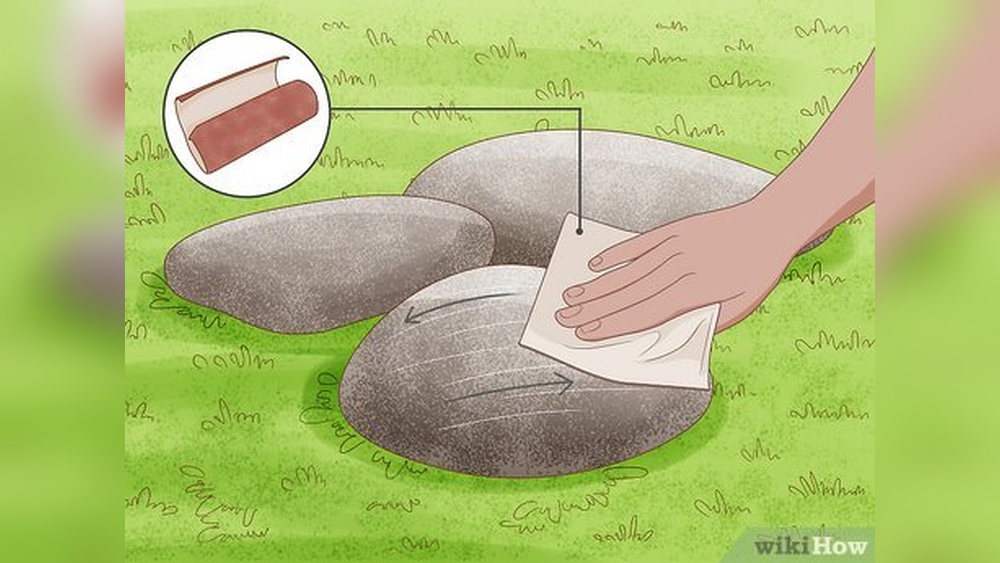
- Roughen surfaces: For smooth stones, scuff with sandpaper or a grinder to improve adhesion. Focus on contact points to maximize grip. This is especially important with river rocks or polished flagstones.
Step 3: Adhesive Preparation
- Read manufacturer’s instructions carefully. Each adhesive has unique mixing ratios, temperature ranges, and application tips.
- For epoxies: Mix parts A and B in correct ratios, using a disposable container and mixing stick. Only mix as much as you can use within the working time window.
- For tube adhesives: Cut nozzle to desired size and load into caulking gun. Practice on scrap material to get a feel for flow and bead size.
- Test a small sample if working with unfamiliar materials or unusual stone types.
Step 4: Applying The Adhesive
- Apply adhesive generously to one surface (usually the smaller rock or the one easiest to handle).
- Use a zigzag or dotted pattern for broad coverage and to ensure adhesive spreads evenly under pressure.
- For large rocks, apply multiple beads and spread evenly with a spatula or trowel.
- Avoid over-applying: Excess can ooze out and mar the appearance. If working in visible areas, mask edges with tape to catch overflow.
Step 5: Assembling The Rocks
- Press rocks together firmly, aligning with your marks. Use both hands and apply steady, even pressure.
- Wiggle slightly to spread adhesive and eliminate air pockets. This ensures maximum contact and prevents weak spots.
- Clamp or weigh down rocks if possible—especially for vertical or overhead joins. Use temporary bracing or supports if needed.
- Check alignment with a level. Misaligned rocks are difficult to reposition once the adhesive sets.
Step 6: Curing And Cleanup
- Leave untouched for the adhesive’s recommended cure time (typically 24–72 hours for full strength).
- Clean up excess immediately with a damp rag or recommended solvent. Some adhesives are easier to remove before curing; check instructions.
- Protect from rain or freezing during curing. Use tarps or covers if weather threatens.
Step 7: Inspect And Maintain
- After curing, inspect joints for gaps or weak spots. Tap gently to check for hollow sounds indicating poor contact.
- Touch up as needed with additional adhesive or surface sealant.
- For high-traffic or structural features, periodically check and re-glue if necessary. Seasonal inspections are especially important in freeze-thaw climates.
Sample Project Timeline Table
| Step | Time Required | Key Actions |
|---|---|---|
| Planning & Layout | 30–60 mins | Arrange & mark rocks |
| Surface Preparation | 15–30 mins | Clean, dry, roughen surfaces |
| Adhesive Application | 10–20 mins | Mix/apply adhesive |
| Assembly & Clamping | 10–30 mins | Join, align, clamp rocks |
| Curing | 24–72 hours | Let adhesive set undisturbed |
Real-world Examples And Case Studies
Seeing how others have successfully glued rocks together in landscaping projects can provide inspiration and practical insights.
Example 1: Diy Stone Garden Edging
A homeowner in Oregon used polyurethane landscape adhesive to create curved garden edging with river rocks. Key steps included:
- Cleaning rocks with a pressure washer to remove all moss and dirt, ensuring a strong bond.
- Arranging in a shallow trench for stability, preventing rocks from shifting over time.
- Applying adhesive in a zigzag bead to maximize contact and grip.
- Clamping overnight with bricks and checking alignment in the morning.
Result: Edging remained stable and attractive after four winters, despite freeze-thaw cycles. The homeowner reported only minor touch-ups were required after heavy spring rains, demonstrating the reliability of polyurethane adhesive for harsh climates.
Example 2: Building A Rock Waterfall Feature
A landscape contractor in Florida used epoxy adhesive to secure boulders in a pondless waterfall. The technique involved:
- Dry fitting rocks for water flow optimization, ensuring natural appearance and minimizing splash.
- Mixing small batches of epoxy to avoid waste and ensure optimal working time.
- Masking visible edges to prevent adhesive stains, preserving the natural look.
- Allowing 48 hours for full curing, with the water system covered to prevent splashing during that time.
Result: The waterfall withstood heavy rains and required no repairs after two years. The contractor noted that the epoxy’s resistance to chlorine and constant moisture made it a superior choice for water features.
Example 3: Repairing A Stone Retaining Wall
A public park in Illinois used landscape block adhesive to reattach loose face stones on an aging wall. The process included:
- Scraping off old mortar and debris, and thoroughly cleaning the stones.
- Applying adhesive to both surfaces to maximize contact area.
- Clamping and supporting with temporary braces, especially on vertical faces.
Result: The repaired sections blended seamlessly and passed a city safety inspection. Maintenance staff appreciated the low-odor, easy application, and quick turnaround compared to full mortar repairs.
Lessons Learned
- Proper surface prep is crucial for long-lasting bonds. Even the best adhesive will fail if dirt or moss remains on contact surfaces.
- Choose adhesive based on exposure (e.g., epoxy for wet areas, polyurethane for general outdoor use).
- Clamping/weighting rocks prevents movement during curing, especially for large or vertical projects.
- Test before large-scale projects to confirm compatibility with your specific stone type and environmental conditions.
For more landscaping inspiration and case studies, visit the Gardenista website.
Common Mistakes And How To Avoid Them
Even experienced landscapers can make errors when gluing rocks. Here’s how to sidestep the most frequent pitfalls.
Inadequate Surface Preparation
Dirty or mossy rocks significantly weaken adhesive bonds. Always clean and dry rocks thoroughly before applying adhesive. Skipping this step is the leading cause of bond failure, especially in damp or shaded areas.
Using The Wrong Adhesive
Don’t use indoor or low-strength adhesives for outdoor landscaping. Choose products labeled for exterior use, water resistance, and stone compatibility. For example, standard wood glue or interior construction adhesives will degrade rapidly when exposed to moisture or sunlight.
Over- Or Under-applying Adhesive
- Too much adhesive can squeeze out and attract dirt, insects, or moss, creating an unsightly seam.
- Too little adhesive creates weak joints, increasing the risk of rocks loosening over time.
Apply a consistent, even bead, and avoid large gaps between rocks. If you’re unsure, consult the manufacturer’s coverage recommendations.
Ignoring Cure Times
Moving or stressing rocks before the adhesive has fully cured often leads to failure. Always follow the manufacturer’s recommended cure time, and avoid shortcuts—especially in high-humidity or cold weather, which can slow curing.
Neglecting Safety
Adhesives can irritate skin, eyes, and lungs. Use gloves, goggles, and work in a ventilated area. Take extra care with epoxies, which can cause allergic reactions with prolonged exposure.
Skipping Test Runs
For unfamiliar adhesives or rock types, test bond strength on a sample before committing to the entire project. This ensures compatibility and helps you refine your application technique.
Table: Top 5 Mistakes And Solutions
| Mistake | Consequence | Solution |
|---|---|---|
| Dirty surfaces | Poor bond, joint failure | Clean and dry rocks thoroughly |
| Wrong adhesive | Weak or failed joints | Use exterior, stone-specific adhesive |
| Over/under application | Messy look or weak bond | Apply even, adequate bead |
| Premature movement | Bond failure | Allow full cure time |
| No test run | Surprise failures | Test on sample rocks first |
Maintenance And Longevity Of Glued Rock Features
Proper maintenance ensures your glued rock features look great and last for years. Even the best adhesive bonds benefit from routine care.
Inspecting For Damage
- Check joints each season for cracks, gaps, or loose rocks. Early detection allows for simple spot repairs, saving time and money.
- Use a flashlight to inspect shaded or underwater areas, as algae or moss can conceal damage.
Cleaning And Resealing
- Remove moss or dirt with a soft brush and water. Avoid using a pressure washer directly on glued joints, as it may weaken the adhesive.
- Avoid harsh chemicals that can degrade adhesives. If cleaning agents are necessary, test in an inconspicuous spot first.
Repairing Failed Joints
- Remove loose rocks and scrape off old adhesive completely. New adhesive bonds best to bare, clean stone.
- Clean surfaces and reapply fresh adhesive, following the original application steps.
- Clamp and cure as originally done. For large repairs, consider upgrading to a stronger adhesive if previous bonds failed prematurely.
Weatherproofing And Seasonal Care
- In freeze-thaw climates, ensure rocks are not submerged in pooling water, as expansion can crack joints.
- For water features, use adhesives rated for submerged use to prevent breakdown.
- Cover delicate features in winter if possible, or divert water to prevent ice buildup.
Expected Lifespan
With high-quality adhesives and proper installation, glued rock features can last 10–20 years or more. Epoxy and polyurethane adhesives provide the longest service life in outdoor conditions, especially when protected from standing water and direct UV exposure. Regular inspection and minor touch-ups can extend lifespan even further.
For guidelines on outdoor adhesive durability, see the ASTM International standards.
Environmental And Safety Considerations
Using adhesives safely and responsibly protects both your health and the environment.
Eco-friendly Adhesive Choices
- Select low-VOC (volatile organic compound) adhesives where possible. These products emit fewer harmful fumes and are safer for use around plants and water features.
- Dispose of empty tubes and unused adhesives at designated hazardous waste centers. Never pour adhesives down drains or into soil.
- Avoid adhesives with solvents near water features or ponds, as they can harm aquatic life.
Personal Safety Protocols
- Always wear PPE (gloves, goggles, mask if required) during mixing and application.
- Work outdoors or in well-ventilated areas to disperse fumes.
- Store adhesives away from children and pets, ideally in locked cabinets.
Wildlife And Plant Safety
- Prevent adhesive runoff into soil, ponds, or streams. Use drop cloths and be cautious during rainy or windy weather.
- Avoid gluing rocks near root systems or sensitive habitats. Adhesive spills can damage plants and soil microbes.
Regulatory Guidelines
Check local regulations for disposal and use of construction adhesives. Some municipalities restrict the use of certain chemicals near water sources. For more on safe chemical use in landscaping, consult the EPA Safer Choice program.
Frequently Asked Questions
How Long Does It Take For Glued Rocks To Cure Fully?
Cure times vary by adhesive type and environmental conditions. Most construction adhesives require 24–48 hours to achieve handling strength, and up to 7 days for full cure. Epoxies may cure faster, often within 24 hours, but always check the manufacturer’s recommendations. Cold or damp weather can extend cure times, so plan accordingly.
Is Glued Rock Landscaping Safe For Pets And Children?
Once fully cured, most exterior-grade adhesives are inert and safe. However, keep pets and children away during application and curing, as uncured adhesives can be toxic or cause irritation. Always read safety labels and store chemicals securely. For water features, select adhesives labeled “aquarium safe” if fish, amphibians, or pets may contact the water.
Can I Use Regular Super Glue For Outdoor Rocks?
Super glue (cyanoacrylate) is not recommended for landscaping rocks. It lacks weather resistance, UV stability, and flexibility required for outdoor environments. Use epoxy, polyurethane, or landscape block adhesives designed for exterior stone. Super glue bonds are brittle and can fail quickly in wet or hot conditions.
What Is The Strongest Adhesive For Large Rocks?
Epoxy adhesives are generally considered the strongest, especially for large or load-bearing rocks. Two-part, marine-grade epoxies offer superior water resistance and strength. For very heavy features, consider using mechanical anchors in addition to adhesive for maximum safety and code compliance.
How Do I Remove Glued Rocks If I Make A Mistake?
Carefully pry apart rocks using a chisel and hammer after softening the adhesive with heat (a heat gun) if safe. Remove any remaining adhesive with a scraper and solvent as recommended by the manufacturer. Always wear PPE during removal, and work slowly to avoid damaging the rocks.
Additional Resources
For more in-depth techniques and product reviews, check these authoritative sources:
- Family Handyman
- This Old House
Creating stunning, durable rock features in your landscape is fully achievable with the right adhesive, tools, and techniques. From decorative garden borders to dramatic water features, gluing rocks together opens up new possibilities for outdoor design—without the mess and hassle of traditional mortar.
By following best practices for surface preparation, adhesive selection, and safety, you’ll enjoy beautiful, long-lasting results that enhance your property for years to come. Whether you’re a DIY enthusiast or a professional landscaper, mastering this technique is a valuable addition to your skills toolbox.
With careful planning and ongoing maintenance, your glued rock features will remain a source of beauty and pride through every season.