How to Clean Debris From Landscaping Rock Without Damage
Landscaping rocks are a timeless addition to gardens, walkways, and outdoor living spaces, offering both beauty and practicality. However, over time, leaves, twigs, dirt, and other debris can accumulate between the rocks, dulling their appearance and threatening the health of your landscape.
Improper cleaning can not only fail to remove stubborn debris, but also damage the rocks, underlying weed barriers, or the plants you’ve worked hard to cultivate.
Homeowners and landscaping professionals alike often struggle to find effective, non-damaging techniques for cleaning landscaping rocks. While there are plenty of myths and quick fixes, understanding the safest and most efficient cleaning methods is essential for maintaining your landscape’s aesthetic and longevity.
This guide walks you through a comprehensive, evidence-based approach to cleaning debris from landscaping rocks without causing damage, drawing from expert advice, real-world case studies, and the latest research.
Key Takeaways
- Use manual tools like leaf blowers, rakes, and vacuums for gentle, effective debris removal.
- Understand the type of rock and its vulnerabilities before selecting a cleaning method.
- Regular, seasonal maintenance prevents buildup and prolongs the lifespan of your landscaping rocks.
- Avoid harsh chemicals and high-pressure washing that can erode or discolor rocks.
- Real-world case studies demonstrate the effectiveness of proper cleaning strategies.
- Always prioritize environmental considerations and safety for plants and wildlife.
Understanding Landscaping Rocks And Debris Accumulation
To clean landscaping rocks effectively, it’s important to first understand their types and the nature of debris that accumulates over time. Different rocks have varying tolerances to cleaning methods, and the debris itself can range from light leaves to deeply embedded soil.
Types Of Landscaping Rocks
Landscaping rocks come in various shapes, sizes, and materials, each with unique features:
- River rock: Smooth, rounded, typically 1–3 inches in diameter; often used for borders and dry creek beds. Their smooth surface makes them less prone to trapping dirt, but leaves can still accumulate in between.
- Pea gravel: Small, rounded stones, about the size of a pea; used for paths and patios. Their compact size makes them comfortable for walking, but they can easily hide debris and are more challenging to clean thoroughly.
- Crushed stone: Angular, rough-edged; ideal for driveways and drainage solutions. Their jagged edges help them lock together, preventing shifting, but they also trap soil and organic matter more readily.
- Lava rock: Lightweight, porous volcanic stone; popular for mulch and accent areas. Its porous structure can harbor weeds and retain moisture, making it susceptible to moss and algae.
- Marble chips: Bright white, reflective stones; often used in decorative beds. While visually striking, they can show stains and discoloration more easily than darker rocks.
Each rock type responds differently to cleaning. For example, smooth river rocks are less likely to trap dirt than porous lava rocks, while marble chips require special care to avoid surface etching or discoloration.
Common Debris Types
The most typical debris found in landscaping rock includes:
- Leaves and twigs: From nearby trees and shrubs, especially in autumn. These can create dense layers that smother the rocks and trap moisture.
- Soil and dust: Blown in by wind or splashed by rain. Fine particles can settle deep between rocks, making them difficult to remove without washing.
- Weeds and moss: Growing in moist, shaded areas. The organic material from fallen debris creates an ideal seedbed for opportunistic plants.
- Litter: Such as wrappers, plastics, or other human-made items. Litter not only affects aesthetics but can also pose environmental hazards.
How Debris Accumulates
Debris tends to settle due to gravity, wind, and rain. Once wedged between rocks, it can:
- Promote weed growth by providing organic material. Seeds carried by wind or animals may find these pockets of organic matter ideal for germination.
- Cause discoloration or staining of rocks. Organic debris decomposes, leaving behind tannins and other compounds that can stain lighter-colored stones.
- Increase the risk of pest infestations. Decomposing material attracts insects and other pests, which may also pose a threat to surrounding plants or structures.
Understanding these dynamics is crucial for selecting the right cleaning strategy. For example, if your landscape is surrounded by deciduous trees, you may need to clean more frequently during autumn, while in drier climates, wind-blown dust may be your primary concern.

Credit: landscapingbyjmichael.com
Assessing Your Landscape Before Cleaning
Before jumping into cleaning, assessing your unique landscape will ensure the best results with minimal risk.
Evaluating Rock Stability And Placement
Check if rocks are loosely placed or set in mortar. Loose rocks allow for more thorough cleaning, while fixed rocks may require gentler methods. Take note of any rocks that have shifted or sunken over time, as these may need to be reset after cleaning.
If your rocks are layered over fabric or a weed barrier, inspect for any visible damage or signs of shifting that could expose the soil underneath.
Identifying Sensitive Areas
Locate any vulnerable areas:
- Delicate plants adjacent to rock beds. Some perennials or groundcovers have shallow roots that can be easily damaged by tools or water runoff.
- Irrigation systems or drip lines. Exposed piping or emitters can be dislodged or broken if not identified beforehand.
- Weed barriers or landscape fabric beneath rocks. Torn or exposed fabric can compromise weed prevention and may require repair.
Protecting these elements will prevent accidental damage during cleaning. Use temporary markers or flags to identify sensitive zones as you work.
Safety Considerations
- Wear gloves, eye protection, and a dust mask if necessary. Rocks can harbor sharp edges, insects, or allergens.
- Ensure pets and children are clear of the work area. Flying debris or heavy tools can pose risks.
- Check for wildlife (e.g., insects, small mammals) that may have taken shelter. Gently encourage any animals to vacate the area before you begin.
Consider the impact of noise from leaf blowers or vacuums, especially in residential neighborhoods or near sensitive wildlife areas.
Environmental Impact
Minimize runoff into storm drains and avoid contaminating nearby water sources. Choose eco-friendly cleaning methods whenever possible. Be mindful of the products you use, as even biodegradable soaps can have unintended effects if used excessively or allowed to enter natural waterways.

Credit: www.nbcnews.com
Best Manual Methods For Cleaning Landscaping Rock
Manual cleaning methods are often the safest and most effective way to remove debris without damaging rocks or surrounding plants.
Using A Leaf Blower
A leaf blower on a low setting can quickly clear loose leaves and twigs. Hold the nozzle at a shallow angle to avoid blasting rocks out of place. For large areas, consider a battery-powered blower for maneuverability. Adjusting the power setting allows you to control the force and avoid disturbing the rock bed.
Leaf blowers are particularly effective for newly fallen debris or when cleaning up after seasonal leaf drop. For areas near delicate plants, use a directional nozzle or shield to prevent blowing debris onto garden beds.
Leaf Blower Effectiveness Comparison
| Debris Type | Leaf Blower | Manual Rake | Vacuum |
|---|---|---|---|
| Dry leaves | Excellent | Good | Fair |
| Twigs | Good | Excellent | Poor |
| Soil/Dust | Poor | Poor | Good |
Gentle Raking
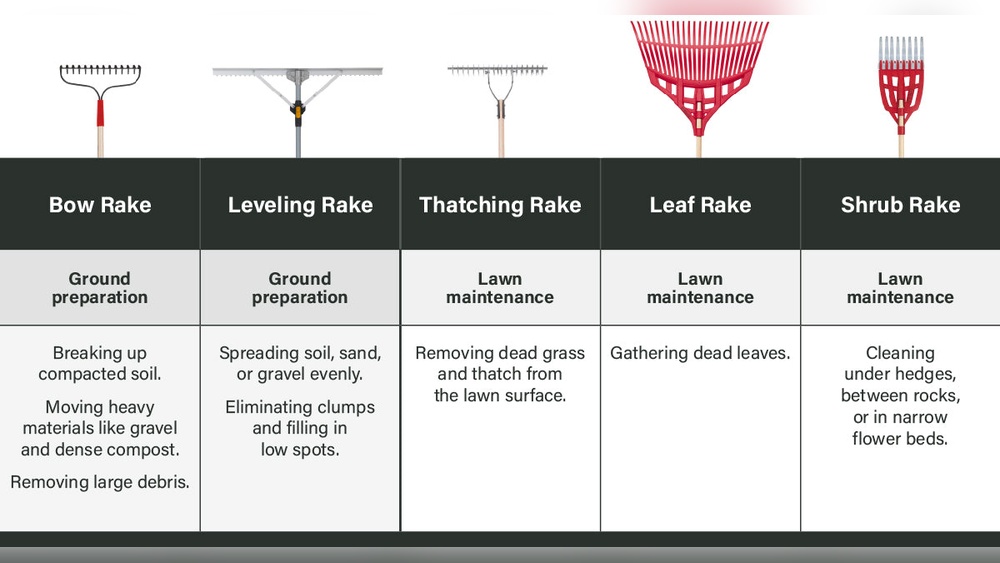
For rocks larger than pea gravel, a plastic rake with flexible tines is ideal. Metal rakes can scratch or shift rocks. Use gentle strokes to lift debris without disturbing the rock layer. If using a rake on smaller stones, be careful not to dig too deeply, which can bring up soil or damage weed barriers.
Rake Selection Tips
- Choose a rake appropriate for the rock size. Larger rocks can tolerate wider tines, while smaller stones benefit from fine, close-set tines.
- Avoid using garden forks or heavy-duty tools, as these can create deep grooves, damage fabric, or even chip softer stones.
- For tight spaces, a hand rake or cultivator works best. These allow for precision cleaning around plants or in narrow borders.
Raking also helps to redistribute rocks evenly, filling in low spots and maintaining a uniform appearance.
Shop Vacuum Or Yard Vacuum
A shop vacuum with a wide nozzle can suck up dry leaves, dust, or small litter. For pea gravel or smaller stones, use a mesh filter to prevent sucking up the rocks themselves. Some yard vacuums also have a blower mode, providing flexibility for different types of debris.
- Use extension cords or battery-powered models for larger areas.
- Empty the collection bag frequently to maintain suction power.
- Adjust the height of the nozzle to avoid picking up rocks.
Vacuuming is particularly effective for fine dust or after a period of dry, windy weather.
Hand-picking And Spot Cleaning
For larger debris or areas near delicate plants, manual removal is safest. Wear gloves to protect your hands and avoid disturbing the rock arrangement. Use a small garden trowel or scoop to remove embedded leaves or weeds.
Hand-picking is also the best method for removing non-organic litter, such as plastic wrappers or glass shards, which can be hazardous to pets, children, and wildlife.
Real-world Example: Suburban Garden Bed
A homeowner in Seattle found that using a combination of a low-power leaf blower for surface debris and a hand rake for stubborn spots kept her river rock border pristine, while minimizing disruption to her perennial flowers. By working in small sections and being mindful of wind direction, she avoided blowing debris into flower beds or onto the lawn.

Credit: www.theglobeandmail.com
Washing Landscaping Rocks Safely
Sometimes, debris is too stubborn for manual removal, requiring washing. Care must be taken to avoid damaging the rocks, underlying weed barriers, or contaminating the soil.
Low-pressure Hose Washing
A garden hose with a spray attachment is ideal for rinsing rocks:
- Use the shower or gentle spray setting to avoid dislodging rocks.
- Start at the highest point and work down, letting gravity carry debris away. This approach helps prevent re-soiling cleaned areas and directs debris toward a designated collection spot.
- Use a broom or brush to guide loosened debris toward a collection point, such as a drain or compost bin.
Avoid using high-pressure settings, which can:
- Dislodge rocks, causing uneven surfaces or exposed fabric.
- Tear landscape fabric, undermining weed control.
- Erode soil underneath, potentially leading to settlement or erosion issues.
For large areas, consider working in sections and allowing each area to dry before moving to the next to prevent water pooling or muddy conditions.
Bucket And Brush Method
For smaller areas or stubborn buildup:
- Mix water with a small amount of biodegradable soap (optional) in a bucket. Avoid harsh detergents that can harm plants or soil microbes.
- Use a soft-bristled brush to gently scrub rocks. This is especially effective for removing algae, moss, or stains from bird droppings.
- Rinse with clean water, catching runoff when possible to prevent contamination.
This method is especially effective for marble chips and decorative stones, which can show stains more readily. For porous rocks like lava rock, use minimal water and allow for thorough drying.
Soaking And Sifting (for Removable Rocks)
If rocks are heavily soiled and can be removed:
- Shovel rocks into a wheelbarrow or mesh tray. Work in small batches to avoid excessive weight or mess.
- Rinse with a garden hose, stirring the rocks to release debris. If needed, use a mild soap solution for stubborn stains.
- Spread rocks on a tarp to dry before returning to the bed. Inspect for weeds or pests during this process.
This method allows for a deep clean and is ideal for periodic maintenance, especially after several years of accumulation.
Washing Method Comparison Table
| Method | Best For | Risk of Damage | Water Use |
|---|---|---|---|
| Low-pressure hose | Most rock types | Low | Moderate |
| Bucket & brush | Small areas, stains | Very low | Low |
| Soak & sift | Removable rocks | Very low | High (if not reused) |
Drying And Returning Rocks
Allow rocks to dry completely before putting them back to prevent mold and mildew. This drying period also gives you the chance to inspect for damaged or broken rocks that may need replacing. Use this opportunity to inspect for weed barrier damage or soil compaction.
If you notice compacted soil, loosen it gently before replacing the rocks to maintain drainage and discourage weed growth.
Case Study: Restoring A Neglected Pathway
A landscaping company in Denver restored a heavily soiled pea gravel pathway by removing the stones, washing them in batches, and replacing the worn weed barrier beneath. The result was a like-new appearance without any rock loss or damage. This approach also eliminated persistent weed problems and improved drainage along the pathway, demonstrating the value of periodic deep cleaning and barrier maintenance.
Preventing Damage During Cleaning
The wrong cleaning methods can harm both your landscaping rocks and the overall health of your garden. Prevention and caution are key.
Avoiding High-pressure Washers
While high-pressure washers are tempting for quick cleaning, they can:
- Chip or erode soft rocks like limestone, sandstone, or even some river rocks.
- Dislodge rocks, causing uneven surfaces or exposing weed barriers.
- Damage landscape fabric or expose soil, inviting weeds and creating erosion issues.
If you must use a pressure washer, select the lowest possible setting and a wide spray nozzle, and test on a small, inconspicuous area first. However, manual and low-pressure methods are almost always safer and more effective for home landscapes.
Chemical Cleaners: Risks And Alternatives
Harsh chemicals (e.g., bleach, ammonia) can:
- Discolor rocks, especially marble or decorative stones, leading to permanent etching or fading.
- Harm nearby plants and pollute runoff, affecting beneficial soil organisms and aquatic life.
- Kill beneficial soil organisms that contribute to healthy plant growth.
Instead, opt for:
- Biodegradable soaps for spot cleaning, which break down quickly and are less likely to harm plants.
- Vinegar-water solutions for light stains (test on a small area first). A 1: 1 solution can help with algae or mold, but must be rinsed thoroughly to avoid affecting soil pH.
For more on eco-friendly landscape maintenance, visit the EPA Greenacres site, which offers tips on sustainable gardening practices.
Protecting Weed Barriers And Soil
When washing, use gentle water pressure and avoid saturating the area. If you notice rips in the weed barrier, repair or replace them before returning rocks. A well-maintained barrier not only prevents weeds but also helps maintain the integrity of your landscape design.
Safeguarding Plants And Wildlife
Cover nearby plants with a tarp during cleaning to prevent soap, debris, or water from damaging foliage or roots. Check for nests or burrows before starting, and clean in sections to allow wildlife to relocate safely. If you encounter pollinators or beneficial insects, wait until they have moved on before proceeding.
Real-world Example: Community Pollinator Garden
Volunteers at a local pollinator garden in Austin used a combination of hand-picking and gentle hose rinsing to clean decorative gravel, taking care to preserve native wildflowers and not disturb beneficial insects. By scheduling cleaning for late afternoon, they avoided peak pollinator activity times, further protecting the garden’s ecosystem.
Regular Maintenance Strategies
Consistent, seasonal maintenance reduces the need for intensive cleaning sessions and helps maintain the landscape’s appearance and health.
Seasonal Cleaning Routines
- Spring: Remove winter debris, check for weed growth, and inspect for frost heave or erosion. Early spring cleaning prepares beds for new growth and prevents issues from compounding.
- Summer: Light raking/blowing to clear dust and dropped flowers. Focus on removing spent blooms and monitoring for insect activity.
- Autumn: Frequent leaf blowing/raking to prevent matting and buildup. Removing leaves before they become waterlogged reduces staining and pest risk.
- Winter: Inspect for damage, but avoid cleaning when rocks are frozen. Freeze-thaw cycles can loosen rocks and expose fabric, so wait for thawed, dry days for any necessary work.
Mulching And Edging
Install edging to prevent grass and soil from encroaching. Metal, plastic, or stone edging helps define boundaries and makes maintenance easier. Use mulch in adjacent beds to reduce the amount of organic debris reaching rocks, and select mulch types that break down slowly for longer-lasting protection.
Weed Prevention
- Keep the rock layer at least 2–3 inches deep to smother weed seeds and prevent light penetration.
- Inspect and repair weed barriers as needed, especially after heavy rains or animal activity.
- Hand-pull weeds promptly to prevent seeding, and dispose of them away from the landscape to prevent re-infestation.
Consider pre-emergent herbicides or natural alternatives, but always follow product instructions and assess environmental impacts.
Scheduling And Tracking
Keep a simple log or calendar to track when each area was last cleaned. This helps anticipate future needs and prevents over-cleaning, which can waste time and resources. Use photos or notes to document problem areas or improvements over time.
Data Table: Maintenance Frequency By Rock Type
| Rock Type | Debris Build-Up Rate | Recommended Cleaning Interval |
|---|---|---|
| River rock | Low | Quarterly |
| Pea gravel | Medium | Every 2 months |
| Crushed stone | High | Monthly |
| Lava rock | Medium | Quarterly |
Advanced Tools And Professional Services
In some cases, advanced tools or professional help may be necessary for large or complex landscapes.
Specialized Yard Vacuums
High-powered yard vacuums, designed for gravel and rock beds, can efficiently collect debris with minimal disturbance. Some models have adjustable suction and debris collection bags. Modern models are designed to separate rocks from leaves, reducing the risk of rock loss.
- Pros: Fast, effective for large areas, and capable of handling different debris sizes.
- Cons: Expensive, may require rental, and can be noisy.
When renting equipment, request a demonstration to ensure proper operation and safety.
Landscape Maintenance Companies
Professional landscapers have access to specialized tools and experience. They can:
- Remove, clean, and replace rocks in large beds, using efficient, minimally invasive techniques.
- Repair or replace weed barriers to extend the life of your installation.
- Provide ongoing maintenance contracts for regular service, saving time and ensuring consistently high standards.
For guidance on selecting a reputable company, see the Better Business Bureau.
When To Call A Professional
Consider hiring help if:
- The area is larger than 500 sq. Ft., or includes hard-to-reach spaces.
- Rocks are set in mortar or concrete, requiring special care.
- There is significant weed or pest infestation, which may involve soil treatment.
- You lack the time, tools, or physical ability for safe, effective cleaning.
Professionals can also advise on upgrades or redesigns to improve drainage, weed control, and aesthetic appeal.
Equipment Rental Options
Many hardware stores rent blowers, vacuums, and power washing equipment. Always choose the gentlest tool available for your needs, and ask for tips on safe, effective use from staff.
Case Study: Commercial Property Renovation
A business park in Phoenix contracted a landscaping firm to clean and refresh 2,000 square feet of decorative rock beds. The team used industrial yard vacuums and hand tools, finishing the job in two days without damaging rocks or disrupting office operations.
The revitalized landscape improved curb appeal, reduced maintenance costs, and provided a safer, cleaner environment for employees and visitors.
Environmental And Health Considerations
Cleaning landscaping rocks isn’t just about aesthetics—it also impacts the environment and your health.
Minimizing Water And Chemical Use
- Use buckets or targeted hoses instead of open spraying to conserve water and reduce runoff.
- Collect runoff when possible, especially when using any cleaning agents.
- Avoid cleaning before heavy rain to prevent pollution from washing into storm drains or waterways.
Water-efficient practices are not only environmentally responsible but can also lower your utility bills and comply with local water restrictions.
Protecting Pollinators And Wildlife
- Clean in sections, allowing insects and small animals to relocate, especially in gardens with native plants or pollinator habitats.
- Avoid chemical cleaners that harm beneficial species, such as bees, butterflies, and soil organisms.
For more, see the US Fish and Wildlife Service Pollinators resource, which highlights the importance of pollinator-friendly practices.
Dust And Air Quality
Dry cleaning methods (blowing, raking) can stir up dust. Wear a mask if you have allergies or respiratory conditions, and clean on days with minimal wind. Consider lightly misting the area before raking or blowing to keep dust down.
Responsible Debris Disposal
- Compost organic debris whenever possible, turning leaves and twigs into valuable mulch or soil amendment.
- Bag and dispose of weeds and invasive plants to prevent spreading, as composting may not kill seeds or roots.
- Recycle or dispose of litter properly, following local guidelines for plastics, glass, and hazardous materials.
For local disposal guidelines, check with your city’s municipal recycling program.
Example: Eco-friendly Community Park
A city park in Portland implemented regular, low-water cleaning routines for its stone walking paths, leading to reduced water use and improved safety for local pollinators, as documented in a recent Portland Parks & Recreation report. The park’s maintenance team also planted native flowers near rock beds, further supporting biodiversity and reducing the need for chemical weed control.
Frequently Asked Questions
How Often Should I Clean My Landscaping Rocks?
The frequency depends on rock type, debris buildup, and local climate. Most rock beds benefit from cleaning at least once per season, with more frequent maintenance during heavy leaf drop or after storms. High-traffic or urban areas may require monthly attention, while sheltered or low-debris spaces might only need annual cleaning.
What Is The Safest Method For Cleaning Small Pea Gravel?
Use a shop vacuum with a mesh filter or gentle hand raking. Avoid high-pressure water, which can displace the gravel and damage weed barriers. For deep cleaning, consider sifting small sections at a time using a mesh screen.
Can I Use Bleach Or Vinegar To Clean Landscaping Rocks?
Bleach is not recommended due to the risk of discoloration and plant damage. Diluted vinegar can be used for mild stains, but always test a small area first and rinse thoroughly. For stubborn stains, a mild biodegradable soap is preferable. Always follow up with clean water to remove any residue.
How Do I Prevent Weeds From Growing Between My Rocks After Cleaning?
Maintain a 2–3 inch layer of rock, repair or replace weed barriers as needed, and hand-pull any weeds promptly. Mulching nearby beds and edging also help reduce the spread of weed seeds. Consider applying a pre-emergent weed control product in spring for additional prevention.
Are Professional Cleaning Services Worth It For Small Gardens?
For small gardens, DIY methods are usually sufficient. Professionals are best suited for large, complex, or commercial projects, or when specialized equipment is required. However, if you have physical limitations or lack the time, even small gardens can benefit from a one-time professional refresh.
External Resources
For additional guidance and in-depth information, consult these authoritative resources:
- Better Homes & Gardens: How to Clean Landscape Rocks
- Penn State Extension: Using Rocks for Landscape Mulch
- EPA Greenacres
- Portland Parks & Recreation: Sustainable Maintenance
- US Fish and Wildlife Service: Pollinators
- Better Business Bureau
Taking the time to clean your landscaping rocks properly ensures they remain an attractive, low-maintenance feature for years to come. By using the right tools, understanding your landscape’s unique needs, and prioritizing safety and environmental responsibility, you can keep your outdoor spaces looking their best—without risking damage or unnecessary effort.
With regular care and the right approach, your landscaping rocks will continue to enhance your property’s value and enjoyment for many seasons to come.