How to Do Diy Concrete Landscape Edging Step by Step
Creating a beautiful, functional landscape often comes down to the small details. One of the most transformative DIY projects you can undertake is installing concrete landscape edging. This simple addition can define flower beds, keep grass out of garden areas, and give your yard a crisp, professional appearance. While it may seem like a job best left to professionals, with the right guidance and preparation, homeowners can achieve impressive results with DIY concrete edging.
Concrete landscape edging offers durability, versatility, and a timeless look that complements a wide range of garden styles. Whether you want gentle curves or straight lines, this edging can be customized to suit your needs. With a clear step-by-step approach, you can save money, increase property value, and gain the satisfaction of tackling a substantial home improvement project yourself.
This guide will lead you through the entire process, from planning to finishing touches, with expert tips, real-world examples, and answers to common questions.
Key Takeaways
- Concrete landscape edging offers a durable, attractive, and customizable border for gardens and lawns.
- Proper planning, material selection, and site preparation are crucial for a professional-looking result.
- The process involves setting a layout, building forms, mixing and pouring concrete, and finishing with sealing or coloring.
- DIY concrete edging can be budget-friendly compared to professional installation, saving hundreds of dollars.
- Maintenance is straightforward but essential for long-term durability and appearance.
- Common mistakes—like poor site prep or improper curing—can be avoided with careful attention to detail.

Credit: ryanhobbies.com
Planning Your Diy Concrete Landscape Edging
Assessing Your Landscape Needs
Before you begin, take a detailed look at your yard. Identify the areas that need definition—these could be flower beds, walkways, driveways, or tree rings. Measure these spaces carefully. Use string, stakes, or a garden hose to visualize the new edge, ensuring it complements your existing landscape design.
Consider the overall style of your garden. For example, if your landscape features sweeping beds and naturalistic plantings, curved concrete edging may best highlight these forms, while straight lines suit more formal gardens. Also, evaluate any elevation changes or sloped areas, as these can impact both the installation process and the final look.
Key considerations:
- Will the edging be straight, curved, or a mix?
- How tall and wide should it be for your needs?
- Do you need to accommodate lawn equipment or foot traffic?
- Will the edging serve a purely decorative purpose, or does it need to function as a root or grass barrier?
Thinking ahead about the practical uses of your edging can prevent regrets later. For instance, if you use a riding mower, ensure the edge is wide and stable enough to withstand wheel contact.
Selecting The Right Tools And Materials
A successful project starts with the right equipment. For DIY concrete edging, you’ll need:
- Concrete mix (premixed or custom blend)
- Edging forms (commercial plastic/metal or DIY wooden boards)
- Level and measuring tape
- Wheelbarrow and shovel
- Trowel and float
- Concrete mixer (optional but helpful for large projects)
- Stakes and string
- Release agent (for forms)
- Gloves, eye protection, and knee pads
Additionally, consider tools for specific customizations, such as color additives or stamping tools for textured finishes. Some homeowners also find it helpful to have an edging tool or curb shaping tool for achieving uniformity. If you plan to reinforce your edging, purchase rebar or wire mesh as well.
For enhanced aesthetics, consider color additives or stamping tools for textured finishes. These are widely available at home improvement stores or online.
Understanding Local Regulations And Utility Safety
Always check with your local municipality for any regulations regarding permanent landscape installations. Some neighborhoods, especially those governed by HOAs, may have restrictions on concrete work or require permits for major exterior changes.
Before digging, contact your local utility marking service (such as 811 in the United States) to ensure you avoid underground lines. This step is critical for both safety and compliance. Striking a utility line can lead to dangerous accidents, costly repairs, and even service outages for your neighborhood.
If your property borders public sidewalks or streets, verify setback requirements and ensure you’re not encroaching on easements.
Budgeting: Diy Vs. Professional Installation
Concrete edging can be a cost-effective DIY project, often saving 50–70% over professional installation fees. Below is a comparison table illustrating typical costs:
| Installation Type | Average Cost per Linear Foot | Typical Total Cost (50 ft.) | Labor Included? |
|---|---|---|---|
| DIY Concrete Edging | $2 – $4 | $100 – $200 | No |
| Professional Concrete Edging | $7 – $15 | $350 – $750 | Yes |
| Plastic/Metal Edging (DIY) | $1 – $3 | $50 – $150 | No |
Remember to factor in the value of your time and the satisfaction of DIY. The potential savings are significant, but the sense of accomplishment is equally valuable. For more detailed cost analysis, see HomeAdvisor.
Preparing The Site For Concrete Edging
Marking And Measuring The Layout
With your plan in hand, use stakes and string to outline the edging’s path. For curves, a garden hose or flexible plastic pipe provides an accurate guide. Mark the edge with spray paint for clear visibility. Double-check measurements to ensure symmetry and alignment with other landscape features.
Take time to step back and view the layout from multiple angles. Adjust as needed to achieve the most visually pleasing result. Don’t rush this stage—perfecting the layout now will pay off later.
Excavating The Trench
Dig a trench along your marked lines. The trench should be slightly wider than your planned edging (typically 4–6 inches wide) and deep enough to accommodate both the concrete and a stable gravel base (usually 4–6 inches deep). Remove all grass, roots, and debris to prevent future shifting.
Pro tip: Slope the trench slightly away from garden beds for optimal drainage and to prevent water pooling.
If you encounter rocky soil or clay, spend extra time loosening and removing hard sections. A clean trench will help the forms set snugly and yield a more professional appearance.
Adding A Stable Base
A solid foundation is critical for long-lasting concrete edging. Pour a 2–3 inch layer of crushed gravel or paver base into the trench, and compact it thoroughly with a hand tamper. This prevents settling and cracking over time.
For best results, use angular gravel that interlocks when compacted. Avoid pea gravel, which can shift under pressure. Test the base for firmness by walking on it—there should be minimal give.
Installing Edging Forms
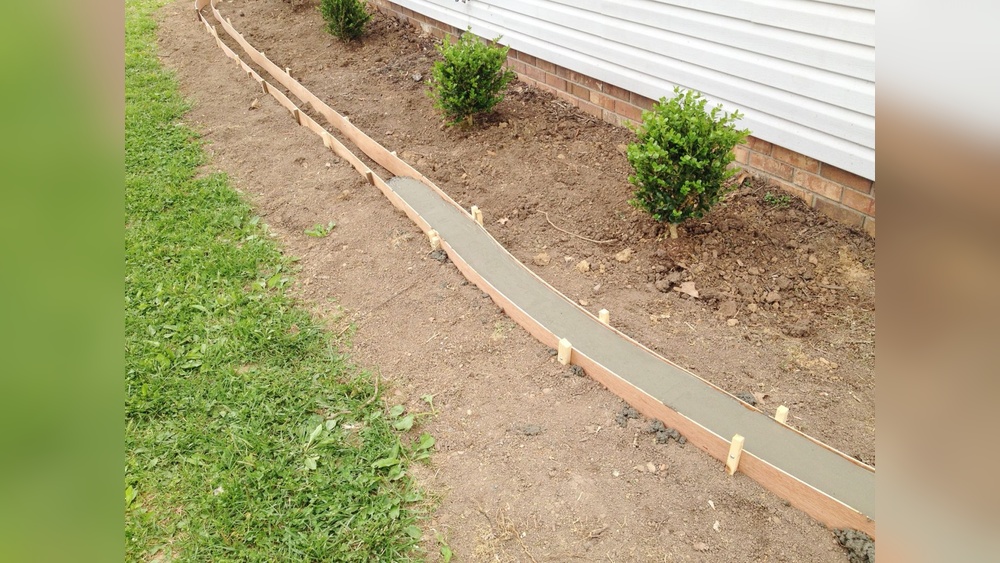
Securely set your edging forms along both sides of the trench. Forms must be sturdy and level to ensure a smooth, even edge. For curves, use flexible plastic or thin plywood. Hammer stakes outside the forms every 2–3 feet, fastening the forms to the stakes. Apply a release agent to prevent concrete from sticking to the forms.
Checklist for forms:
- Level across the top
- Securely staked
- Proper width and height
- Smooth curves or straight lines
Take the time to check for gaps between the form and the ground. Fill gaps with soil or sand to prevent concrete from leaking out during the pour. The stability and quality of your forms directly impact the final finish.
Credit: www.woodshopdiaries.com
Mixing And Pouring Concrete
Choosing The Right Concrete Mix
For landscape edging, use a high-strength concrete mix—look for products rated at least 4,000 PSI. Pre-mixed bags are convenient, but for larger projects, you can mix your own blend using 1 part cement, 2 parts sand, and 3 parts gravel. Consider adding fibermesh for additional strength or polymer additives for flexibility and crack resistance.
Mixing tips:
- Use a concrete mixer for efficiency on larger jobs.
- Add water gradually to achieve a thick, workable consistency.
- Avoid overly wet mixes, which can weaken the finished edge.
Mix in small batches if you’re working alone, so the concrete doesn’t begin to set before you can place it. If you’re coloring your concrete, ensure consistent mixing for uniform color throughout the batch.
Pouring The Concrete
Shovel or pour concrete into the prepared forms, starting at one end and working in manageable sections. Use a trowel to press the concrete firmly into the corners and edges of the form, eliminating air pockets.
Steps for a smooth pour:
- Fill forms halfway, compacting with a trowel.
- Fill to the top, slightly overfilling to allow for settling.
- Tap the sides of the forms with a hammer or mallet to remove bubbles and help the concrete settle.
- Use a straight board (screed) to level the top, moving in a back-and-forth motion.
Work quickly but carefully, as concrete begins to set within 30–60 minutes. If you’re working in hot weather, enlist a helper to speed up the process.
Reinforcing For Extra Strength
For areas subject to heavy traffic or freeze-thaw cycles, embed steel rebar or wire mesh in the concrete. Place reinforcement in the middle of the pour before filling to the top, ensuring it is fully encased.
Use rebar ties or wire to secure the reinforcement and prevent shifting during the pour. Reinforcement is especially important along driveways, paths, or sloped areas prone to soil movement.
Shaping And Texturing The Surface
Immediately after screeding, use a concrete float to smooth the surface. For a rounded top edge, run an edging tool along the sides. Apply any desired texture or patterns with a stamping tool or broom. If adding color, sprinkle dry pigment or use a colored concrete mix at this stage.
Popular finish options:
- Smooth (classic and modern)
- Brushed (slip-resistant)
- Stamped (brick, stone, or custom patterns)
Use a light touch when adding texture—overworking the surface can draw excess water or fine particles to the top, weakening the finish. Experiment with small sections or sample boards to perfect your technique. For inspiration, see Better Homes & Gardens.

Credit: ryanhobbies.com
Curing, Sealing, And Finishing Touches
Proper Curing For Strength
Concrete needs time to cure properly. Cover the edging with plastic sheeting or wet burlap immediately after finishing to retain moisture. Maintain coverage for at least 48–72 hours, lightly misting with water if the weather is hot or dry. Avoid heavy use or traffic during this period.
Curing timeline:
- 24 hours: Surface set, forms may be removed carefully.
- 72 hours: Light foot traffic allowed.
- 7 days: 70% strength achieved.
- 28 days: Full strength reached.
Proper curing is crucial for concrete’s long-term durability. Rushing this process can result in surface cracking or weak spots, so patience pays off.
Removing Forms And Cleaning Up
Once the concrete is firm but not fully cured (usually after 24–48 hours), carefully remove the forms. Use a utility knife or trowel to clean up any rough edges or excess material. Fill any gaps along the base with topsoil or mulch for a neat appearance.
Dispose of or clean your forms for future projects. Take care not to disturb the new edging during the first week. If necessary, place caution tape or temporary fencing to keep pets and children away.
Sealing And Coloring Options
To enhance longevity and appearance, apply a concrete sealer after full curing (typically 28 days). Sealers protect against moisture, stains, and freeze-thaw damage. Choose from matte, satin, or glossy finishes depending on your preference.
If you want colored edging, use a concrete dye or stain at this stage. Follow manufacturer instructions for the best results, and always test on a small section first.
Regularly resealing every 2–3 years will help preserve color and shine, especially in areas exposed to harsh weather or heavy irrigation.
Landscaping Around The New Edging
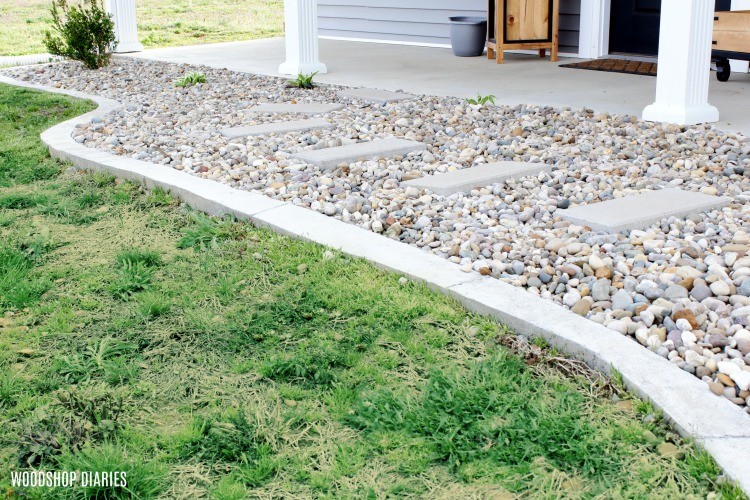
Complete the project by backfilling along the edge with soil, mulch, or decorative gravel. Plant ground covers or flowers to soften the transition between edging and beds. Regular maintenance—trimming grass and cleaning debris—keeps the border looking sharp.
Mulch and gravel not only enhance appearance but also help with drainage and weed suppression. Consider drip irrigation or soaker hoses along your new beds for efficient watering without undermining the concrete.
Real-world Examples And Case Studies
Example 1: Curved Garden Bed Edging
In suburban Seattle, the Johnson family wanted to separate their perennial beds from the lawn with a smooth, curved border. By marking out an organic, flowing line with a garden hose and constructing flexible forms, they were able to pour a 4-inch wide, 6-inch tall concrete edge.
The project took a weekend, cost under $200 for 60 linear feet, and transformed the garden’s appearance. After three years, the edging remains crack-free and requires minimal upkeep.
Additionally, the Johnsons used a charcoal-colored release agent and a stone-texture stamp, giving the edging a natural look that blends beautifully with the surrounding plants. Their neighbors have since adopted similar techniques, demonstrating the project’s impact on curb appeal and community inspiration.
Example 2: Driveway Border For Durability
A homeowner in Austin, Texas, faced issues with gravel spreading onto the driveway and grass encroaching onto the pavement. They installed a 6-inch wide, reinforced concrete edging along both sides of the driveway. Reinforcing with rebar and sealing the concrete prevented cracking from vehicle tires and temperature fluctuations.
The edging provided a visual upgrade and functional boundary, withstanding both car and lawnmower traffic.
This project also included a brushed finish for improved traction, important during rainy weather. The homeowner noted that the edging simplified mowing and eliminated the need for frequent touch-up work, saving time and effort season after season.
Example 3: Decorative Stamped Edging
In a residential neighborhood in Columbus, Ohio, a DIY enthusiast added value to their home by installing stamped concrete edging. Using brick-patterned stamping mats and a terra cotta color additive, the border mimicked traditional clay bricks at a fraction of the cost.
The project was completed for under $300 for 40 linear feet. The result was a high-end look that impressed both neighbors and prospective buyers.
The homeowner also added solar LED path lights, embedding the fixtures directly into the concrete before it set. This not only enhanced evening curb appeal but improved safety along pathways at night. The investment paid off at resale, with the home’s listing highlighting the upgraded landscaping.
Troubleshooting And Common Mistakes
Preventing Cracks And Shifting
Cracking is the most common issue with concrete edging. It is usually caused by poor base preparation, inadequate curing, or insufficient reinforcement. Always compact the base, use reinforcement in high-stress areas, and follow recommended curing times.
Expansion joints can also be added every 6–8 feet to accommodate movement from soil settling or temperature changes. These joints, created by inserting a thin strip of wood or plastic during the pour, help control where cracks form and keep the edging looking uniform.
Shifting can occur if the forms are not well anchored or the trench is too shallow. Double-check form stability and trench depth before pouring concrete.
Achieving Even, Consistent Edging
Uneven surfaces or inconsistent width can detract from the professional look. Use a level frequently during setup and pouring. Screed the surface carefully, and use guides or forms designed for edging.
For DIYers, it helps to enlist a second person to check levels and measurements as you pour. A little teamwork can prevent costly mistakes and ensure a smooth, professional result.
Dealing With Weather Challenges
Concrete work is best performed in mild, dry weather. Avoid pouring concrete during extreme heat, cold, or rain. Rapid drying can cause surface cracking, while freezing temperatures can prevent proper curing.
Weather guidelines:
- Ideal pouring temperature: 50–75°F
- Avoid pouring below 40°F or above 90°F
If rain is forecast, cover the site with a tarp and postpone your pour. In warm climates, work early in the morning or late in the afternoon to avoid peak heat. For cool climates, consider using a fast-setting concrete mix or curing blankets to help retain warmth.
Fixing Surface Imperfections
If you notice minor surface flaws after demolding, fill small holes with concrete patch or mortar mix. For color inconsistencies, apply a concrete stain or dye to even out the appearance.
For more troubleshooting tips, visit Portland Cement Association.
Maintenance And Longevity Of Concrete Edging
Cleaning And Seasonal Care
Keep your concrete edging looking its best with routine cleaning. Sweep off debris, and rinse with water as needed. In areas with harsh winters, avoid using metal shovels or salt deicers directly on the edging, as these can cause surface damage.
For stubborn stains, use a mild detergent and a soft-bristled brush. Pressure washing is generally safe for sealed concrete but test a small area first. In autumn, clear away leaves and organic matter to prevent staining and mold growth.
Preventing And Repairing Damage
Inspect the edging annually for cracks or shifting. Early repairs can prevent larger issues. Use concrete patch for small cracks, and reseal the surface every 2–3 years for optimal protection.
Maintenance checklist:
- Clean debris regularly
- Inspect for cracks and repair promptly
- Reseal every few years
After heavy storms or freeze-thaw cycles, check for movement or undermining along the trench. Promptly address any erosion or soil loss to preserve the integrity of the edge.
Comparing Concrete Edging Longevity
How does concrete edging compare to other common materials? See the table below:
| Edging Material | Average Lifespan | Maintenance Required | Durability |
|---|---|---|---|
| Concrete | 20+ years | Low | Excellent |
| Plastic | 3–10 years | Medium | Moderate |
| Metal (steel/aluminum) | 15–25 years | Low | Very Good |
| Wood | 5–10 years | High | Poor–Moderate |
| Stone | 25+ years | Low | Excellent |
For more on the durability of landscape materials, see Wikipedia: Landscape Edging.
When To Replace Or Upgrade Edging
Over time, even concrete may need replacement due to shifting ground or major cracks. Plan for periodic upgrades if you remodel your landscape or want to update the style. Replacing concrete edging is straightforward: simply break up the old concrete with a sledgehammer and remove the debris before installing new edging.
If you anticipate future changes, design your edging in sections rather than one continuous strip. This makes removal and modifications easier down the road.
Enhancing Your Concrete Edging: Design And Customization
Adding Color, Texture, And Patterns
Modern concrete edging doesn’t have to be plain gray. Add visual interest with integral color (mixed into the concrete), surface-applied stains, or dry-shake pigments. Stamping mats or custom molds can create the look of brick, stone, or wood.
Popular design options:
- Earthy brown or red tones to mimic brick
- Slate or stone textures for a natural look
- Smooth, modern lines for contemporary gardens
Advanced DIYers may experiment with inlaid mosaics or glass for unique visual effects. Embedding small stones or colored aggregates into the surface before it sets can also provide a distinctive touch.
For more creative ideas, visit Houzz.
Integrating Lighting Or Decorative Features
For added safety and nighttime appeal, embed solar LED lights or low-voltage landscape lighting along the edge. Incorporate decorative stones, glass beads, or mosaic tiles for a one-of-a-kind look.
Lighting can be installed flush with the surface or angled upward to highlight plantings and pathways. For garden accents, consider casting house numbers or monograms directly into the edging.
Matching Edging To Your Landscape Style
Tailor your edging to fit your garden’s aesthetic:
- Cottage gardens: Use curves and stamped floral patterns.
- Modern landscapes: Opt for straight lines and smooth finishes.
- Traditional yards: Classic gray or brick-textured edging works well.
Choosing the right finish and color can help your edging either blend with the landscape or stand out as a design feature. Don’t be afraid to experiment with samples before committing to a full pour.
Connecting Edging To Other Hardscape Elements
Coordinate your concrete edging with existing patios, walkways, or retaining walls by matching color, texture, or height. This creates a cohesive, professional look throughout your landscape.
For integration ideas, see The Spruce.
Frequently Asked Questions
What Are The Benefits Of Concrete Edging Over Other Materials?
Concrete edging stands out for its durability, low maintenance, and versatility. It resists weather, lawn equipment, and root intrusion better than plastic or wood. With proper installation, concrete can last 20 years or more, making it a smart long-term investment. It’s also highly customizable in terms of shape, color, and texture. Unlike wood, it won’t rot or attract pests; unlike metal, it won’t rust in most environments.
How Long Does It Take To Install Diy Concrete Landscape Edging?
Most DIY concrete edging projects for 50–100 linear feet can be completed over a weekend. The process includes site prep, form installation, pouring, finishing, and initial curing. Full curing for maximum strength takes about 28 days, but the forms can typically be removed after 24–48 hours.
If you’re working alone or on complex designs, allow extra time for layout and finishing. Plan for weather delays and always allocate time for proper curing to ensure longevity.
Can I Pour Concrete Edging In Cold Or Wet Weather?
It’s best to avoid pouring concrete during extreme cold (below 40°F) or wet weather, as both can interfere with curing and lead to cracking or surface flaws. If you must work in less-than-ideal conditions, use a fast-setting mix, insulate the forms, and cover the concrete to protect it from rain and freezing temperatures.
In hot weather, use shade cloths and mist the surface to prevent rapid drying, which can cause shrinkage cracks.
How Do I Repair Cracks Or Damage In Existing Concrete Edging?
Small cracks can be filled with concrete patch or repair caulk, available at hardware stores. For larger damage, it’s often best to remove and replace the affected section. Prevent future cracks by ensuring a solid base, proper curing, and regular maintenance.
If you notice repeated cracking, investigate drainage and soil movement in the area, as these could indicate deeper issues.
Is It Possible To Remove Or Relocate Concrete Edging In The Future?
Yes, concrete edging can be removed with a sledgehammer or demolition saw. Relocating is not practical since the concrete will break during removal, but you can replace or redesign your edging as your landscape needs change. Dispose of old concrete responsibly at a recycling center or landfill.
If you anticipate frequent landscape changes, modular edging solutions may be more suitable, but for permanent, long-lasting borders, concrete remains the top choice.
By following this comprehensive, step-by-step guide, you’ll be well-equipped to tackle your own DIY concrete landscape edging project with confidence. The result will be a beautiful, long-lasting border that enhances your yard’s appearance and functionality for years to come.