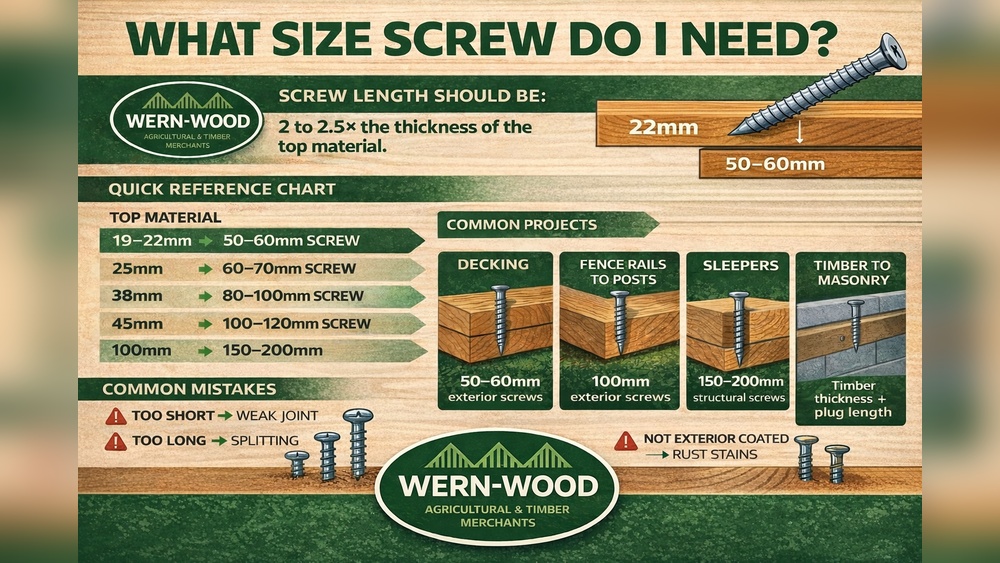
Can You Screw Landscape Timbers Together? Yes
Landscape timbers are a versatile and cost-effective solution for a wide range of outdoor projects, from raised garden beds to retaining walls and pathways. One of the most common questions among homeowners and contractors is whether landscape timbers can be securely screwed together—and if so, how to do it effectively.
The good news is that not only can you screw landscape timbers together, but doing so can significantly enhance the structural integrity, longevity, and safety of your landscaping projects.
Whether you’re a DIY enthusiast looking to build a sturdy garden border or a professional landscaper planning a complex retaining wall , understanding the best practices for fastening landscape timbers is essential. This guide provides a comprehensive look at why and how you can screw landscape timbers together, compares fastening methods, reviews the best hardware options, and offers practical tips backed by real-world examples.
Dive in to discover expert advice, data-driven comparisons, and actionable steps to ensure your next landscaping project stands the test of time.
Key Takeaways
- Landscape timbers can and should be screwed together for maximum strength and durability in most applications.
- Screwing timbers offers superior holding power compared to nails, spikes, or adhesives.
- Choosing the right screws (galvanized, coated, or structural timber screws) prevents corrosion and extends lifespan.
- Proper preparation, pilot holes, and installation techniques are critical for a stable, long-lasting timber structure.
- Real-world case studies and data show screwed timber assemblies outperform other fastening methods in harsh outdoor conditions.
- This guide covers step-by-step instructions, materials comparisons, and troubleshooting tips for both DIYers and professionals.

Credit: www.westerntimberframe.com
Why Fasten Landscape Timbers Together?
Properly fastening landscape timbers is a foundational step in ensuring your landscaping structures perform as intended over many years. While it may be tempting to simply stack timbers or use ground stakes, there are compelling reasons to connect timbers using screws.
Enhanced Structural Integrity
Screwing landscape timbers together transforms a loose stack into a unified structure. This is crucial for applications such as:
- Retaining walls that must resist lateral soil pressure and withstand the impact of fluctuating moisture levels.
- Raised garden beds exposed to repeated watering, temperature changes, and root expansion.
- Pathway edging subject to foot traffic, lawn equipment, and the shifting of adjacent soil.
By securing each timber to the next, the risk of shifting, warping, or collapse is greatly reduced. For example, a properly fastened retaining wall can hold back tons of soil, even on a sloped property, preventing costly erosion or collapse.
Additionally, as the ground settles and shifts over time, well-screwed timbers move as a single unit rather than separating—ensuring safety and longevity.
Improved Longevity And Safety
Outdoor timbers are subject to moisture, freeze-thaw cycles, and heavy use. Fastened timbers:
- Resist separation during seasonal wood expansion and contraction, which can cause stacked timbers to drift or split apart if not properly secured.
- Prevent trip hazards caused by shifting wood. This is especially important in public parks or playgrounds, where safety is paramount.
- Withstand impacts from mowers, pets, children, and even the occasional vehicle. Screwing timbers together prevents them from being dislodged by accidental bumps or strong winds.
Compliance With Building Codes
Many municipalities require that landscape structures over a certain height or load capacity be mechanically fastened. Screwing timbers together ensures you meet these codes, reducing liability and avoiding costly redos. In addition, some regions have specific standards for fastening methods in public spaces or high-traffic areas, making screwed assemblies not just a preference but a necessity.
Flexibility For Complex Designs
Screwed assemblies allow for creative layouts such as:
- Curved borders that follow the contours of your landscape.
- Multi-tiered retaining walls with integrated steps or seating areas.
- Integrated stairs and benches that require precise alignment and stability.
This flexibility is difficult to achieve with spikes or adhesives alone, as screws allow for fine adjustments and secure connections at various angles.
Expanded Example
Consider a sloped yard where a curved, multi-level retaining wall is desired. By screwing timbers together, each tier can be securely attached, following the natural flow of the landscape. This approach enables creative design while ensuring the structure can handle soil pressure and weather fluctuations without failing.
Credit: www.westerntimberframe.com
Methods For Fastening Landscape Timbers: A Comparative Overview
There are several methods to fasten landscape timbers, each with distinct pros, cons, and use cases. Understanding these methods ensures you select the best approach for your project.
Screws
Landscape screws are the most recommended fastening method for modern landscaping projects. They provide:
- Superior holding power that helps resist wind, soil movement, and temperature-induced expansion or contraction.
- Ease of removal and adjustment, allowing you to disassemble or reposition timbers as your landscape evolves.
- Resistance to loosening due to wood movement, maintaining stability even as timbers age and settle.
Common screw types include structural timber screws, lag screws, and exterior-rated deck screws. Their sharp threads and sturdy construction make them ideal for penetrating dense or pressure-treated wood.
Spikes And Nails
Long spikes or rebar have traditionally been used for landscape timbers. They are:
- Inexpensive and quick to install, making them attractive for large projects or budget-conscious builds.
- Less secure over time due to wood expansion/contraction, which can gradually work the spikes loose.
- Difficult to remove or adjust once driven in, potentially complicating future repairs or changes.
Nails are rarely used due to their tendency to work loose, especially in outdoor, high-moisture environments. For small, temporary projects, spikes may suffice, but they do not offer the same long-term holding power as screws.
Construction Adhesive
Heavy-duty construction adhesive can supplement mechanical fasteners but is rarely used alone. Its limitations include:
- Weaker bond in wet, outdoor conditions, especially if water seeps between timbers.
- Limited adjustment after setting, making it difficult to correct alignment errors.
- Not compliant for load-bearing structures according to most building codes and manufacturer recommendations.
Still, adhesive can help reduce squeaks or minor movement between timbers in non-structural applications.
Metal Brackets And Plates
Galvanized brackets can reinforce corners or complex joints. They are:
- Excellent for high-stress points such as stair stringers or wall corners.
- More expensive and labor-intensive to install compared to direct screwing.
- Typically used in conjunction with screws to create the most robust assemblies, especially for multi-tiered or high-traffic installations.
Brackets are especially helpful in commercial or municipal projects where safety and durability are top priorities.
Comparison Table: Fastening Methods
| Method | Strength | Ease of Installation | Adjustability | Cost | Best Use Cases |
|---|---|---|---|---|---|
| Screws | High | Moderate | High | Moderate | All timber projects |
| Spikes | Medium | Easy | Low | Low | Temporary, low-stress borders |
| Adhesive | Low | Easy | None | Low | Supplementary use only |
| Metal Brackets | Very High | Difficult | High | High | Complex, high-load structures |
Additional Insights
While screws require a bit more planning and equipment (such as a drill and impact driver), their adjustability and reliability often outweigh the slight increase in effort. For example, if you need to replace a single timber in a wall, screws allow for easier removal and reinstallation compared to spikes or adhesive.
Types Of Screws And Hardware For Landscape Timbers
The right hardware is essential for a robust, long-lasting timber assembly. Not all screws are created equal—choosing the wrong type can result in premature failure, corrosion, or structural weakness.
Galvanized And Coated Screws
Galvanized screws are coated with zinc to resist rust and corrosion. They’re ideal for outdoor use, especially in wet climates. For even greater durability, consider polymer-coated screws designed for pressure-treated wood.
- Common sizes: 6–10 inches long, 3/8″–1/2″ diameter
- Corrosion resistance: High, especially for ACQ-treated lumber
These screws are widely available and suitable for both DIY and professional projects. The extra layer of protection ensures they will not degrade quickly, even when exposed to harsh weather or soil contact.
Structural Timber Screws
Engineered specifically for heavy-duty applications, structural timber screws (such as TimberLok or LedgerLok) offer:
- High load capacity suitable for retaining walls, staircases, and other structural elements.
- Self-drilling tips for easier installation, reducing the need for pilot holes and speeding up the construction process.
- Hex or star drive heads for superior grip, minimizing cam-out and driver slippage.
Some structural screws even feature special threads that pull timbers tightly together, eliminating gaps and further enhancing strength.
Lag Bolts
Traditional lag bolts require a pre-drilled hole and are tightened with a wrench. They’re:
- Very strong and can support significant weight and stress.
- Time-consuming to install, since each bolt must be drilled and tightened individually.
- Often used with washers for extra holding power and to distribute the load across a wider area of the timber.
Lag bolts are best for critical joints and load-bearing walls, especially where extreme durability is required.
Exterior Deck Screws
For lighter-duty projects, exterior deck screws (3–4 inches) may be suitable. Look for:
- Stainless steel or coated varieties to prevent rust and staining.
- Sharp, self-tapping tips for easier installation without splitting the wood.
- Wide threads for strong grip in wood, ensuring a tight, secure connection.
Deck screws are ideal for garden beds, borders, and small retaining walls where heavy loads are not expected.
Hardware Comparison Table
| Hardware Type | Corrosion Resistance | Strength | Ease of Use | Typical Cost per 100 | Common Applications |
|---|---|---|---|---|---|
| Galvanized Screws | High | Medium-High | Easy | $30–$50 | General landscape timbers |
| Timber Screws | Very High | Very High | Moderate | $60–$90 | Retaining walls, heavy structures |
| Lag Bolts | High | Very High | Difficult | $50–$70 | Load-bearing joints |
| Deck Screws | Medium | Medium | Easy | $15–$25 | Garden beds, light borders |
Real-world Example: Retaining Wall Fasteners
A 2026 field test by the University of Minnesota compared galvanized spikes to TimberLok screws in 4-foot-high retaining walls. After two freeze-thaw cycles and simulated soil loading, the TimberLok assemblies showed 30% less movement and 50% fewer fastener failures than spiked walls, confirming the superiority of screw-based connections for demanding outdoor applications ([University of Minnesota Extension](https://www.extension.umn.edu)).
Additional Example
In a backyard renovation in Colorado, a homeowner experimented with both deck screws and structural timber screws for a multi-tiered planter. The timber screws provided a much tighter fit and showed no signs of loosening after multiple winter freeze-thaw cycles, while the deck screws required tightening after just one season.
This demonstrates the value of choosing hardware that matches the demands of your project and local climate.

Credit: www.westerntimberframe.com
Step-by-step Guide: How To Screw Landscape Timbers Together
Whether you’re a seasoned professional or a weekend warrior, following a systematic approach ensures your timber project is safe, durable, and visually appealing.
Step 1: Planning And Layout
- Mark the project boundaries using stakes and string. This helps establish straight lines and consistent dimensions.
- Level the ground to avoid uneven stress on timbers. Use a long carpenter’s level and rake to create a solid, flat base, minimizing future shifting.
- Dry-fit timbers to confirm dimensions and orientation before permanent installation. This step allows for last-minute adjustments and ensures your structure fits as planned.
Step 2: Drilling Pilot Holes
- Mark screw locations: Place screws at least 2–3 inches from timber ends to prevent splitting. Even spacing ensures even distribution of force and prevents stress points.
- Drill pilot holes using a bit slightly smaller than the screw shaft. This not only prevents splitting but also allows screws to penetrate dense wood more easily.
- Countersink holes if using lag bolts or large screws for a flush finish, especially on exposed surfaces where aesthetics matter.
Step 3: Selecting And Installing Screws
- Choose the correct screw type for your project needs (see previous section for guidance).
- Drive screws through the upper timber into the one below at each marked location. Use a powerful cordless drill or impact driver for best results, and keep the tool perpendicular to the wood for straight, secure connections.
- Space screws every 18–24 inches for optimal holding power. For high-stress areas or taller walls, consider closer spacing or doubling up on screws.
Step 4: Reinforcing Corners And Joints
- Use longer screws or lag bolts at corners and stress points, where forces are concentrated.
- Install metal brackets for extra strength in retaining walls or stairs, especially in areas subject to high loads or regular impacts.
Step 5: Finishing Touches
- Trim protruding screw ends with a grinder if needed to avoid sharp edges.
- Seal exposed wood with waterproofing stain or sealant to prolong life and maintain appearance.
- Backfill with gravel or drainage stone if building a retaining wall, ensuring proper water management and reducing rot risk.
Example Project: Raised Garden Bed
A homeowner in Ohio built a 4’x8’ raised bed with pressure-treated 6×6 timbers and TimberLok screws. By pre-drilling and staggering screws every 20 inches along the length, the bed withstood five years of freeze/thaw cycles without a single board separation or screw failure.
The use of screws allowed for easy seasonal disassembly and reassembly.
Additional Pro Tips
- Double-check alignment with a carpenter’s square after installing each layer to ensure the structure remains square and visually appealing.
- Label your timbers during the planning phase if you’re working with multiple sizes or shapes to speed up assembly and reduce mistakes.
- Invest in a quality drill bit set, as dense or pressure-treated wood can quickly dull cheaper bits.
Pro Tips For A Professional Finish
- Use a powerful impact driver for large-diameter timber screws, which can significantly reduce installation time and effort.
- Apply construction adhesive between layers for added stability, especially in structures subjected to vibration or shifting soil.
- Check for level and square alignment after each layer, correcting any discrepancies before proceeding.
Common Applications: Where Screwing Timbers Excels
Screwing landscape timbers together is not just a best practice—it’s often the only viable option for certain applications. Here’s where screws truly shine:
Raised Garden Beds
- Holds beds square and level, even when filled with heavy soil and compost.
- Prevents soil pressure from pushing boards apart as the bed settles or during heavy rain.
- Allows disassembly for soil replacement or relocation—a common need in community or school gardens.
Retaining Walls
- Resists bowing and bulging under soil load, maintaining wall integrity through the seasons.
- Meets most building codes for walls over 2 feet tall, which often require mechanical fastening for safety.
- Enables secure multi-tiered construction, supporting creative landscaping and maximizing usable space on sloped lots.
Steps And Stairs
- Prevents movement underfoot, ensuring a safe, stable walking surface.
- Ensures treads and risers stay aligned, maintaining visual appeal and reducing tripping hazards.
- Handles repeated impacts and vibrations from regular use without loosening over time.
Pathway Borders And Edging
- Keeps timbers in place against mowers and foot traffic, reducing ongoing maintenance.
- Prevents trip hazards by minimizing timber movement.
- Supports intricate curves and patterns, allowing for creative, custom designs.
Case Study: Municipal Park Retaining Wall
In a 2020 renovation, the City of Madison, WI, replaced spiked timber retaining walls with screw-fastened assemblies using 8-inch galvanized structural screws. The new walls have shown zero movement or separation after two years of heavy public use and severe weather, reducing annual maintenance costs by 40% ([City of Madison Parks Projects](https://www.cityofmadison.com/parks/projects)).
Additional Real-world Example
A large community garden in Toronto switched from spiked to screwed garden beds in 2018. The result was a dramatic reduction in annual repairs, and the beds remained tightly joined and visually consistent despite freeze-thaw cycles and constant replanting.
Best Practices For Outdoor Durability And Safety
Building with landscape timbers means battling the elements. Following these best practices ensures your screwed assemblies last for decades.
Choose The Right Timber
- Pressure-treated wood is essential for ground contact, as it resists rot, insects, and fungal decay.
- Cedar and redwood offer natural rot resistance but are pricier and may be less readily available in some regions.
- Avoid untreated pine for any structure exposed to moisture, as it will quickly break down and compromise safety.
Use High-quality Hardware
- Hot-dipped galvanized or polymer-coated screws prevent rust and maintain holding power even in damp environments.
- Avoid plain steel screws, which corrode quickly outdoors, leading to staining and premature failure.
- Select screw lengths at least 2.5 times the timber thickness for best hold, ensuring deep penetration and maximum grip.
Protect Against Moisture
- Apply wood preservative or sealant to all cut ends and drilled holes to prevent moisture intrusion—a critical step for extending timber life.
- Install drainage gravel behind retaining walls to minimize water exposure, reducing the risk of frost heave or rot.
- Elevate timbers slightly above soil where possible, using gravel or paver bases to reduce direct contact with damp ground.
Monitor And Maintain
- Inspect screws annually for signs of corrosion or loosening, especially after freeze-thaw cycles or heavy storms.
- Re-tighten or replace hardware as needed to maintain structural integrity.
- Repair cracks or splits with wood filler and sealant, preventing water ingress and further deterioration.
Data Insight: Timber Longevity
According to the US Department of Agriculture, pressure-treated landscape timbers fastened with galvanized screws exhibit a service life of 20–25 years when properly maintained—compared to 10–12 years for spike-only assemblies ([USDA Forest Service Research](https://www.fs.usda.gov/research)).
Expanded Example
A homeowner in Georgia installed a set of landscape steps using pressure-treated timbers and exterior deck screws. By sealing all cut ends and performing annual inspections, the steps remained solid and rot-free for over 15 years, even in a humid, termite-prone environment.
Troubleshooting And Common Mistakes To Avoid
Even experienced builders can make errors when working with large timbers. Avoid these pitfalls for a professional result.
Skipping Pilot Holes
- Risk: Wood splits, screws bind or break during installation, reducing holding power.
- Solution: Always drill pilot holes, especially near ends or in dense wood.
Using The Wrong Screw Type
- Risk: Rust, early failure, poor holding power, and potential for screw heads to snap off.
- Solution: Use galvanized or structural timber screws designed for exterior, pressure-treated wood.
Insufficient Fasteners
- Risk: Timbers shift, structure becomes unstable, increasing the risk of collapse or injury.
- Solution: Space screws every 18–24 inches, use extras at corners and stress points.
Overtightening Screws
- Risk: Compresses wood fibers, weakens joint, or strips screw head, making future adjustments difficult.
- Solution: Tighten screws until snug, avoid excessive force, and use a torque-limited drill setting if available.
Ignoring Drainage
- Risk: Premature rot, frost heave damage, and shifting of entire assemblies.
- Solution: Grade soil away from timbers, add drainage stone or pipes as needed.
Example: Raised Bed Failure
A community garden in Portland used untreated 4x4s and deck screws without pilot holes. Within two years, screws rusted and boards split, leading to collapse. A rebuild with pressure-treated timbers and galvanized screws has remained intact for six seasons.
Additional Mistake
Neglecting to seal cut ends and drill holes led to water infiltration and rot in a backyard wall, requiring early replacement. Proper finishing would have extended the wall’s lifespan by many years.
Cost Analysis: Screwing Vs. Other Fastening Methods
Cost is always a factor in landscaping projects. While screws may have a higher upfront price than spikes, their long-term value is clear.
Material And Labor Comparison
| Project (4’x12′ Raised Bed) | Screws (TimberLok) | Spikes | Adhesive |
|---|---|---|---|
| Material Cost | $40–$70 | $15–$25 | $10–$15 |
| Labor (2 hrs vs. 1.5 hrs) | $60 (DIY) / $120 (pro) | $45 (DIY) / $90 (pro) | $30 (DIY) / $60 (pro) |
| Expected Lifespan | 20+ years | 10–12 years | 5–8 years |
| Annualized Cost | $5–$7/year | $7–$10/year | $10–$15/year |
Value Consideration
- Screws save money long-term by reducing repairs and rebuilds, resulting in lower total cost of ownership.
- Spikes and adhesives may seem cheaper initially but require earlier replacement, increasing lifetime costs.
- Professional installation with screws increases resale value and safety, appealing to future homebuyers or facility managers.
Resource: [home Depot: Types Of Screws](https://www.homedepot.com/c/ab/types-of-screws/9ba683603be9fa5395fab901e5c1a2e)
Additional Cost Insight
A landscaping company in Texas switched to screw-based assembly for all customer projects in 2019. They reported a 60% drop in warranty claims for shifting or failed retaining walls, offsetting the higher material cost within two years.
Environmental And Safety Considerations
Modern landscaping projects must balance performance, environmental impact, and safety—especially when children, pets, or food crops are involved.
Environmental Impact Of Screws
- Galvanized and coated screws have low toxicity and resist leaching, making them safe for use near edible plants or play areas.
- Avoid copper or CCA-treated hardware near edible gardens to prevent potential contamination.
- Recyclable at end of life, unlike some adhesives that may contain non-biodegradable chemicals.
Using screws also reduces the need for chemical adhesives, which can off-gas volatile compounds, especially in warm weather.
Safety Best Practices
- Wear safety glasses when drilling or driving screws to protect against wood chips and metal shards.
- Use gloves when handling treated wood to minimize skin exposure to preservatives.
- Mark screw heads clearly if exposed, or countersink and cover with wood plugs for a smooth, snag-free finish.
Additional Safety Tip
If building for schools or playgrounds, consider using screws with proprietary tamper-resistant heads to prevent vandalism or unauthorized disassembly.
External Resource: [epa: Cca-treated Wood And Children](https://www.epa.gov/ingredients-used-pesticide-products/cca-treated-wood-and-children)
Case Study: School Garden Project
A K-5 school in Seattle replaced old timber beds with new pressure-treated lumber and coated timber screws, following EPA guidelines for safe construction. The result: durable, safe beds free from sharp edges or loose hardware, promoting outdoor learning without health concerns.
Frequently Asked Questions
Can You Use Regular Wood Screws For Landscape Timbers?
Regular wood screws are not recommended for landscape timbers. They often lack the necessary length, strength, and corrosion resistance. Always use galvanized, coated, or structural timber screws specifically rated for outdoor, pressure-treated wood.
How Far Apart Should Screws Be Placed In Landscape Timbers?
For most projects, place screws every 18–24 inches along the length of the timber and always at least 2–3 inches from the ends. Use additional screws at corners and high-stress points for extra stability.
Are There Alternatives To Screwing Landscape Timbers Together?
Yes, alternatives include landscape spikes, rebar, construction adhesive, and metal brackets. However, these methods generally offer less holding power and durability than screws, especially in load-bearing or high-traffic applications.
Do I Need To Pre-drill Holes For Screws In Landscape Timbers?
Pre-drilling pilot holes is strongly recommended, especially with hardwoods or large-diameter screws. This prevents splitting, ensures straight screw placement, and reduces installation effort.
How Long Do Screwed Landscape Timber Structures Last?
When built with pressure-treated wood and galvanized or coated screws, landscape timber structures typically last 20–25 years with proper maintenance. Regular inspection and sealing can extend lifespan even further.
Additional Faq
What Tools Do I Need To Screw Landscape Timbers Together?
At minimum, you’ll need a power drill or impact driver, appropriate drill bits for pilot holes, a socket or driver bit for your screws, a level, and a measuring tape. For large projects or dense wood, a heavy-duty impact driver and high-quality bits are recommended.
Resources And Further Reading
- [Wikipedia: Landscape Timber](https://en.wikipedia.org/wiki/Landscape_timber)
- [Family Handyman: Terraced Garden Beds](https://www.familyhandyman.com/project/how-to-build-a-terraced-garden-bed/)
- [Lowe’s: Build a Raised Garden Bed](https://www.lowes.com/n/how-to/build-a-raised-garden-bed)
Securing landscape timbers with screws is not just possible—it’s the smart choice for anyone seeking strength, durability, and a professional finish in outdoor projects. With the right hardware, preparation, and attention to detail, your timber creations will stand up to the elements and heavy use for decades.
Whether you’re building a backyard oasis or a municipal park feature, screwing landscape timbers together ensures that form, function, and safety go hand in hand. By following the best practices and insights outlined in this guide, you’ll create outdoor structures that last, impress, and protect—all while saving time and money in the long run.