How to Start a Pineapple Plant From a Pineapple Top Easily
Growing your own pineapple plant from a pineapple top is a rewarding and surprisingly simple way to bring a touch of the tropics into your home or garden. Whether you’re an urban gardener with limited space or someone with a sprawling backyard, starting a pineapple from its crown is an accessible project for gardeners of any skill level.
The process not only delivers a beautiful, exotic plant but, with a bit of patience, can also yield a delicious homegrown fruit.
What makes this method so appealing is its sustainability—repurposing the leafy top of a store-bought pineapple, which would otherwise be discarded, into a thriving new plant. It’s a perfect example of low-cost, low-waste gardening that blends eco-friendly principles with horticultural fun.
In this comprehensive guide, you’ll learn every step of the process, from selecting the right pineapple top to nurturing your plant to maturity, troubleshooting common issues, and even harvesting your own fruit.
Key Takeaways
- Pineapple plants can be easily started from the leafy top of a store-bought fruit using only basic materials and care.
- The process involves preparing, rooting, and planting the top, then providing the right conditions for growth.
- It typically takes 18-36 months for a pineapple plant to produce fruit, but the plant itself is attractive and low-maintenance.
- Proper watering, sunlight, and soil are critical to healthy growth and eventual fruiting.
- Common issues such as root rot or pests can be managed with prompt attention and good gardening practices.
- Growing pineapples is a sustainable and cost-effective way to enjoy tropical gardening at home.
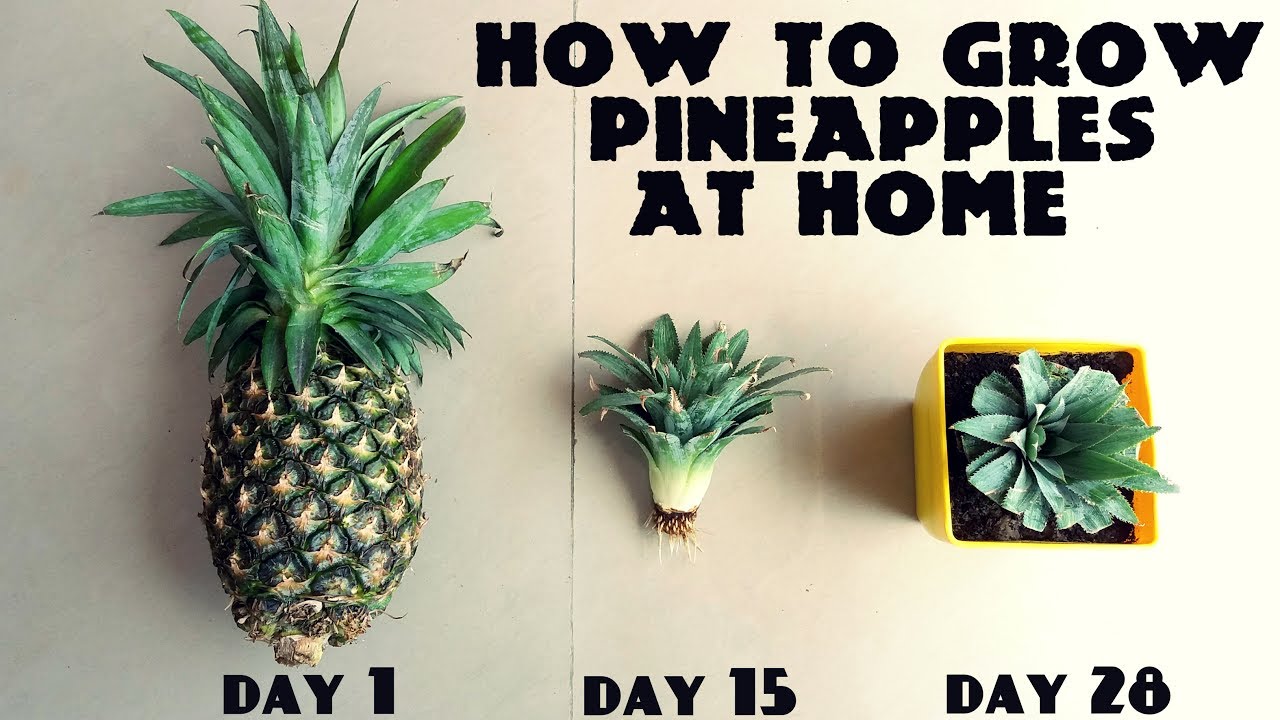
Understanding The Pineapple Plant
Pineapples (Ananas comosus) are tropical plants native to South America and beloved worldwide for their sweet, tangy fruit. Before diving into the practical steps, it’s helpful to understand the plant’s biology and requirements, which will boost your chances of success.
Origins And Characteristics
Pineapples belong to the Bromeliaceae family, a diverse group of plants that also includes popular ornamental bromeliads. What makes bromeliads unique is their ability to absorb water and nutrients both through their roots and directly from the air via specialized leaf structures called trichomes. Pineapples, in particular, have evolved to thrive in nutrient-poor soils, making them well-suited for container culture and less-than-ideal garden conditions.
Unlike most fruit plants, pineapples grow close to the ground and develop a central fruiting stalk from the rosette of leaves. The plant’s adaptability makes it suitable for both indoor pots and outdoor gardens, especially in warm climates. A mature pineapple plant can reach up to 3–5 feet (1–1.
5 meters) in both height and diameter, with its stiff, arching leaves forming an impressive tropical display.
Growth Cycle Overview
The growth cycle of a pineapple plant is distinct and fascinating:
- Vegetative Stage: The plant establishes roots and produces new leaves, gradually increasing its size and foliage density.
- Maturation: Over the next 12–24 months, the plant develops a strong root system and a dense crown of leaves, storing energy for future fruiting.
- Fruiting: A flower stalk emerges from the center, eventually producing a single, composite fruit made up of many individual berries fused together.
- Suckering: After fruiting, the main plant produces side shoots (“suckers” or “pups”) at the base, which can be separated and grown into new plants.
This life cycle not only offers the reward of a homegrown pineapple but also the opportunity to propagate your own pineapple patch for years to come.
Environmental Needs
Pineapples thrive in warm, humid conditions with plenty of sunlight. The optimal temperature range is 68°F–86°F (20°C–30°C). They are sensitive to frost, and exposure to temperatures below 60°F (16°C) can inhibit growth. Prolonged cold can stunt development or even kill the plant, so those in cooler climates should plan to grow pineapples in containers that can be moved indoors during the winter.
Good airflow is also important, as stagnant air can encourage fungal diseases. Pineapples tolerate drought better than excessive moisture, thanks to their xerophytic adaptations. However, overly dry conditions can slow growth and reduce fruit quality.
Real-world Example: Urban Pineapple Success
In Miami, Florida, a balcony gardener started three pineapple tops in shallow pots. Within 18 months, she had robust, spiky plants, and one bore fruit in two years. This showcases the adaptability of pineapples to container culture in urban environments.
The gardener reported that the plants required little attention aside from regular watering and occasional feeding, and they quickly became a conversation piece among neighbors.
How To Select And Prepare The Perfect Pineapple Top
Success starts with choosing the right pineapple top and preparing it for rooting. The quality of your starter material greatly influences your plant’s health and vigor.
Choosing The Right Pineapple
When selecting a pineapple for propagation, look for these characteristics:
- Fresh, green leaves: Avoid tops with brown, wilted, or dry leaves. Freshness is key, as older pineapples may have less viable crowns.
- No signs of rot: The base should be firm, not mushy or moldy. Gently squeeze the base; any give may indicate internal rot.
- Fully intact crown: The leafy top should be undamaged and not trimmed. Avoid fruit with crowns that have been cut off too close to the leaves.
Avoid pineapples with insect damage, significant discoloration, or evidence of chemical treatments. Ideally, choose an organically grown fruit to reduce the risk of pesticide residues, which could potentially interfere with healthy root development.
Pro tip: If you have access to a local farmers’ market, ask the vendor about their pineapples. Locally grown or freshly imported fruits often have more viable crowns for propagation.
Removing The Top
- Twist and pull: Hold the fruit firmly and twist the leafy crown until it separates. This method typically removes the crown with minimal fruit flesh attached, reducing the risk of rot.
- Cut method: Alternatively, slice off the top about half an inch below the leaves, then trim away any remaining fruit flesh. Take care not to cut into the base of the leaves, as this is where new roots will emerge.
Once removed, peel away the lower few layers of small leaves to expose the stem. This step helps roots emerge more easily and reveals the small root buds (called “eyes”) around the base.
Curing The Top
Let the crown dry for 2-3 days in a shaded, ventilated spot. This curing period allows the cut end to callous, reducing the risk of rot once planted. Lay the crown on its side on a paper towel or wire rack to ensure airflow. If the crown is particularly moist or you live in a humid climate, extend the curing period to 3–5 days.
Case Study: Grocery Store Pineapple To Thriving Plant
A gardener in San Diego documented her process on social media, showing how she selected a vibrant pineapple, cured the crown for three days, and ended up with a healthy potted plant that set roots within three weeks. She emphasized the importance of removing all fruit flesh to prevent rot and recommended using a fungicidal powder on the cut end in particularly humid climates.

Rooting Your Pineapple Top: Methods And Best Practices
Rooting is the critical stage where your pineapple top transitions from a discarded crown to a living plant. There are two main methods: water rooting and soil rooting.
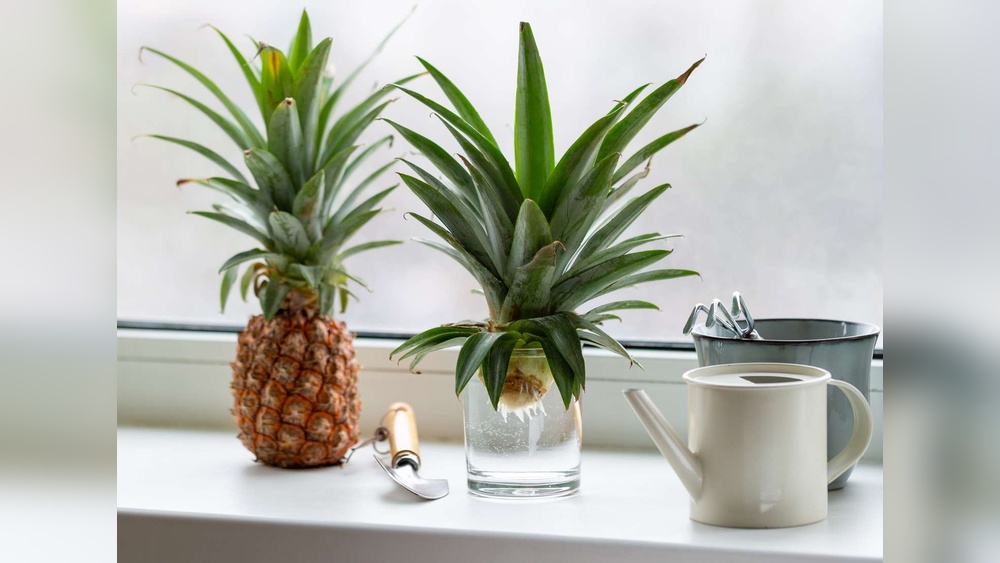
Water Rooting Method
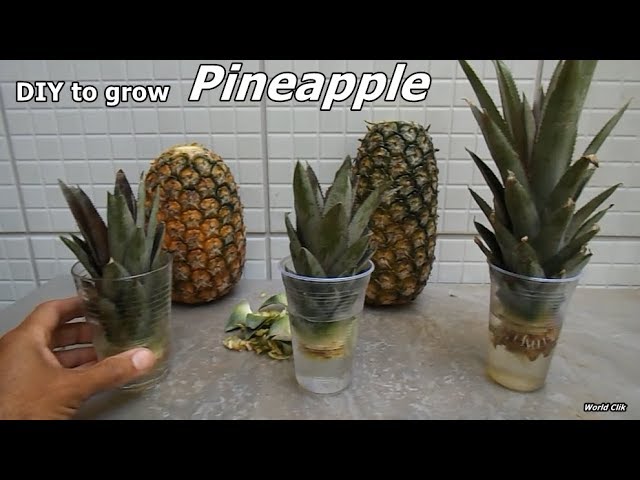
- Place in water: Suspend the cured crown in a glass of water, with the bottom inch submerged and leaves above the rim. Toothpicks can help support the crown if necessary.
- Change water regularly: Replace water every 2-3 days to prevent bacterial growth and ensure oxygenation for the developing roots.
- Bright, indirect sunlight: Position the glass in a warm, sunny spot, but avoid direct midday sun, which can overheat the water and damage the crown.
Roots typically appear within 2-4 weeks. Once roots are 2-3 inches long, the top is ready for planting in soil. Gently rinse the roots before transplanting to remove any decaying matter.
Soil Rooting Method
- Prepare a pot: Fill a 6-inch pot with well-draining potting mix. A mix designed for succulents or cacti works well.
- Plant the crown: Insert the cured top 1-2 inches deep, ensuring it stands upright. Press the soil gently around the base to stabilize the crown.
- Water lightly: Keep soil slightly moist but not soggy. Water with a spray bottle to avoid disturbing the crown.
- Warm environment: Place in a location with bright, indirect light and consistent warmth, ideally above 70°F (21°C).
Soil rooting also yields roots in 2-4 weeks. This method is slightly faster for some gardeners and avoids the shock of transplanting from water to soil. You may notice new leaf growth at the center of the crown as a sign of successful rooting.
Comparison Table: Water Rooting Vs. Soil Rooting
| Method | Success Rate | Rooting Time | Ease for Beginners | Transplant Shock |
|---|---|---|---|---|
| Water Rooting | High | 2-4 weeks | Very Easy | Moderate |
| Soil Rooting | High | 2-4 weeks | Easy | Low |
Troubleshooting Rooting Issues
- No roots after 4 weeks: Check for rot, insufficient warmth, or overly wet conditions. Relocate to a warmer spot if necessary.
- Rotting base: Discard and start again with a fresh top, ensuring proper curing. If using the water method, consider switching to soil for your next attempt.
- Wilting leaves: Reduce direct sunlight and maintain moderate moisture. If the crown is drying out, mist lightly to raise humidity.
Patience is key—some crowns take a little longer to root, especially in cooler or less humid environments.
Real-world Example: Classroom Pineapple Project
A third-grade teacher in Houston used both rooting methods with her students. Water-rooted tops fascinated the class with visible roots, while soil-rooted ones adapted quickly to being potted. Both methods resulted in healthy plants after one month, and the project became a hands-on lesson in plant biology and sustainability.
Planting And Caring For Your Pineapple Plant
Once your pineapple top has developed healthy roots, it’s time to plant it in its permanent home and begin routine care.
Choosing The Right Pot Or Garden Spot
- Container gardening: Use a pot at least 12 inches wide with drainage holes. Larger pots allow more room for root development and increase the likelihood of fruiting.
- In-ground planting: Choose a sunny, well-drained spot if you live in USDA Zones 9-11. For colder regions, keep your plant in a container to bring indoors during winter.
If planting outdoors, elevate the soil bed or use raised beds in areas prone to heavy rainfall to prevent waterlogging.
Potting Mix And Soil Requirements
Pineapples prefer sandy, slightly acidic soil (pH 4.5–6.5). A commercial cactus mix or a blend of potting soil, sand, and perlite works well. Good drainage is essential—pineapples do not tolerate “wet feet.” For extra nutrition, mix in a handful of well-rotted compost or worm castings.
Planting Steps
- Fill the pot or hole with soil mix, leaving space for watering.
- Plant the rooted crown so that the base is level with the soil surface. Avoid burying the leaves.
- Water thoroughly but do not saturate. Initial deep watering helps settle the soil around the roots.
- Place in a spot with 6-8 hours of sunlight daily, such as a south-facing window or a sunny patio.
Mulch with bark chips or pebbles to retain soil moisture and suppress weeds if planting outdoors.
Watering Guidelines
- Frequency: Water when the top inch of soil is dry. In humid climates, you may water once a week or less.
- Amount: Pineapples are drought-tolerant—overwatering is more dangerous than underwatering. Allow soil to dry slightly between waterings.
- Humidity: Misting leaves occasionally can help in dry indoor environments. Pineapples appreciate moderate humidity (40–60%).
If growing in containers, ensure saucers are emptied after watering to avoid standing water.
Fertilizing
Feed your pineapple plant every 2-3 months with a balanced, slow-release fertilizer. Alternatively, use a diluted liquid fertilizer during the growing season. Avoid over-fertilizing, as excess nutrients can damage the roots and cause leaf burn.
For organic gardening, compost tea or fish emulsion are excellent choices. Reduce feeding in the fall and winter when growth slows.
Comparison Table: Indoor Vs. Outdoor Pineapple Care
| Factor | Indoor | Outdoor |
|---|---|---|
| Sunlight | Bright, indirect or filtered | Full sun |
| Temperature | 68–86°F (20–30°C) | 68–86°F (20–30°C) |
| Watering | Less frequent | More frequent in dry spells |
| Pest Risk | Low | Moderate |
Real-world Example: Indoor Pineapple Plant
A home gardener in Seattle kept his pineapple plant on a south-facing windowsill. Despite the city’s cool climate, supplemental grow lights and careful watering resulted in a thriving plant that survived year-round indoors. He noted that rotating the pot every few weeks prevented the plant from leaning toward the light, and a small fan helped maintain airflow and prevent mildew.
Troubleshooting Common Pineapple Plant Problems
Pineapples are generally hardy, but they can face challenges. Early detection and prompt action are key to maintaining a healthy plant.
Root Rot
Root rot is usually caused by overwatering or poorly drained soil. Signs include wilting, yellowing leaves, and a soft base. The affected plant may emit a foul odor, and roots will appear brown or black rather than white.
Solution: Remove the plant, cut away affected roots with sterile scissors, repot in fresh, well-draining soil, and reduce watering frequency. If most roots are lost, propagate healthy pups or try rooting a new crown.
Pests And Diseases
Common pests:
- Mealybugs: Look for white, cottony clusters in leaf joints.
- Spider mites: Tiny, red or brown dots and fine webbing on leaves.
- Scale insects: Brown or tan bumps on leaf surfaces.
Manage pests by:
- Spraying with insecticidal soap or neem oil.
- Wiping leaves with a damp cloth to physically remove pests.
- Introducing natural predators (if outdoors), such as ladybugs for mealybugs.
Fungal diseases like leaf spot can be treated by removing affected leaves and applying a fungicide. Improve air circulation and avoid wetting the leaves to prevent recurrence.
Nutrient Deficiencies
- Yellowing leaves: May indicate nitrogen deficiency. Apply a balanced fertilizer.
- Brown leaf tips: Usually a sign of underwatering or salt buildup in soil. Flush soil with clean water and adjust watering habits.
Magnesium deficiency can cause a reddish tint to older leaves; a small dose of Epsom salts dissolved in water can help.
Environmental Stress
- Cold damage: Brown, mushy leaves after exposure to frost. Move plant indoors or provide frost protection.
- Sunburn: Pale, scorched patches if exposed to intense midday sun. Gradually acclimate plant to brighter light or provide shade in extreme heat.
Case Study: Overcoming Root Rot
A gardener in Atlanta lost her first pineapple plant to root rot after heavy spring rains. By switching to a cactus mix and using a raised container, her next plant thrived and produced fruit in two years. She also elevated her pots on bricks to improve drainage and used a moisture meter to avoid overwatering.
Encouraging Flowering And Fruit Production
Pineapple plants need time—and sometimes a little encouragement—to bloom and bear fruit.
Natural Fruiting Timeline
- Most plants flower after 18-30 months of growth, though some may take up to three years.
- Fruiting depends on size and environmental conditions, not just age. A healthy, robust plant will flower sooner than one that is stressed or undernourished.
Tricks To Induce Flowering
If your mature plant shows no sign of flowering after two years, try these methods:
- Ethylene treatment: Place a ripe apple in the plant’s center and cover with a plastic bag for 5-7 days. Ethylene gas, naturally released by apples and bananas, promotes flowering by signaling the plant that it’s time to reproduce.
- Stress method: Reduce watering slightly for 2-3 weeks (but do not let the plant wilt). This mild stress can also trigger flowering in a mature plant.
Some gardeners use calcium carbide pellets (available at some garden centers), which release acetylene gas when mixed with water, to induce flowering. However, this method requires careful handling and is not recommended for beginners.
Fruit Development
Once flowering begins, a small red or purple flower stalk appears. The fruit will develop over the next 5-7 months, gradually swelling and turning from green to golden yellow. During this time, maintain regular care and avoid disturbing the plant, as fruit development is sensitive to stress.
Harvesting
Harvest when the pineapple turns golden yellow and emits a sweet aroma. Use a sharp knife to cut the fruit, leaving some stem attached. Pineapples do not ripen further after harvesting, so wait until the color and scent indicate full ripeness.
Table: Timeline From Planting To Harvest
| Stage | Time Frame | Key Actions |
|---|---|---|
| Rooting | 2-4 weeks | Water/soil rooting, proper light |
| Establishment | 2-4 months | Routine watering, fertilizing |
| Vegetative Growth | 12-24 months | Sunlight, feeding, pest control |
| Flowering | After 18-30 months | Can use ethylene induction |
| Fruit Development | 5-7 months | Continue care, watch for ripeness |
Real-world Example: Ethylene-induced Flowering
A pineapple hobbyist in Hawaii used the apple trick to induce flowering in his 2-year-old plant. Within six weeks, the plant developed a flower stalk, eventually producing a sweet, homegrown pineapple. He shared that patience and consistent care were critical, and the reward was well worth the wait.
Propagating More Pineapple Plants From Offshoots
Once your pineapple plant fruits, it doesn’t have to be the end of the journey. Pineapples produce side shoots (“suckers” or “pups”) that can be propagated to grow even more plants.
Identifying Offshoots
- Suckers: Grow at the base of the plant, near the soil line. These are the most common type of offshoot and are typically the first to appear.
- Slips: Develop just below the fruit, emerging from the stem. Slips are often smaller but root just as readily.
- Ratoons: Arise after fruit is harvested, growing from the root system.
Offshoots can appear while the main fruit is still developing, allowing you to multiply your pineapple collection without waiting for the cycle to end.
Propagation Steps
- Wait until pups are 8-12 inches tall. This ensures they have enough stored energy and root buds for successful propagation.
- Gently twist or cut off the offshoot, taking care not to damage the parent plant or the pup.
- Allow the cut end to dry for 1-2 days to prevent rot.
- Root in water or soil, following the same procedure as for a crown. Pups tend to root faster and more vigorously than crowns.
Advantages Of Propagating Offshoots
- Faster fruiting: Offshoots mature more quickly than crowns, often fruiting in 12–18 months.
- Higher success rate: Pups are less prone to rot and transplant shock due to their established root systems.
- Genetic consistency: The new plants are clones of the parent, preserving desirable fruit traits.
Case Study: Multiplying A Pineapple Patch
A community garden in Orlando started with three pineapple crowns. After each plant fruited, gardeners propagated 10 pups, expanding their patch to 30 plants in just three years, with staggered fruit production. This not only increased their harvests but also provided a lush, tropical border that required minimal maintenance.
Pineapple Plant Care Throughout The Seasons
Maintaining your pineapple plant’s health is a year-round commitment, especially if you live in a region with pronounced seasons.
Spring And Summer Care
- Increase watering as temperatures rise, but always allow the soil to dry between waterings.
- Feed with balanced fertilizer every 2-3 months to support active growth.
- Watch for pests as growth accelerates; inspect leaves regularly.
Fall And Winter Care
- Reduce watering as growth slows. Overwatering in cooler months is a common cause of root rot.
- Move containers indoors if frost threatens, ideally before nighttime temperatures fall below 60°F (16°C).
- Supplement with grow lights if sunlight is limited, aiming for at least 6 hours of light per day.
Pruning And Clean-up
- Remove dead or yellowing leaves to prevent disease and maintain appearance.
- Trim any spent flower stalks after fruit harvest to direct energy into new growth or pups.
Long-term Maintenance
- Repot every 2-3 years or when the plant outgrows its container to refresh the soil and encourage vigorous growth.
- Refresh soil periodically to prevent nutrient depletion and compaction.
Table: Seasonal Pineapple Care Checklist
| Season | Action | Notes |
|---|---|---|
| Spring | Resume feeding, increase water | Watch for new growth |
| Summer | Regular watering, pest monitoring | Ensure full sun |
| Fall | Reduce watering, prep for cool temps | Bring indoors if needed |
| Winter | Minimal watering, grow lights | Avoid drafts and cold windows |
Real-world Example: Year-round Balcony Pineapple
A Toronto gardener grew her pineapple plant in a pot outdoors from May to September, then brought it inside for winter. Supplemental lighting and careful watering helped the plant survive several winters, eventually flowering in its third year. She credited her success to keeping the plant near a radiator and misting the leaves to maintain humidity during the dry indoor heating season.
Frequently Asked Questions
How Long Does It Take For A Pineapple Plant To Bear Fruit?
Most homegrown pineapple plants take 18-36 months to flower and produce fruit. The timeline depends on factors such as temperature, sunlight, and the plant’s overall health. Offshoots (pups) often fruit faster than crowns, sometimes within 12–18 months under optimal conditions.
Can I Grow A Pineapple Plant Indoors Year-round?
Yes, you can grow pineapples indoors if you provide adequate sunlight (ideally 6-8 hours/day) or supplemental grow lights. Keep the plant warm (above 68°F) and water sparingly during winter. Place your plant near a bright window, and rotate the pot to ensure even growth.
What Should I Do If My Pineapple Top Starts To Rot Before Rooting?
If the base turns mushy or smells foul, discard it and start again with a new, properly cured top. Ensure you allow the cut end to dry and avoid excess moisture during rooting. For more details, see the guide from Royal Horticultural Society.
Are There Any Common Pests That Affect Pineapple Plants?
Yes, indoor and outdoor plants can attract mealybugs, spider mites, and scale insects. These can be managed with insecticidal soap or by wiping leaves. Outdoor plants are more susceptible. For organic pest control tips, check Gardener’s Supply Company.
Is It Possible To Speed Up The Fruiting Process?
You can sometimes encourage earlier fruiting in mature plants by using the ethylene induction method (covering the plant with a ripe apple for a week). This tricks the plant into flowering. For the science behind this, visit Wikipedia and University of Florida IFAS Extension.
Growing a pineapple plant from a pineapple top is a delightful way to experience tropical gardening at home. With patience, attention to detail, and a bit of creativity, you can nurture a humble fruit top into an eye-catching, productive plant. The journey is filled with learning and satisfaction, culminating in the sweet reward of your own homegrown pineapple. For further reading and advanced tips, explore resources from the Better Homes & Gardens and Penn State Extension. Happy planting!