How To Grow Hyssop Plants: Complete Gardening Guide
Hyssop is a hardy perennial herb known for its fragrant leaves and spikes of blue, purple, or white flowers. It thrives in sunny spots and well-drained soil. Proper planting, watering, and occasional pruning will ensure a healthy, productive plant. Hyssop is valued for both its ornamental appeal and its traditional medicinal uses.

As an Amazon Associate I earn from qualifying purchases.
For the broader gardening context, How Many Grape Plants To Grow For The Backyard Gardener gives readers a useful next step on the same topic.
For the broader gardening context, How Far To Space Broccoli Plants In High Intensity Gardening gives readers a useful next step on the same topic.
For a related plant-care question, How To Graft Two Plants Using Cleft Grafting (Step-By-Step) gives readers a more focused follow-up.
For the broader gardening context, How To Grow Marigolds From Seeds When Gardening Is Your Passion gives readers a useful next step on the same topic.

What Is Hyssop?
Hyssop is a small, bushy plant. Its scientific name is Hyssopus officinalis. It is part of the mint family.
This plant is native to the Mediterranean region. It has been used for centuries. People use it in cooking and for traditional remedies.
Hyssop has a strong, slightly bitter, minty aroma.
The plant grows to about 1 to 2 feet tall. It has narrow, dark green leaves. These leaves are often fuzzy.
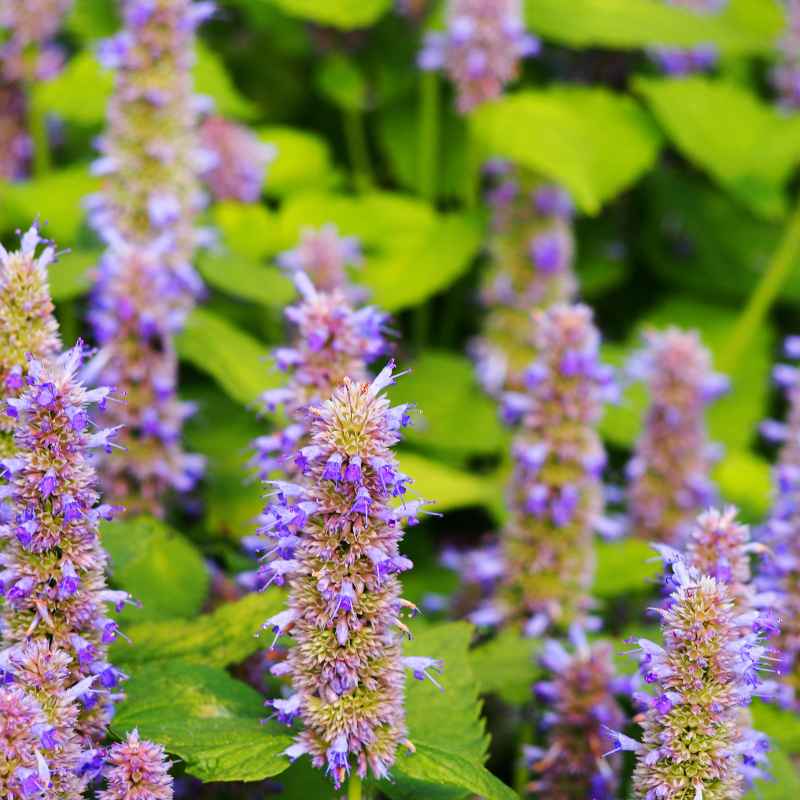
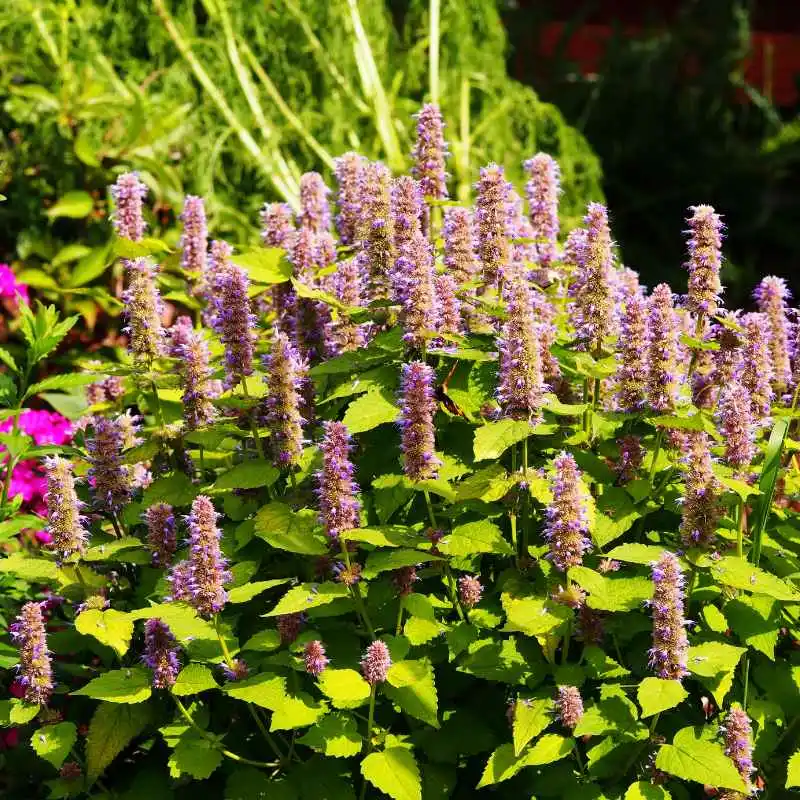
In summer, hyssop produces pretty flower spikes. These spikes bloom with small flowers. The flowers are usually blue or purple.
Sometimes they can be pink or white. Bees and butterflies love hyssop flowers.
Hyssop likes warm weather. It can tolerate some dry conditions once established. It is a perennial.
This means it comes back year after year. It is a tough plant. But it needs the right start to do its best.
Understanding its needs helps a lot.

Why Grow Hyssop?
There are many good reasons to grow hyssop. For one, it’s beautiful. The flowers add a nice splash of color to your garden.
It attracts helpful insects like bees. This is great for pollination. Hyssop also has a lovely scent.
It can make your garden smell fresh.
Beyond its looks, hyssop has a long history. It’s mentioned in ancient texts. People have used it for its health properties for ages.
It’s often used in teas. Some people use it in cooking. It can add a unique flavor to dishes.
Having fresh hyssop on hand is very convenient.
It’s also quite easy to care for once it’s growing well. This makes it a good choice for beginner gardeners. It doesn’t demand constant attention.
With a little bit of know-how, you can have a thriving hyssop plant. It’s a plant with many benefits.
Starting Your Hyssop Journey
Getting started with hyssop is simple. You can start it from seeds or buy small plants. Seeds are a cost-effective way to grow many plants.
Small plants offer a quicker start. Both methods work well.
When planting seeds, choose a sunny spot. Hyssop needs at least 6 hours of sun each day. Good soil drainage is key.
Hyssop hates wet feet. If your soil is heavy, add sand or compost. This will help it drain better.
You can sow seeds directly outside in spring. Or you can start them indoors a few weeks before the last frost.
If you buy small plants, they are usually ready to go. Gently remove them from their pots. Loosen any tightly bound roots.
Plant them at the same depth they were in the pot. Give them enough space. About 12 to 18 inches apart is good.
This allows them to spread out.
Water them gently after planting. This helps the soil settle around the roots. Avoid overwatering.
The soil should feel moist, not soggy. Hyssop likes it on the drier side. This is a common mistake people make.
Too much water can cause root rot. So, pay close attention to that.
Planting Hyssop Seeds
Planting hyssop from seeds is quite straightforward. You can do this in the spring. Choose a spot that gets plenty of sunlight.
Hyssop really loves the sun. The soil needs to drain well. If you have clay soil, mix in some compost or sand.
This improves drainage.
You can sow seeds directly in the ground. Do this after the last frost. Or start them indoors about 4-6 weeks before the last frost.
For indoor starting, use small pots or seed trays. Fill them with a seed-starting mix. Plant the seeds about 1/8 inch deep.
Water gently.
Keep the soil moist but not wet. Once seedlings have a few sets of leaves, they can be transplanted. Harden them off first.
This means gradually getting them used to outdoor conditions. Put them outside for a few hours each day for a week. Then plant them in their final sunny spot.
Space the seedlings about 12-18 inches apart. This gives them room to grow. Hyssop can become a bushy plant.
If you notice the seeds are not germinating well, it could be the soil or temperature. Hyssop seeds need warmth to sprout. Patience is key here.
Hyssop Seed Starting Tips
Indoor Start: Begin 4-6 weeks before last frost.
Seed Depth: Sow seeds about 1/8 inch deep.
Soil Moisture: Keep soil consistently moist but not soggy.
Temperature: Hyssop seeds need warmth to germinate.
Light: Provide bright light once seedlings emerge.
Hardening Off: Gradually expose indoor plants to outdoor weather.
Caring for Your Hyssop Plants
Once your hyssop is planted, care is mostly about giving it what it likes. Sunlight is a must. Hyssop will grow in partial shade.
But it will be less bushy and have fewer flowers. Aim for a spot that gets sun most of the day.
Watering is important, but less is often more. Water deeply when the top inch of soil feels dry. Allow the soil to dry out slightly between waterings.
This is especially true for established plants. Young plants might need a bit more water. But always avoid waterlogged soil.
Feeding hyssop is usually not necessary. It’s a hardy herb. It doesn’t need a lot of fertilizer.
If your soil is very poor, you can add a little compost in the spring. Too much fertilizer can make the plant grow leafy. It might reduce the flavor of the leaves and flowers.
Pruning helps keep hyssop tidy. It also encourages new growth. After the plant flowers, you can trim it back.
Cut stems back by about a third. This prevents it from looking leggy. You can also prune in early spring.
This removes any dead or damaged branches.
Hyssop is generally pest-free. The strong scent of the leaves can deter some insects. Slugs and snails might be an occasional problem.
You can deal with them by hand-picking. Or use a slug bait if needed. Deer usually leave hyssop alone.
Soil and Location Matters
Hyssop is quite particular about its soil. It absolutely needs good drainage. This is non-negotiable.
If your garden soil holds too much water, hyssop will likely struggle. It can get root rot. This is a common reason why plants fail.
Sandy soil or loamy soil is ideal. If you have heavy clay soil, you must amend it. Mixing in plenty of compost will help.
You can also add perlite or coarse sand. This improves the soil structure. It allows water to flow through freely.
Raised beds are also an excellent option for hyssop.
The location needs to be sunny. Hyssop thrives in full sun. That means at least six hours of direct sunlight per day.
More sun is even better. It will flower more and have a stronger scent in full sun. A south-facing location is often perfect in many climates.
Avoid planting hyssop in areas that get waterlogged. This includes low-lying spots or areas where water pools after rain. Check your chosen spot after a good rain.
Does water sit there for a long time? If so, find a different spot or improve the drainage significantly. A happy hyssop plant starts with happy roots.
Ideal Hyssop Conditions
Sunlight: Full sun (6+ hours daily).
Soil Type: Well-drained, sandy or loamy.
Soil pH: Slightly alkaline to neutral (6.0-7.0).
Watering: Allow soil to dry slightly between waterings.
Fertilizer: Minimal to none needed.
Air Circulation: Good air flow helps prevent fungal issues.
Understanding Hyssop’s Water Needs
Watering hyssop can feel like a balancing act. People often overwater herbs. Hyssop is one of those that truly dislikes being too wet.
It’s better to underwater it slightly than to overwater.
When you water, water thoroughly. This means soaking the root zone. But then let the soil dry out before watering again.
How often is “again”? It depends on your climate. It depends on your soil type.
It depends on the weather. Feel the soil with your finger.
If the top inch or two feels dry, it’s time to water. In hot, dry weather, this might be every week or so. In cooler, more humid weather, it could be every two or three weeks.
Established plants are more drought-tolerant than young ones.
Signs of overwatering include yellowing leaves. The plant might look generally weak. The base of the stem can become mushy.
Signs of underwatering are drooping leaves and slow growth. But be careful not to jump to watering if the soil is already moist. Always check the soil moisture first.
Container-grown hyssop will dry out faster. Check these plants more often. They might need watering every few days in summer.
Ensure pots have drainage holes. This is crucial for container plants.
Pest and Disease Management
Hyssop is generally a very healthy and robust plant. It doesn’t attract many pests. Its strong scent actually helps to keep some unwanted visitors away.
This is one of its many advantages.
However, sometimes you might see a few common garden nuisances. Aphids can occasionally be found on new growth. They are small, soft-bodied insects.
They feed on plant sap. If you find them, a strong spray of water can often dislodge them. You can also use insecticidal soap.
Apply it according to the product directions.
Slugs and snails can be a problem, especially in damp conditions. They like to nibble on the leaves. You can pick them off by hand.
This is best done in the early morning or evening. Beer traps can also work. Place a shallow dish of beer near the plants.
The most common issue hyssop faces is root rot. This is almost always due to overwatering or poor drainage. It’s not a pest or disease you treat with sprays.
It’s about fixing the growing conditions. Ensure the soil drains well. Avoid letting the plant sit in water.
Fungal diseases are rare if the plant has good air circulation. Pruning can help with this. Don’t plant hyssop too close together.
Good airflow around the plant is beneficial. If you see any signs of disease, remove affected parts promptly.
Pruning and Harvesting Hyssop
Pruning hyssop is important for its health and appearance. It also gives you more to harvest. You can prune it in spring.
Remove any winter damage. Trim back any straggly or dead stems. This encourages new growth from the base.
The main pruning or harvesting time is usually in the summer. When the plant is in full bloom, cut back the flowering stems. You can cut them back by about one-third to one-half.
This encourages the plant to produce more flowers. It also keeps the plant compact and prevents it from becoming too woody.
For harvesting leaves, you can do this anytime. Pinch off small sprigs as you need them. For a larger harvest, cut the stems.
It’s best to harvest in the morning. After the dew has dried. This is when the plant’s essential oils are most concentrated.
To dry hyssop, gather bunches of stems. Tie them together with string. Hang them upside down in a cool, dark, well-ventilated place.
They should dry within a week or two. Once dry, strip the leaves from the stems. Store them in airtight containers.
You can also use fresh hyssop. Chop the leaves finely. Add them to salads, soups, or stews.
It has a strong flavor. Use it sparingly at first. Fresh leaves are best used soon after harvesting.
Dried leaves retain their flavor for a long time.
Harvesting and Drying Hyssop
Best Time to Harvest: Morning, after dew dries.
Method for Drying: Hang upside down in a cool, dark, airy place.
Storage: Store dried leaves in airtight containers.
Fresh Use: Add chopped fresh leaves to dishes.
Flavor Profile: Strong, slightly bitter, minty.
Amount to Use: Start with small amounts due to strong flavor.
Hyssop in the Garden and Home
Hyssop is more than just an herb. It’s a versatile plant for your garden. It looks lovely planted in borders.
It’s also great in herb gardens. Because it attracts bees and butterflies, it’s a welcome addition to any pollinator garden. Its upright flower spikes add structure.
It pairs well with other drought-tolerant herbs. Think of rosemary, thyme, or lavender. They all have similar needs.
This makes planting and care simpler. You can grow hyssop in containers too. This is perfect for small spaces or if you have challenging soil.
In your home, dried hyssop has many uses. As mentioned, it can be used in teas. Steep a teaspoon of dried leaves in hot water.
It’s sometimes used for coughs and colds. This is a traditional use. Always consult a healthcare professional before using herbs for medicinal purposes.
Hyssop can also be used in cooking. Its flavor is strong. A little goes a long way.
It’s often used in Mediterranean cooking. It can add depth to meat dishes or bean soups. Some people use it in liqueurs or spirits.
Its history is rich with such uses.
The scent of hyssop is pleasant. You can dry bunches of it and place them around your home. It can act as a natural air freshener.
The essential oils from hyssop have a strong, clean aroma. It’s a plant that offers benefits both inside and outside your home.
When is Hyssop Overgrown?
Hyssop is a plant that can become a bit wild if left unchecked. Overgrown hyssop might look leggy. The stems can become bare at the bottom.
The flowers might be less profuse. It can also spread outwards more than you might want.
A sign of overgrowth is when the plant loses its shape. It may flop over. The center of the plant can become woody.
This reduces air circulation. It can make the plant more prone to issues. Overgrown plants are often less productive in terms of flowers and flavor.
The best time to address overgrowth is through regular pruning. As we discussed, cutting back after flowering helps. A spring pruning also keeps it in check.
Don’t be afraid to cut hyssop back hard. It will respond with new growth.
If your hyssop has become very woody and old, you might consider replacing it. Hyssop plants are generally long-lived. But after several years, they can become less vigorous.
They might not bloom as well. You can take cuttings from younger, healthier plants to start new ones.
Don’t confuse an overgrown plant with a struggling one. An overgrown plant is simply too large. A struggling plant might be yellowing, wilting, or showing signs of pests.
If it’s overgrown, it’s usually a sign of good health. It just needs a good trim. Or it might be time to rejuvenate your planting.
Hyssop for Beginners: Key Takeaways
If you’re new to growing herbs, hyssop is a great choice. Here are the most important things to remember. These tips will help you succeed.
They focus on the plant’s basic needs.
Sunlight: Hyssop needs a lot of sun. Pick the sunniest spot you have. At least six hours daily is a good rule.
More sun means a happier plant.
Drainage: This is critical. Hyssop hates wet soil. If your soil is heavy, improve it with compost or sand.
Or grow it in a raised bed or pot.
Watering: Water when the soil is dry. Not on a schedule. Feel the soil.
Let it dry out between waterings.
Pruning: Cut it back after it flowers. This keeps it tidy. It also encourages more blooms.
A spring prune is also helpful.
Fertilizer: You probably won’t need any. Hyssop is hardy. It doesn’t need much to thrive.
Too much can be harmful.
By following these simple guidelines, you can enjoy your hyssop plant. It’s a plant that rewards you with beauty and fragrance. It offers traditional uses too.
Start with these basics, and you’ll be well on your way.
Quick Hyssop Checklist for Beginners
- Sun: Full sun required.
- Soil: Excellent drainage is a must.
- Water: Water only when soil is dry to the touch.
- Pruning: Prune after flowering to encourage new growth.
- Fertilizer: Avoid if possible; too much can harm the plant.
- Pests: Generally pest-resistant.
Growing Hyssop in Different Climates
Hyssop is a hardy plant. It grows well in many different climates. It is generally considered a Zone 3 to Zone 9 plant.
This means it can survive quite cold winters in some areas. It also tolerates heat well in warmer regions.
In colder climates (Zones 3-5), hyssop will die back to the ground in winter. But the roots are hardy. It will regrow in spring.
Make sure the soil drains well, especially in areas with winter moisture. This helps prevent the roots from freezing and rotting.
In warmer climates (Zones 7-9), hyssop is often evergreen. It might continue to grow slowly through winter. It handles heat quite well.
But it still needs that good drainage. In very hot, humid climates, ensure there is good air circulation. This can help prevent fungal issues.
Coastal areas can be good for hyssop. It’s fairly salt-tolerant. But remember the drainage rule.
Sandy coastal soils are often ideal. In arid regions, hyssop will do well once established. It’s quite drought-tolerant.
But you may need to water more frequently during extreme dry spells.
The key to success in any climate is mimicking its native environment. Think sunny, dry, and well-drained. Adapt your watering and soil preparation to suit your local conditions.
With a little attention, hyssop can thrive almost anywhere.
Hyssop’s Traditional Uses and Benefits
Hyssop has a long and storied past. For centuries, it has been used for various purposes. People in ancient Greece and Rome valued it.
It’s mentioned in the Bible. Its traditional uses span health, culinary, and even spiritual practices.
Medicinally, hyssop was often used for respiratory issues. It was made into teas or syrups. People believed it helped with coughs, colds, and sore throats.
It was thought to have expectorant properties. This means it might help loosen mucus. It was also used for digestive complaints.
In cooking, hyssop adds a unique flavor. It’s a bit pungent. It’s often used with savory dishes.
Think of stews, meat roasts, or bean dishes. It can be part of a bouquet garni. Its strong taste means it’s best used in moderation.
It’s also used in some liqueurs.
Spiritually, hyssop was used for purification. It was part of cleansing rituals. This is why it’s mentioned in religious texts.
Its fresh, clean scent was likely associated with purity.
Modern herbalists still recognize hyssop. However, it’s important to note that information about traditional herbal remedies is not a substitute for medical advice. Always consult with a healthcare provider.
Especially if you have health concerns or are considering using herbs for medical purposes.
The essential oil of hyssop is also used. It has a strong aroma. It’s used in aromatherapy and perfumery.
But it must be used with extreme caution. It can be potent. It is not recommended for internal use in its concentrated oil form.
The whole herb in tea is generally safer for common uses.
Can Hyssop Be Grown Indoors?
Growing hyssop indoors is possible. But it requires careful attention to its needs. Hyssop is a sun-loving plant.
This is its biggest challenge indoors. Most homes don’t get enough direct sunlight.
You will need a very sunny window. A south-facing window is best. Even then, supplemental grow lights might be necessary.
Especially during winter months. The plant needs at least 6 hours of bright light daily. More is better.
Use a well-draining potting mix. A mix designed for herbs or cacti is a good choice. Ensure the pot has drainage holes.
This is crucial for indoor plants. Hyssop can easily get root rot if its roots sit in water.
Watering is key. Let the soil dry out between waterings. Check the soil moisture with your finger.
Don’t water on a strict schedule. Indoor plants often need less water than outdoor plants. Overwatering is a common mistake indoors.
Hyssop doesn’t need a lot of fertilizer. A weak, balanced liquid fertilizer applied once or twice during the growing season is usually enough. Too much will make it leggy.
Pruning is still important indoors. It helps keep the plant compact. It encourages bushier growth.
Pinch back the tips of new shoots. This will make the plant fuller.
While you can grow hyssop indoors, it often performs best outdoors. It will likely be more vigorous. It will produce more flowers and scent.
But if you want to try, follow these tips. You might be able to enjoy fresh hyssop year-round.
Hyssop Indoors: Success Factors
- Light: Brightest possible window; consider grow lights.
- Pot: Must have drainage holes.
- Soil: Fast-draining potting mix.
- Water: Allow soil to dry out between waterings.
- Fertilizer: Use sparingly, only during active growth.
- Pruning: Regular pinching promotes bushiness.
Hyssop Varieties to Consider
While Hyssopus officinalis is the most common type, there are some variations. These can offer slightly different appearances or flavors. But the basic growing needs remain the same.
Common Hyssop (Hyssopus officinalis): This is the standard. It has blue flowers typically. It’s widely grown for culinary and medicinal uses.
It’s the variety most people refer to.
White Hyssop (Hyssopus officinalis ‘Albus’): This is a cultivar with pure white flowers. It offers a different visual appeal. It has the same fragrant leaves and uses as the common hyssop.
Pink Hyssop (Hyssopus officinalis ‘Roseus’): As the name suggests, this variety has soft pink flowers. It’s a pretty alternative for those who prefer pink hues.
‘Blue Cascade’ Hyssop: This is a more vigorous growing variety. It often has a slightly more cascading habit. It produces abundant blue flowers.
‘Winter Hyssop’ or ‘Mint Hyssop’ (Agastache species): While often called hyssop, these are a different genus. They are related and have similar aromatic qualities. But they have different growing needs and flower shapes.
For example, Agastache foeniculum (Anise Hyssop) is very popular for its anise scent and edible flowers.
When choosing, consider the color you prefer. Also, think about the space you have. Most Hyssopus officinalis varieties grow to a similar size.
If you want something slightly different, look into the named cultivars.
The essential oils and chemical makeup can vary slightly between types. But for general home gardening, the differences are minor. Stick to Hyssopus officinalis for the classic experience.
It’s reliable and widely available.
The Importance of Good Air Circulation
Good air circulation is vital for healthy plants. This is especially true for herbs like hyssop. Hyssop thrives in sunny, dry conditions.
It doesn’t like humidity or stagnant air.
When air moves around the plant, it helps in several ways. It prevents moisture from lingering on the leaves. This reduces the risk of fungal diseases.
Fungi love damp, still conditions. Good airflow dries off dew and rain quickly.
It also helps regulate temperature. It can prevent the plant from getting too hot. Especially during summer.
It helps keep the leaves healthier. Healthier leaves mean a healthier plant overall.
How do you ensure good air circulation? Plant hyssop with enough space between plants. Don’t overcrowd your garden.
Give each plant room to grow. Ensure your soil drains well. Wet soil can lead to problems that affect the entire plant.
If you’re growing hyssop in pots, make sure they aren’t crowded together. If you have them indoors, ensure they aren’t packed tightly. A small fan can help if your indoor space is stuffy.
Outdoor plants benefit from being in an open area, not tucked away in a dense hedge.
Pruning also contributes to air circulation. By removing dense growth, you open up the plant. This allows air to move through the center.
It’s another reason why regular pruning is so beneficial for hyssop.
Hyssop in Companion Planting
Hyssop can be a good companion plant in the garden. Its strong scent can help deter some pests. This can protect other nearby plants.
It’s often planted near cabbage and cauliflower. It’s said to repel the cabbage moth. It might also deter the carrot rust fly.
It’s a great addition to an herb garden. It grows well with other Mediterranean herbs. Think of thyme, rosemary, sage, and lavender.
These plants often share similar needs for sun and drainage. This makes them easy to care for together.
Hyssop also attracts beneficial insects. Bees and butterflies are drawn to its flowers. These pollinators are essential for many fruiting plants.
Planting hyssop can help boost pollination in your garden. This means better yields for your vegetables and fruits.
Avoid planting hyssop too close to radishes. Some sources suggest it can stunt their growth. But overall, its benefits as a companion plant are widely recognized.
Consider its height. Hyssop grows to about 1-2 feet. It has an upright habit.
This makes it suitable for the middle of a garden bed. Or at the front of a border. It won’t shade out smaller plants too much.
When planning your garden, think about what your other plants need. If they need similar conditions (sun, good drainage), hyssop is a natural fit. It’s a plant that gives back to the garden ecosystem.
It helps other plants thrive.
When to Worry About Your Hyssop
Hyssop is generally a very forgiving plant. But there are times when you might need to be concerned. Most issues stem from incorrect growing conditions.
Especially related to water.
Yellowing Leaves: This is often a sign of overwatering. Check the soil moisture. Is it constantly soggy?
If so, reduce watering. Ensure excellent drainage. If the soil is dry and the leaves are yellow, it could be a nutrient deficiency.
But this is less common with hyssop.
Wilting: Wilting can be a sign of underwatering or overwatering. Again, feel the soil. If it’s bone dry, water deeply.
If it’s wet and the plant is wilting, it’s likely root rot. The roots are damaged and can’t take up water.
Mushy Stems or Base: This is a serious sign of root rot. The plant is likely too wet. It might be hard to save at this stage.
You may need to remove the plant. And amend the soil before planting something else. Or try a new pot with fresh, well-draining soil.
Lack of Flowers: If your hyssop isn’t flowering, it might not be getting enough sun. Or it could be too old and woody. Pruning it back hard might help.
For older plants, consider replacing them.
Pests like Aphids: While uncommon, a heavy infestation could weaken the plant. Address them promptly with water spray or insecticidal soap. Usually, hyssop can handle a few pests without major issues.
The most crucial check is always the soil. Hyssop’s health is directly tied to its root environment. If the roots are happy and healthy, the plant will usually thrive.
Can Hyssop Be Propagated?
Yes, hyssop can be propagated. This is a great way to get more plants. Or to replace older plants.
The easiest methods are from cuttings or by division.
From Cuttings: Take cuttings from healthy, non-flowering stems. Do this in late spring or early summer. Cut stems about 4-6 inches long.
Remove the lower leaves. You can dip the cut end in rooting hormone. This helps encourage root growth.
Plant the cuttings in a pot filled with a well-draining potting mix. Keep the soil moist. Place the pot in a bright location, but out of direct sun.
Roots should form in a few weeks.
By Division: Hyssop plants can be divided. This is best done in early spring. Before new growth starts.
Dig up the entire plant. Carefully separate the root ball into smaller sections. Make sure each section has roots and some shoots.
Replant the divisions immediately. Water them well.
Hyssop can also be grown from seed, as we discussed earlier. This is a good method if you want many plants. Or if you are starting from scratch.
But cuttings and divisions often produce plants that are true to the parent plant. This is useful if you have a specific variety.
When propagating, always use clean tools. This prevents the spread of diseases. And always ensure good drainage for any new plantings.
Propagating is a rewarding part of gardening. It allows you to expand your collection of herbs. And share them with friends.
Quick Fixes for Common Hyssop Problems
Sometimes, your hyssop might show a minor issue. Here are quick ways to address them. These are simple solutions for common, small problems.
Problem: Leggy Growth
Fix: Prune back hard. Cut the stems by half. This encourages bushier growth.
Ensure it’s getting enough sun.
Problem: Yellow Leaves (Soil is Wet)
Fix: Reduce watering. Improve soil drainage. Do not let it sit in water.
Problem: Wilting (Soil is Dry)
Fix: Water deeply. Check the soil moisture first.
Problem: Aphids on New Growth
Fix: Spray with a strong jet of water. Or use insecticidal soap. Apply as directed.
Problem: Plant Looks Unhealthy After Winter
Fix: Trim away any dead or damaged stems. Wait for spring growth. If it doesn’t recover, the roots may have rotted.
These quick fixes assume the plant is generally healthy. If you have persistent or severe problems, it’s worth investigating the core growing conditions more deeply. But for minor hiccups, these steps should help.
Frequently Asked Questions About Growing Hyssop
What is the best time to plant hyssop seeds?
The best time to plant hyssop seeds is in early spring. You can sow them directly into the ground after the last frost. Or start them indoors about 4-6 weeks before the last frost date.
How often should I water hyssop?
Water hyssop when the top inch or two of soil feels dry. Allow the soil to dry out slightly between waterings. Avoid overwatering, as hyssop dislikes wet feet and can develop root rot.
Does hyssop need fertilizer?
Hyssop is a hardy herb and usually doesn’t need much fertilizer. If your soil is very poor, you can add a little compost in the spring. Too much fertilizer can lead to leggy growth and reduce the herb’s flavor.
Can hyssop be grown in pots?
Yes, hyssop grows well in pots. Ensure the pot has good drainage holes. Use a well-draining potting mix.
Container-grown hyssop may need more frequent watering than those in the ground.
What are the common problems with hyssop?
The most common problem is root rot, caused by overwatering or poor drainage. Yellowing leaves can also indicate too much water. Pests like aphids can sometimes appear on new growth.
When should I prune hyssop?
Prune hyssop in spring to remove dead stems. Cut it back by about one-third to one-half after it finishes flowering in summer. This encourages bushier growth and more blooms.
Conclusion
Growing hyssop can be a delightful addition to your garden. It offers beauty, fragrance, and historical uses. By understanding its simple needs for sun and drainage, you can ensure success.
Don’t be afraid to prune it. And remember, less watering is often more. Enjoy your hyssop!
Related pick: Check today's price on Amazon