How to Fix Low Water Pressure in Garden Irrigation Lines
Start at the water source, then check restrictions and undersized design. If static pressure is acceptable but zones are weak, look for clogs, stuck valves, leaks, or too many heads on one line before replacing parts. Ignoring that order wastes time and can leave plants underwatered or trigger needless parts changes. This guide shows how to trace low irrigation pressure from source to sprinkler and separate supply limits from restriction points and design mistakes.
What you’ll need
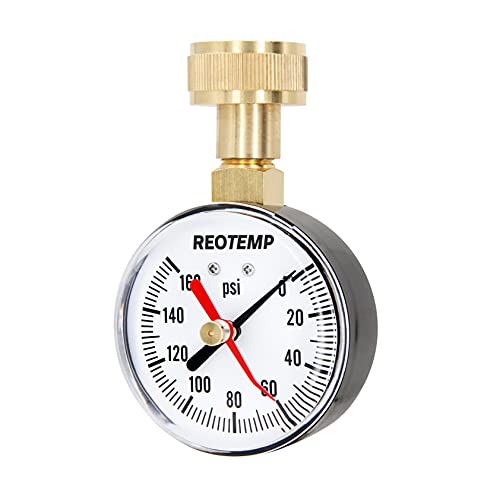


- Pressure gauge that fits a hose bib or other inlet point
- Bucket and timer for flow checks in gpm
- Basic hand tools for valve covers, fittings, and clamps
- Filter screen or cartridge with the correct mesh or micron rating
- Spare emitters, sprinkler heads, and small fittings
- Notebook for static psi, dynamic psi, and flow readings
Why is every head weak?
Weak heads across a whole zone usually point to a source limit, a major restriction, or a zone that asks for more flow than the line can supply. Static pressure may look fine at rest, but dynamic pressure can drop once the zone opens and water starts moving. That difference is the clue.
Check the source first
- Attach the pressure gauge at the hose bib or inlet point and record static psi with all zones off.
- Open one zone and record dynamic psi while the zone runs.
- Compare the reading to other times of day; municipal supply and well pumps can sag at peak demand.
- If pressure drops sharply at the source, inspect the supply before touching heads or tubing.
Suppose a hose bib reads 58 psi static, then falls to 24 psi with one spray zone on. That pattern points upstream if every zone behaves the same way. If the source stays strong but the heads still fade, the fault is farther down the line.
What to check first
A common troubleshooting order is source pressure, then valves, then filters, then the run itself. That sequence separates supply problems from line problems and keeps you from swapping parts that are not the real fault. Work one zone at a time.
- Shut off all zones and read static pressure at the hose bib.
- Run one zone and note dynamic pressure and flow in gpm from a timed bucket test if possible.
- Open each manual shutoff and valve box fully; look for a stuck or partly closed valve, including solenoid issues.
- Remove and clean the filter screen, then check its mesh or micron rating for blockage.
- Walk the line for splits, disconnected fittings, kinks, crush points, and buried damage.
Is it a clog or a leak?
A clog limits flow and often shows up as weak pressure at the end of the line or only on a few heads. A leak wastes water and can lower pressure for the whole zone, especially if the break is large. The fix depends on which pattern appears first.
Test one zone at a time
- Close every zone except one, then compare head output from near the valve to the far end.
- Lift a few emitter lines or sprinkler heads and check for partial clogging, wear, or debris at the inlet.
- Inspect the ground for wet spots, bubbling, soft soil, or hissing that points to a split or disconnected fitting.
- Repair the visible leak, then retest before cleaning or replacing more parts.
A common first-timer mistake is to replace the weakest sprinkler head first. If a cracked fitting sits upstream, the new head will still starve because pressure is escaping before it reaches the branch.
How do you test the line?
Test pressure and flow together. Pressure tells you how hard water is pushing, while flow tells you how much water the system can actually deliver. A line can show decent psi and still fail if the available gpm is too low for the zone demand.
Measure at the inlet point
- Connect a pressure gauge to the hose bib or other inlet point and record static psi.
- Start the zone and record dynamic psi after the initial surge settles.
- Use a bucket and timer to estimate gpm from one outlet or a test port.
- Compare the measured gpm to the total demand of the heads or emitters in that zone.
For drip zones, many emitters are rated in gph, such as 1 or 2 gph each. Add the emitters on the branch, convert the total to gpm, and compare it with the supply. For spray zones, matched precipitation matters more than one head alone.
Irrigation pressure matrix
This matrix helps separate source limits, restrictions, leaks, and design errors before you replace parts. Use the static psi reading, the dynamic psi reading, and the flow symptom together. One number rarely tells the whole story.
| Symptom pattern | Static psi | Dynamic psi | Flow symptom | Probable fault | Next test |
|---|---|---|---|---|---|
| Whole-zone weak flow | 50 psi | 22 psi | All heads or emitters run weak at once | Source limit, partly closed valve, clogged filter, or over-demanded zone | Check hose bib pressure, valve position, and filter screen first |
| Far-end-only weak flow | 52 psi | 38 psi | Near heads look normal, far heads fade | Undersized tubing, excessive run length, hidden crush point | Measure tube inside diameter and compare run length to zone demand |
| Intermittent pressure drop | 48 psi | 30 to 35 psi | Pressure falls during operation, then recovers | Pump cycling, pressure switch issue, debris moving through the system, or partial leak | Watch source pressure while the zone runs and check the backflow preventer |
| One-cluster failure | 55 psi | 46 psi | One branch after a splitter is weak | Local clog, kink, blocked fitting, damaged emitter, or partly closed branch valve | Isolate that branch and test the branch valve, fittings, and emitters |
When should you resize the line?
Resize tubing or split zones when the system stays weak after cleaning, valve checks, and leak repair, and the far end still loses pressure under normal demand. Long runs, narrow inside diameter, and too many fixtures on one branch create chronic loss that parts cleaning will not fix.
Spot undersized tubing and excess run length
- Measure the tubing inside diameter and compare it to the number of emitters or heads on the branch.
- Look for long runs with weak far-end pressure, especially after splitters.
- Check for mixed drip and spray on the same line; the demand often exceeds what one branch can carry.
- Increase the tube size, shorten the run, or split the zone so the load matches available flow.
Drip pressure regulators commonly target about 25 psi, while spray zones often run closer to 30 psi, though product labels vary. Place the regulator before drip zones, not after the emitters. If the regulator fails, pressure can sit too low or climb too high.
Common mistakes
Most missed diagnoses come from checking only one symptom. Static pressure can look fine while dynamic pressure fails under load. A clean head will not fix a crushed line. A new regulator will not cure an undersized zone.
- Skipping the static-versus-dynamic check and guessing from head appearance alone
- Replacing emitters before cleaning the filter or confirming source pressure
- Ignoring a stuck valve, a partly closed manual shutoff, or a failed solenoid
- Overlooking a backflow preventer that adds restriction or shows winter damage
- Adding more heads to an already overloaded line instead of splitting the zone
If that does not solve it, move upstream. Recheck the source with the gauge, then test the backflow preventer, then inspect the valve body and branch fittings. For a well-fed system, watch for pump cycling or a pressure switch that drops out under peak demand. For a rain barrel or gravity-fed setup, lower pressure is expected, so keep the number of emitters and the run length conservative.
Frequently asked questions
Why is my garden irrigation line pressure low?
Low pressure usually comes from one of four places: the source, a restriction, a leak, or an overloaded zone. Start with static psi at the hose bib, then compare it with dynamic psi while the zone runs. If static is fine but dynamic falls hard, the line or zone design is usually the problem.
How do I tell if low water pressure is caused by a clog or a leak?
A clog usually weakens flow at specific heads, while a leak often lowers pressure across the whole zone and may leave wet soil or bubbling fittings. Check the filter screen, emitters, and sprinkler heads first, then walk the run for visible water loss. Test one zone at a time so the pattern stays clear.
What pressure should drip irrigation lines run at?
Drip zones commonly use a regulator set around 25 psi, though the exact target depends on the components. Check the label on the regulator, emitters, and tubing. If the reading is far below the target, look for a bad regulator, a blocked filter, or a source-side limit.
How do I test water pressure in irrigation lines?
Use a pressure gauge at a hose bib or other inlet point. Record static psi with all zones off, then record dynamic psi with one zone running. Add a bucket-and-timer flow check in gpm if the zone still seems weak, because pressure without flow can hide an overloaded line.
Can a filter cause low pressure in drip irrigation?
Yes. A clogged screen or cartridge can cut flow sharply, especially on fine-mesh drip filters. Clean or replace the element based on the mesh or micron rating and retest immediately. If pressure returns, the filter was the restriction; if not, move to valves and tubing.
When do I need to resize irrigation tubing or split zones?
Resize or split when the farthest heads stay weak after you have checked pressure, valves, filters, and leaks. Chronic pressure drop over a long run, especially with mixed drip and spray, means the line is carrying more demand than it can supply. Upsize the tubing or reduce the number of fixtures on that branch.