How To Program An Automatic Drip Irrigation System Step By Step
Is your garden looking a little thirsty? Or maybe you’re tired of dragging hoses around? Watering your plants can be a real chore.
Especially when life gets busy. Automatic drip irrigation systems can be a game-changer. But programming them can seem tricky.
You might feel a bit lost. Like trying to read a foreign instruction manual. Don’t worry.
This guide will walk you through it. We’ll break it down simply. So you can get your system running smoothly.
And give your plants the perfect drink.
Programming an automatic drip irrigation system involves setting a timer to deliver water directly to plant roots. This process ensures consistent moisture, conserves water by reducing evaporation, and promotes healthier plant growth. It requires connecting the system to a water source, installing emitters, and then configuring the timer for specific watering schedules based on plant needs and weather conditions.
Understanding Your Drip Irrigation System Basics
Before we dive into programming, let’s quickly cover what makes these systems tick. A drip irrigation system is pretty smart. It delivers water slowly.
Right where your plants need it most: the roots. This is way better than sprinklers. Sprinklers lose lots of water to wind and sun.
They also water paths and weeds. Drip systems use less water. They keep your soil evenly moist.
This helps plants grow stronger. And it means fewer weeds popping up.
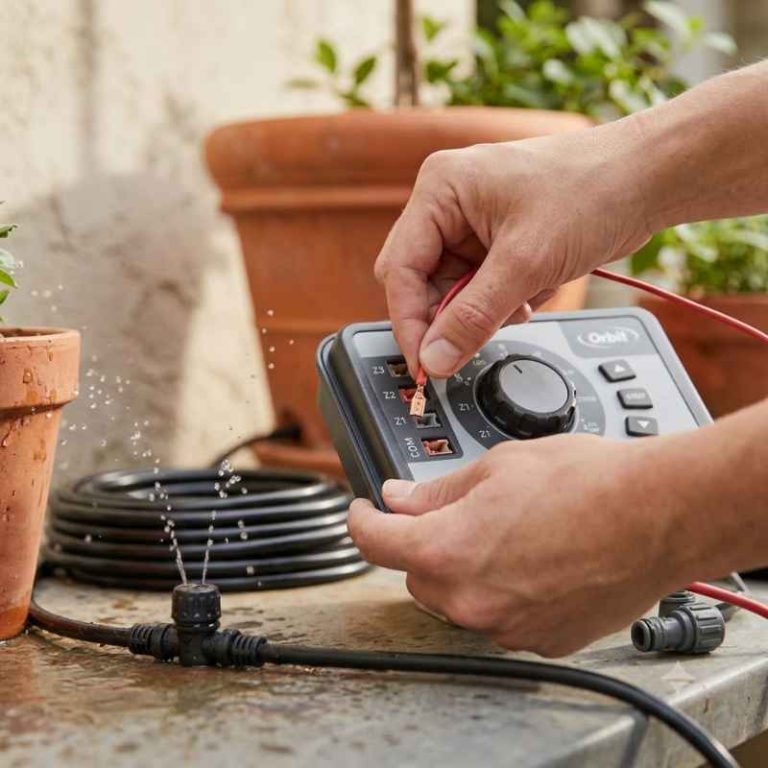
The main parts you’ll deal with for programming are the water source, the filter, the pressure regulator, the tubing, and the timer or controller. The timer is the brain. It tells the system when to turn on and off.
And for how long. Most modern timers are digital. They have buttons or a dial to set things up.
Some even connect to your phone. Which makes things super easy.
Knowing these parts helps. It means you won’t be totally lost when you see the actual device. It’s like knowing the names of your car’s dashboard buttons.
You don’t need to be a mechanic. But knowing ‘gas’ and ‘brake’ helps a lot. Your irrigation timer works the same way.
It’s designed to be used by gardeners, not engineers.

Why Programming Matters So Much
Getting the programming right is key. It’s not just about making water come out. It’s about giving your plants exactly what they need.
When they need it. Too much water can be as bad as too little. Soggy soil can lead to root rot.
It can also encourage fungal diseases. On the flip side, not enough water stresses plants. This makes them weak.
They can’t fight off pests or diseases well. And you won’t get good blooms or fruits.
Proper programming also means saving water. This is good for your wallet. It’s also great for the environment.
Especially in dry areas. You’re only using water when and where it’s needed. No waste.
Think about it. You’re targeting the root zone. That’s where the plant drinks.
No water is sprayed into the air. Or left to evaporate on hot surfaces.
And let’s not forget convenience. The whole point of an automatic system is to save you time and effort. But if it’s programmed wrong, you might as well be watering by hand.
Or worse, you might be hurting your plants without knowing it. So, taking a little time to learn how to program it correctly is a big payoff.
Getting Started: What You Need Before You Program
Before you even touch the timer, gather a few things. First, you need your irrigation system installed. That means tubing is laid out.
Emitters or drippers are in place near your plants. The system is connected to your water spigot. And a filter and pressure regulator are installed.
These prevent damage. They ensure the water flows correctly.
Next, understand your plants. Different plants need different amounts of water. A tomato plant needs more water than a succulent.
Young plants need less than mature ones. Check the specific needs of what you are growing. Online resources or plant tags are good places to look.
Consider your soil type. Sandy soil drains fast. It needs more frequent, shorter watering.
Clay soil holds water longer. It needs less frequent, longer watering. Loamy soil is in between.
Knowing your soil helps you set watering times. Weather is also a big factor. Is it hot and dry?
Or cool and rainy? Your program needs to change with the seasons.
Finally, have the timer’s manual handy. Even the simplest timers have a few buttons. Knowing what each one does is important.
Don’t toss that little booklet. It’s your best friend for this task. If you lost it, most manufacturers have them online.
Just search for your timer’s model number.
Step 1: Powering Up Your Timer
Most modern drip irrigation timers are battery-powered. Some may plug into an outdoor outlet. Check yours.
If it’s battery-powered, you’ll need a few AA or AAA batteries. Make sure they are new. Old batteries can cause odd behavior.
Like not saving your settings. Or turning off unexpectedly.
Open the battery compartment. It’s usually on the back or side of the timer. Insert the batteries.
Pay attention to the plus (+) and minus (-) signs. They must match the markings in the compartment. Most timers will beep or show something on the screen when they get power.
This confirms it’s working.
Some timers might have a main power switch. Ensure it’s in the “on” position. If your timer plugs in, ensure the outlet is working.
Test it with a lamp. Also, make sure the connection is secure. Moisture can cause problems with electrical outlets.
Use a weatherproof cover if you don’t have one.
Step 2: Setting the Current Time and Date
This is often the very first step shown on a new timer. It needs to know the correct time. So it can water at the right times.
And the correct date. So it knows which days to water. Look for buttons labeled “Clock,” “Time,” “Date,” or “Set.”
You’ll likely use arrow buttons (up/down or left/right) or a dial to change the numbers. Press the button that sets the hour. Adjust it to the current hour.
Remember to set AM or PM correctly if your timer has a 12-hour clock. Some timers use a 24-hour format.
Then, set the minutes. Move to the date. Set the month, day, and year.
Again, use the arrow buttons or dial. Sometimes you have to press a “Set” or “Confirm” button after each number. Or after you’ve finished the whole date and time.
Read your timer’s screen. It will guide you. Getting this right is crucial.
Step 3: Defining Watering Days
This step tells the timer which days of the week to water. Many timers offer different options. Some let you pick specific days, like Monday, Wednesday, and Friday.
Others allow you to water every X number of days. For example, every 2 days, or every 3 days.
Look for a button like “Program,” “Schedule,” “Days,” or “Water Days.” You’ll see options on the screen. Often, you’ll cycle through the days of the week. For each day, you might press a button to select “Water” or “Skip.” Some timers have icons.
A watering can might mean water. A cross mark might mean skip.
For beginners, picking specific days is often easiest. If you’re unsure, start with 2-3 days a week. Water deeply.
Then check soil moisture. Adjust later. For example, if you have young plants, you might water every other day.
Mature, drought-tolerant plants might only need watering once a week. Consider how much rain you’ve had too. Many timers let you “rain delay.” This skips watering if it’s already wet.
Quick Tip: Watering deeply less often is usually better than shallow watering every day. It encourages roots to grow deeper. This makes plants more resilient.
Step 4: Setting Watering Start Times
This is when the watering cycle begins. For drip systems, early morning is usually best. Before the sun gets too hot.
This reduces evaporation. It also allows plants to absorb water. Before the heat of the day sets in.
Look for buttons like “Start Time,” “Watering Time,” or “Program Start.” You might be able to set multiple start times. This is useful if you have different zones. Or different watering needs.
For a simple home garden, one start time might be enough.
Again, use the arrow buttons or dial to set the hour. And then the minutes. For example, you might set your start time to 6:00 AM.
If your timer allows multiple start times, you can set them spaced apart. For instance, 6:00 AM and 10:00 AM. This can help if your water pressure is low.
Some advanced timers let you set a “watering interval.” This means the system waters for a set amount of time. Then rests. Then waters again.
This is helpful for clay soils. It prevents water from running off. But for most basic programming, a single start time is fine.
Step 5: Determining Watering Durations (How Long to Water)
This is perhaps the most crucial part. How long should the water run? This depends on many factors.
Plant type, soil type, weather, and emitter flow rate all play a role. There’s no one-size-fits-all answer.
Look for settings like “Duration,” “Water Time,” or “Run Time.” You’ll set this for each start time or zone. The units are usually in minutes. For example, you might set a duration of 15 minutes.
Here’s a simple way to figure this out:
- Check Your Emitter Flow Rate: Look at the emitter packaging. It will say something like “0.5 GPH” (gallons per hour).
- Measure Soil Moisture: After running your system for a set time, say 10 minutes, dig a little into the soil near a plant. Is it wet a few inches down?
If not, you need to water longer. If it’s completely waterlogged, you need to water shorter.
- Observe Your Plants: Wilting leaves often mean not enough water. Yellowing leaves and mushy stems might mean too much.
A good starting point for many gardens is 15-30 minutes per watering session. For sandy soils, you might need shorter but more frequent watering. For clay soils, longer but less frequent.
Remember, you can always adjust this later. It’s better to start conservatively and increase if needed.
Example Calculation: If your emitters are 0.5 GPH and you want to deliver 1 gallon of water to a plant, you need to run the system for 2 hours (120 minutes). This is because 0.5 GPH * 2 hours = 1 gallon. So, if you have a 15-minute watering duration, each emitter will deliver about 0.125 gallons (0.5 GPH / 4 = 0.125 GPH for 15 mins).
Most home gardens do not require such precise calculations. Using observation is usually enough. If you see water pooling or running off, your duration is too long.
If the soil is dry just a few inches down after watering, it’s too short.
Step 6: Reviewing and Activating Your Program
Once you’ve set the time, date, days, start times, and durations, it’s time to check everything. Most timers have a “Program Review” or “Check Schedule” function. This lets you cycle through your settings.
So you can catch any mistakes. Did you set it for AM instead of PM? Did you miss a day?
This is the time to fix it.
Look for a button that says “Run,” “Auto,” or “Manual On.” To activate your programmed schedule, you usually need to set the timer to “Auto” mode. If it’s on “Manual” or “Off,” it won’t follow your programmed schedule. Some timers automatically go to “Auto” after you finish programming.
Others require you to select it.
Many timers also have a “Rain Delay” feature. This is very handy. If you know rain is coming, you can simply activate the rain delay.
It will skip watering for a set number of hours or days. This prevents overwatering. And saves water.
Make sure you know how to use this feature.
Important Note: Always check your system the first few times it runs. Walk around your garden. Make sure water is reaching all your plants.
Check for leaks. Make sure emitters aren’t clogged. This is also a good time to check soil moisture.
Adjust your program as needed.
Modern Drip System Features to Explore
Smart Controllers: These connect to Wi-Fi. They use weather data to adjust watering schedules automatically. They can save even more water.
And ensure your plants always get the right amount. Some even have apps. You can control your system from your phone.
Smart Controller Benefits
Automated Adjustments: Based on local weather forecasts, temperature, and humidity.
Remote Access: Control and monitor your system from anywhere via a smartphone app.
Water Savings: Significantly reduces water usage compared to manual or fixed schedules.
Notifications: Receive alerts for system issues or watering changes.
Flow Meters: Some advanced systems include flow meters. These measure exactly how much water is being used. This can help you identify leaks quickly.
Or track your water consumption.
Multiple Zones: If you have a large garden, you might need multiple watering zones. Each zone can have its own schedule. This is perfect for areas with different plant types.
Or different sun exposure.
Zone Management Insights
Concept: A zone is a section of your garden watered by a specific set of drippers and a valve.
Why it matters: Different plant needs (vegetables vs. flowers) or sun exposure (full sun vs. shade) require tailored watering.
Setup: Each zone is controlled by a separate valve. Your timer directs water to one zone at a time.
Programming: You set independent start times, durations, and watering days for each zone.
Rain Sensors: These devices detect rainfall. They signal the timer to skip watering cycles. This is a simple but effective way to prevent overwatering when nature provides enough moisture.
Troubleshooting Common Programming Issues
What if your system isn’t watering when it should? Or it’s watering too much? Don’t panic.
Most issues are easy to fix. Check the power source first. Are the batteries dead?
Is the timer plugged in? Check the display. Does it show anything?
If not, it might have no power.
Is the timer set to “Auto” or “Run” mode? If it’s on “Manual” or “Off,” your programmed schedule won’t activate. Double-check your settings for the current time and date.
If they are wrong, the schedule might be off. Or it might not be running on the days you intended.
Are the watering days set correctly? Did you accidentally skip a day? Or set it to water every day when you meant every other day?
Review your program carefully. Check the start times and durations. Are they realistic for your plants and soil?
If water is coming out but not to the right plants, check your emitters. Are they clogged? Are they positioned correctly?
Is the tubing damaged? A leak in the main line can also cause low pressure. This means water won’t reach the end of the run.
Troubleshooting Checklist
Issue: System Not Watering
Check: Power (batteries/plug), Mode (Auto/Run), Clock/Date, Watering Days, Start Times.
Issue: Watering Too Much/Too Little
Check: Watering Durations, Emitter Flow Rate, Soil Type, Plant Needs, Weather.
Issue: Low Water Pressure / Leaks
Check: Filter, Pressure Regulator, Tubing for damage, Connections, Emitter clogs.
Real-World Scenarios: Adapting Your Program
Let’s say you live in Arizona. It’s hot and dry most of the year. Your program will need to be robust.
You might set your drip system to water every other day. For longer durations, perhaps 45 minutes. This is to ensure water penetrates deep.
Especially for established trees and shrubs.
Now, imagine you live in Oregon. It rains a lot, especially in fall and winter. You might set your system to water only once a week.
Maybe for just 20 minutes. And you’ll definitely rely on the rain sensor. Or manually disable the system during the rainy season.
You don’t want to drown your plants.
Consider a new garden bed. You just planted delicate seedlings. They need consistent moisture.
But they can’t handle too much water. You might program the system to water daily for 10 minutes. Early in the morning.
As they grow, you’ll gradually increase duration and decrease frequency. You’ll watch them closely.
Vegetable gardens are dynamic. Tomato plants are thirsty. Basil is more forgiving.
You might set up separate zones. One zone for your tomatoes. Another for your herbs.
This allows you to tailor watering for each. It’s about understanding the unique needs of your plants. And then telling your timer to meet those needs.
What This Means for Your Garden Health
A correctly programmed drip irrigation system is a gardener’s best friend. It means healthier plants. Plants that are less stressed.
They’ll produce more flowers and fruits. They’ll be more resistant to pests and diseases. Because they’re getting the hydration they need, consistently.
Not too much, not too little.
It also means a more beautiful garden. No more wilting patches. No more waterlogged areas where nothing grows.
Just vibrant, healthy plants. Plus, the money you save on your water bill will be noticeable. Especially during hot summer months.
It’s a win-win situation.
Remember, programming is not a one-time thing. It’s an ongoing process. You’ll need to adjust your schedule.
As the seasons change. As your plants grow. As the weather shifts.
Paying attention to your garden is the best way to know if your program is working well. Your plants will thank you for it. And you’ll have more time to simply enjoy them.
Quick Tips for Efficient Drip Watering
- Water in the early morning. This reduces evaporation and heat stress.
- Water deeply and less often. This encourages strong root growth.
- Know your plants’ needs. Different plants need different amounts of water.
- Adjust for weather. Increase watering in heat, decrease in cool or rainy periods.
- Check soil moisture regularly. Use your finger or a trowel to feel the soil.
- Inspect emitters. Ensure they are not clogged and are delivering water correctly.
- Consider a rain sensor. It’s a simple way to prevent overwatering.
- Use a smart controller. For automatic adjustments based on real-time weather data.

Frequently Asked Questions About Drip Irrigation Programming
How often should I water with a drip system?
This varies greatly. Most gardens benefit from watering every 2-3 days. For established, drought-tolerant plants, once a week might be enough.
For newly planted seedlings, daily watering may be needed initially. Always check soil moisture. Adjust based on your specific plants, soil, and weather.
How long should I run my drip irrigation system?
Typical durations range from 15 to 45 minutes per session. For systems with low-flow emitters, you might need longer. For clay soils, you might water for 20 minutes, let it soak, then water again for 20 minutes.
The goal is to deliver enough water to reach the root zone without causing runoff.
Can I program my drip system to water at night?
While it’s generally best to water in the early morning, some people do water at night. The main concern with night watering is that leaves can stay wet longer. This can encourage fungal diseases.
However, with drip irrigation, water is delivered directly to the soil, so leaf wetness is less of an issue. Still, morning is preferred to allow surfaces to dry.
My timer has multiple zones. How do I program them?
You will program each zone separately. This allows you to set different watering days, start times, and durations for each. For example, your vegetable garden zone might need more water than your flower bed zone.
Consult your timer’s manual for the specific steps to program multiple zones.
What is a rain delay, and how do I use it?
A rain delay is a feature on most timers. It allows you to skip watering cycles for a set period. If it has rained recently, or if rain is forecast, you can activate the rain delay.
This prevents overwatering and saves water. You typically set it for a number of hours or days.
Do I need to adjust my program for different seasons?
Absolutely. Plant water needs change significantly throughout the year. You’ll need to water more often and for longer durations during hot, dry summer months.
In cooler spring and fall weather, you’ll need less water. In winter, you might turn the system off entirely in many climates.
How do I know if my drip irrigation system is watering enough?
Observe your plants. Wilting leaves are a sign they need more water. Check the soil moisture a few inches down after watering.
If it’s dry, you need to water longer or more often. If the soil is soggy and water is pooling, you are watering too much.
Conclusion: Watering Wisely for a Thriving Garden
Programming your automatic drip irrigation system might seem daunting at first. But by taking it step by step, it becomes manageable. Remember to understand your system, your plants, and your soil.
Always check your settings. And don’t be afraid to adjust your program. A well-programmed system leads to a healthier, more beautiful garden.
And saves you precious water and time. Happy gardening!