How to Setup Orbit 6 Zone Controller for Drip Irrigation
Setting up an Orbit 6 zone controller for drip irrigation ensures your garden gets precise, automated watering without waste. This guide walks you through the complete installation, programming, and troubleshooting process so you can maximize water efficiency and plant health.
Whether you are replacing an old timer or installing fresh, these step-by-step instructions cover everything from wiring to zone scheduling.
Simply put, setting up an Orbit 6 zone controller for drip irrigation involves mounting the unit, connecting valve wires, configuring zone timings, and testing each station. The process takes about 45–90 minutes and requires basic tools like a screwdriver and wire strippers.
Key Takeaways
- The Orbit 6 zone controller supports up to six independent drip zones with flexible scheduling options.
- Proper wire connections between the controller and solenoid valves are critical for reliable operation.
- Drip irrigation setup benefits from the controller’s water budgeting feature, which adjusts run times by percentage.
- Manual testing each zone after programming helps catch wiring errors before they affect plant health.
- The controller’s battery backup preserves your program during power outages for up to 30 days.

What You Need Before Starting the Setup
Before you begin, gather the necessary tools and components. Having everything ready prevents mid-project trips to the hardware store.
A typical Orbit 6 zone controller installation requires basic electrical knowledge and familiarity with outdoor plumbing components. If you are unsure about working with 24VAC systems, consult a licensed irrigation professional.
Essential Tools and Materials
- Orbit 6 zone controller unit (model 57946 or similar)
- Wire strippers and screwdriver (flathead and Phillips)
- 18-gauge multi-conductor irrigation wire (at least 7 strands for 6 zones plus one common)
- Waterproof wire connectors (silicone-filled or grease-packed)
- Valve manifold with solenoid valves for each zone
- PVC pipe or drip tubing and fittings
- Drill with masonry bit (for mounting on brick or stucco)
- Level and measuring tape
Tip: Use direct burial-rated wire for underground runs. Standard indoor wire degrades quickly when exposed to moisture and soil.
Step 1: Mount the Orbit 6 Zone Controller
Choose a location close to a power outlet and near the valve manifold. The controller should be protected from direct rain but still accessible for programming.
Orbit recommends mounting the unit 4–5 feet off the ground so the display is at eye level. Avoid placing it near metal fences or large appliances that could cause electrical interference.
Mounting Instructions
- Hold the controller against the wall and mark the two screw holes using a level.
- Drill pilot holes and insert wall anchors if mounting on drywall or masonry.
- Secure the controller with the provided screws. Do not overtighten.
- Open the front panel and ensure the transformer plug reaches the nearest outlet.
- Route the valve wires through the knockout hole at the bottom or back of the enclosure.
Important: Leave at least 12 inches of extra wire inside the controller enclosure. This slack makes future servicing and reconnections much easier.
Step 2: Connect the Valve Wires to the Controller
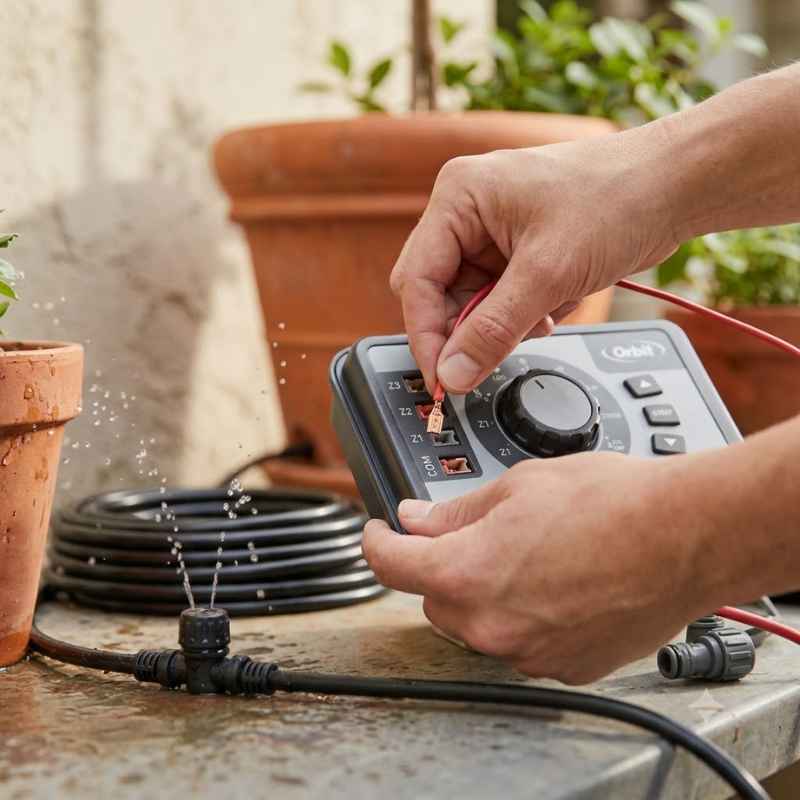
Each zone on your drip system requires a dedicated solenoid valve. The Orbit 6 zone controller sends a 24VAC signal to open and close each valve based on your schedule.
Wire colors matter for organization. Standard practice uses white for the common wire and colored wires (blue, red, yellow, green, orange, brown) for zones 1 through 6.
| Controller Terminal | Wire Color | Connection |
|---|---|---|
| Common (COM) | White | Connects to one wire from every solenoid valve |
| Zone 1 | Blue | To solenoid valve 1 |
| Zone 2 | Red | To solenoid valve 2 |
| Zone 3 | Yellow | To solenoid valve 3 |
| Zone 4 | Green | To solenoid valve 4 |
| Zone 5 | Orange | To solenoid valve 5 |
| Zone 6 | Brown | To solenoid valve 6 |
Strip about 3/8 inch of insulation from each wire end. Insert the wire into the corresponding terminal and tighten the screw firmly. Give each wire a gentle tug to confirm a solid connection.
Tip: Label each wire at both ends with a permanent marker or colored tape. This saves hours of frustration when troubleshooting later.
Step 3: Wire the Solenoid Valves at the Manifold
The solenoid valves sit on the manifold near your water source. Each valve controls water flow to one drip irrigation zone. Proper wiring at this end is just as important as the controller connections.
Every solenoid valve has two wires: one colored wire and one white wire. The white wires from all valves connect together to form the common line. The colored wire from each valve connects to its respective zone wire from the controller.
Valve Wiring Steps
- Arrange the solenoid valves on the manifold in the order corresponding to your zones.
- Twist all white wires together and secure with a waterproof wire connector.
- Connect the colored wire from valve 1 to the blue wire from the controller. Repeat for each zone.
- Tuck all connections inside a weatherproof valve box to protect them from moisture and debris.
- Test each connection by gently pulling on the wires before closing the box.
Warning: Never bury wire connections directly in soil. Moisture causes corrosion that leads to intermittent valve operation and eventual failure. Always use a valve box or waterproof splice kit.
Step 4: Program the Orbit 6 Zone Controller
Once all wiring is complete, plug in the controller and follow the programming sequence. The Orbit interface uses a dial and a few buttons to navigate menus.
The controller remembers your settings even if power is disconnected for short periods thanks to its backup battery. Replace the 9V battery annually to ensure reliable backup performance.
Programming Sequence
- Turn the dial to Set Date/Time. Use the + and – buttons to set the current day, month, year, and time. The controller uses 12-hour AM/PM format.
- Turn the dial to Set Water Start Times. Choose up to four start times per day. For drip irrigation, a single early morning start is usually sufficient.
- Turn the dial to Set Watering Duration. Select each zone individually and set the run time in minutes. Drip zones typically need 15–45 minutes depending on plant type and soil.
- Turn the dial to Set Watering Days. Choose specific days of the week or use the Odd/Even day option. Custom intervals (every 2, 3, or 5 days) work well for drip systems.
- Turn the dial to Auto mode to begin automated operation.
| Programming Step | Dial Position | Typical Setting for Drip |
|---|---|---|
| Date & Time | Set Date/Time | Current date and time |
| Start Times | Set Water Start Times | 6:00 AM (one start) |
| Duration | Set Watering Duration | 20–40 minutes per zone |
| Days | Set Watering Days | Every 2 days |
| Seasonal Adjustment | Water Budget | 100% (adjust seasonally) |
The water budget feature lets you scale all zone run times up or down by a percentage. Use 80% in spring, 100% in summer, and 60% in fall to match seasonal plant water needs without reprogramming each zone individually.
Step 5: Test Each Zone Manually
Before trusting the automatic schedule, test every zone manually. This confirms that wiring, valve operation, and drip emitters all work correctly.
Turn the dial to Manual mode. Select each zone and run it for 2–3 minutes. Walk the drip lines to check for leaks, clogged emitters, or misdirected tubing.
What to Check During Testing
- Listen for the solenoid click when a zone activates. No click means a wiring issue or faulty solenoid.
- Look for even water distribution across all emitters in the zone. Dry spots indicate clogs or pressure problems.
- Check for leaks at tubing connections, fittings, and emitter insertion points.
- Verify that zones run in the correct sequence. Zone 1 should activate first, then zone 2, and so on.
- Time the zone run with a stopwatch. The actual runtime should match your programmed duration.
Tip: Use a soil moisture sensor or a simple screwdriver test after watering. Insert a screwdriver into the soil near the emitters. If it slides in easily, the soil is adequately moist. If it meets resistance, increase runtime.
Common Setup Mistakes and How to Avoid Them
Even experienced gardeners make errors during installation. Knowing the most frequent mistakes helps you avoid them from the start.
The Orbit 6 zone controller is reliable, but incorrect wiring or programming can cause frustrating issues like zones not turning on or the controller skipping scheduled watering.
Top 5 Mistakes
- Reversing common and zone wires – The common terminal must connect only to white wires. Connecting a colored wire to the common terminal can damage the controller.
- Using undersized wire – For runs longer than 200 feet, upgrade to 16-gauge wire to prevent voltage drop that causes valves to chatter or fail.
- Skipping manual testing – Programming without testing masks wiring errors. Always test each zone individually before relying on auto mode.
- Overwatering with long run times – Drip irrigation delivers water slowly. A 60-minute run may drown shallow-rooted annuals. Start with 20 minutes and adjust based on soil moisture.
- Ignoring the water budget feature – Without seasonal adjustment, you overwater in spring and underwater in summer. Use the budget to compensate automatically.
Important: According to the EPA, automated irrigation systems with proper scheduling can reduce outdoor water use by up to 30% compared to manual watering. Accurate setup maximizes those savings.
How to Use the Seasonal Adjustment Feature
The water budget on the Orbit 6 zone controller is a powerful tool for drip irrigation efficiency. It adjusts all zone run times by a single percentage without changing individual programs.
Set the water budget to 100% when you first program the controller. As seasons change, adjust the percentage rather than reprogramming each zone’s duration.
| Season | Recommended Budget | Reason |
|---|---|---|
| Early Spring | 60–70% | Cool temperatures and rain reduce plant water demand |
| Late Spring | 80–90% | Rising temperatures increase transpiration |
| Summer | 100% | Peak water usage for most plants |
| Fall | 60–80% | Cooler weather and shorter days reduce needs |
| Winter (frost-free areas) | 30–50% | Dormant plants require minimal water |
The water budget adjustment saves time and prevents overwatering. For example, if your zone 1 normally runs 30 minutes at 100%, setting the budget to 70% reduces it to 21 minutes automatically.

Frequently Asked Questions
Can I use the Orbit 6 zone controller for drip irrigation without a pressure regulator?
No. Drip irrigation systems operate at low pressure (20–40 PSI), while typical household supply is 50–80 PSI. Install a pressure regulator at the main supply line before the valve manifold to prevent emitter blowouts and tubing damage.
Why is my Orbit controller not turning on after wiring?
Check that the transformer is plugged into a working outlet. If the display is blank, press the reset button inside the battery compartment. A tripped GFCI outlet is another common cause.
Also verify that the 9V backup battery is installed correctly.
How many drip emitters can one zone support?
It depends on your flow rate and emitter specifications. A standard 1/2-inch drip line delivers about 240 GPH at 20 PSI. Most emitters use 0.5–2 GPH.
Calculate total emitter flow per zone and keep it under 80% of the line’s capacity for consistent pressure.
What does the rain delay feature do on the Orbit 6 controller?
The rain delay suspends all watering for a set period (24 to 72 hours) while preserving your programmed schedule. Use it after significant rainfall to avoid oversaturation. The controller resumes normal operation automatically when the delay expires.
How do I reset the Orbit 6 zone controller to factory defaults?
To perform a full reset, press and hold the Reset button (inside the battery compartment) for 5 seconds. All settings return to factory defaults, and you must reprogram date, time, zones, and schedule from scratch.
Final Thoughts
Setting up an Orbit 6 zone controller for drip irrigation is a straightforward project that pays dividends in water savings and healthier plants. Focus on clean wiring, careful programming, and thorough zone testing. The seasonal adjustment feature makes year-round management simple.
Once configured, your drip system will operate automatically, delivering the right amount of water to each zone without daily effort.