Cleft grafting joins a scion (the top part) to a rootstock (the bottom part). It’s a common way to join woody plants. Success depends on careful cuts and good contact.
This method is good for young trees and shrubs.
Understanding Cleft Grafting
Cleft grafting is a way to attach one plant part to another. Think of it like a transplant. You take a piece from a plant you like.
This is called the scion. You attach it to the base of another plant. This is the rootstock.
The goal is for them to grow together. They form one new plant. This new plant has the best parts of both.
Why do we graft? There are many reasons. Maybe you want a special fruit.
The plant that makes the fruit might not grow well in your soil. So, you graft it onto a rootstock that does. This makes the new plant stronger.
It might grow fruit sooner. Or you might want to change a plant. You could graft a flowering variety onto a hardy rootstock.
This makes it bloom longer. It also helps it survive tough weather.
Cleft grafting is a type of “inarching” graft. It means you are pushing the scion into a split. The rootstock is cut.
Then a slit is made down the middle. The scion is shaped like a wedge. This wedge fits into the slit.
The bark on both parts must line up. This is very important. It helps them heal and join.
This method is often used to add varieties to an existing tree. It’s also good for fixing damaged trees.
The rootstock is the base plant. It gives the graft a good start. It provides water and food.
The scion is the top part. It will grow the leaves, flowers, and fruits. The scion is usually a healthy branch.
It should have a few buds on it. These buds will become new growth. The scion is chosen for its traits.
It could be for good flavor. It could be for disease resistance.
Timing is also key. Most grafting is done in late winter or early spring. This is when plants are waking up.
They are ready to grow. But they are not yet leafing out. This helps the graft heal better.
It reduces stress on the plant. It also helps prevent diseases. You need sharp tools.
Clean cuts are vital. This helps the plant heal. It prevents bad germs from getting in.
There are two main parts to a graft. The first is the scion. This is the cutting or twig.
It comes from the plant you want to grow. It usually has two to four buds. The second part is the rootstock.
This is the plant that the scion will be attached to. It provides the roots. It also provides the main stem below the graft.
The point where they join is crucial. This is where the cambium layers meet.
The cambium is a thin layer of cells. It is just under the bark. This is where growth happens.
For a graft to work, the cambium of the scion must touch the cambium of the rootstock. When they touch, they start to make new cells. These cells help them fuse together.
It’s like they are growing into one plant. If they don’t touch, the graft will likely fail.
My First Grafting Fiasco
I remember my first attempt at grafting. It was years ago. I wanted to graft a fancy apple variety onto a strong, old tree.
I had read all the books. I watched videos. I felt so ready.
I picked a beautiful scion branch. It had nice, plump buds. I carefully cut the rootstock.
I made a split down the middle. My hands were shaking a little. I shaped the scion into a wedge.
I pushed it into the slit. Then I wrapped it all up. I felt so proud.
I imagined sweet apples growing soon.
A few weeks went by. I checked on it. Nothing seemed to be happening.
Then I saw it. The scion was turning black. It was clearly dead.
My heart sank. I had messed up. I didn’t know what I did wrong.
Was my cut bad? Was the timing off? Was the scion not good?
It was frustrating. I felt defeated. I almost gave up then and there.
That one failure felt huge. It made me doubt myself. I realized that reading about it wasn’t the same as doing it.
I needed more practice. I needed to understand the details better.
The real problem, I later learned, was a few things. My cuts weren’t perfectly clean. I didn’t get the cambium layers to line up just right.
And I didn’t wrap it tight enough. A little bit of air got in. That was all it took.
It was a tough lesson. But it taught me to be more precise. It taught me to pay attention to every little step.
It’s these small details that make a big difference in grafting success.
I learned that patience is key. Grafting isn’t an instant fix. It takes time for the plant to heal.
It takes time for them to bond. I also learned to ask for help. I found a local nursery owner.
He had grafted for fifty years. He showed me his techniques. He explained the little tricks.
He showed me how to read the bark. He showed me how to feel the wood. It was like unlocking a secret code.
That guidance was invaluable. It turned my frustration into understanding.
Gathering Your Grafting Tools
To get started with cleft grafting, you need a few good tools. Having the right gear makes the job much easier. It also helps you get better results.
Don’t skimp on quality here. Good tools mean cleaner cuts. Cleaner cuts mean a better chance of success.
First, you need a very sharp grafting knife. This is not your kitchen knife. It’s a special knife.
It has a thin, sharp blade. It is curved a bit. This helps you make smooth cuts.
It can shave wood cleanly. If your knife is dull, you will tear the wood. This damages the plant.
It makes healing harder. Keep your knife sharp. Use a honing stone to keep it ready.
Next, you need pruning shears. These are for cutting your scion wood. They should also be sharp.
They should be clean. You want to make a clean cut on the scion. This prepares it for the grafting knife.
Hand pruners are good for small branches. For larger rootstock, you might need loppers. These have longer handles.
They give you more power.
You will also need grafting tape or parafilm. This is used to wrap the graft union. It holds everything in place.
It also keeps the area moist. It protects it from drying out. Parafilm is a stretchy plastic tape.
It seals itself. Grafting tape is also good. It’s often made of paper or cloth.
It stretches and seals.
Some people use grafting wax. This is a waxy substance. You can buy it or make it.
You smear it over the wrapped graft. It acts as a sealant. It protects the graft from air and water.
It helps keep the moisture in. It’s an extra layer of protection.
Finally, you need rubbing alcohol or a disinfectant. You must keep your tools clean. Before and after each cut, clean your knife and shears.
This stops the spread of diseases. If you are grafting many plants, clean your tools between each one. This is a crucial step for plant health.
It prevents passing problems from one plant to another.
Having these tools ready makes the process smoother. It reduces stress. It increases your chances of success.
Think of them as your gardening super tools. They help you create something new and beautiful.
Grafting Tool Essentials
Sharp Grafting Knife: For precise wood shaping.
Clean Pruning Shears: For cutting scion wood.
Grafting Tape or Parafilm: To secure and seal the union.
Grafting Wax (Optional): Extra protection against drying.
Disinfectant: For tool hygiene.
Choosing Your Scion and Rootstock
The success of your graft depends heavily on your choices. You need to pick the right plants. The scion is the part you want to grow.
The rootstock is the plant you graft onto. They need to be compatible. This means they must be closely related.
For cleft grafting, this usually means plants of the same species. Or they can be from the same genus.
For example, you can graft one apple variety onto another apple tree. You can graft a peach onto a peach. You can graft a plum onto a plum.
You generally cannot graft an apple onto a peach. They are too different. They won’t grow together.
Think of it like trying to join two different kinds of animals that don’t match.
The scion wood should be healthy. It should be from a strong, disease-free plant. You should collect scion wood when the plant is dormant.
This is usually in late winter. Cut pencil-thick branches. Make sure they have at least two or three good buds.
Avoid wood that is too old or too young. The best wood is usually from last year’s growth.
Cut the scion wood just before you plan to graft. If you can’t do it right away, store it. Keep it in a cool, moist place.
A plastic bag with a damp paper towel in the refrigerator works well. Don’t let it dry out. Fresh scion wood is always best.
The rootstock should also be healthy and vigorous. It should be free of pests and diseases. The size of the rootstock matters for cleft grafting.
It’s usually best for rootstocks that are about the same size as your scion. A good size is about pencil-thick. Or slightly larger.
You want a sturdy base.
For cleft grafting, the rootstock is usually a tree trunk or a main branch. It will be cut across. Then a slit will be made into the center of the cut.
You can use a young tree. Or you can use an older tree. If you are grafting onto an older tree, choose a strong branch.
Make sure it’s healthy. The size of the rootstock should match the scion reasonably well. This makes the process easier.
And it improves the chances of a good union.
Compatibility is the most important factor. If the plants are not compatible, the graft will not take. It will fail.
Always check what varieties are known to graft well together. Garden centers or local extension offices can help with this. They have lists of compatible plants.
This research upfront saves a lot of time and effort later.
When to Graft: The Best Timing
Timing is critical for successful grafting. You want to do it when the plant is ready. But before it starts new growth.
The ideal time for cleft grafting is in late winter or very early spring. This is usually February or March in most of the U.S. You want to graft when the rootstock is still dormant.
But the sap should be starting to rise.
Why this timing? Dormant plants are less stressed. They are not putting energy into leaves.
They are focused on healing. The rising sap helps the graft union form. It provides moisture and nutrients.
If you graft too late, when the leaves are out, the scion will dry out quickly. It has no roots of its own yet. The leaves will transpire water faster than the graft can supply it.
If you graft too early, the plant might not be ready. The sap might not be flowing well. This can also hinder healing.
The ideal temperature range is also important. You want temperatures that are cool but not freezing. Ideally, temperatures should be between 40°F and 60°F (4°C to 15°C).
Avoid grafting when frost is expected.
Some people graft later in the season. This is often called “summer grafting.” It’s usually done with herbaceous cuttings. But for woody plants like trees and shrubs, spring is best.
It’s the most reliable time. The plant has a whole growing season to heal and form a strong union.
Think of it like this: you are giving the plant a bit of surgery. You want it to be in a state where it can recover quickly. Not too active, not too dormant.
The cusp of waking up is perfect. It has the energy reserves ready. It has the ability to heal.
It hasn’t committed to new leaf growth yet. This balanced state is what you’re aiming for.
If you miss the spring window, you might have to wait. Or you could try summer grafting with special techniques. But for beginners, mastering the spring cleft graft is the way to go.
It offers the highest success rate. It’s the most forgiving time. So, mark your calendar.
Watch the weather. When the time is right, you’ll be ready.
The Step-by-Step Cleft Grafting Process
Now, let’s get down to the actual steps. This is where precision matters most. Take your time.
Follow each step carefully. Don’t rush.
Step 1: Prepare the Rootstock
First, choose a spot on your rootstock. It should be a healthy part of the trunk or a main branch. Cut the rootstock cleanly across.
Use your sharp pruning shears or a saw. Make the cut as flat and smooth as possible. Remove any bark or wood that is damaged or diseased.
Now, use your grafting knife. Make a vertical split down the center of the cut surface. The split should go about 1 to 1.5 inches deep.
This is where your scion will go. Be sure to split it right down the middle. This ensures good cambium contact.
Use a tool, like a grafting chisel or the back of your knife, to hold the split open while you prepare the scion.
Step 2: Prepare the Scion
Take your prepared scion wood. It should have two to four buds. The buds should be pointing upwards.
You need to shape the bottom of the scion into a wedge. Use your sharp grafting knife. Make two long, sloping cuts on opposite sides of the bottom of the scion.
These cuts should meet at a point. The wedge should be thin enough to fit snugly into the split in the rootstock.
The length of the wedge should be about the same as the depth of the split in the rootstock. Make sure the cuts are smooth. The sides of the wedge should be even.
Aim for clean, flat surfaces. This is where the cambium layers will meet. Good contact here is vital.
Step 3: Insert the Scion
Carefully insert the wedge-shaped scion into the split in the rootstock. You need to align the cambium layers. The bark of the scion should line up with the bark of the rootstock.
On one side of the split, push the scion in. Make sure the outer edge of the scion’s bark touches the inner edge of the rootstock’s bark.
If your rootstock is large, you might be able to insert two scions. One on each side of the split. This gives you a better chance of success.
The rootstock will then hold both scions firmly in place. They will be wedged into the split.
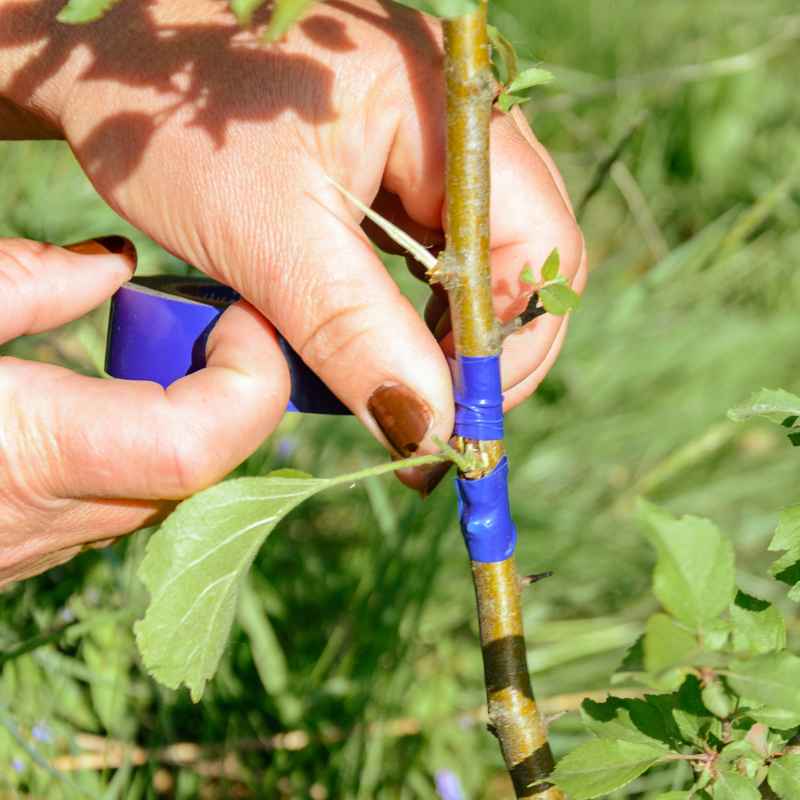
Step 4: Secure the Graft
Once the scion is in place, it needs to be secured. This is where the grafting tape or parafilm comes in. Start wrapping the tape.
Begin below the graft union. Wrap upwards, covering the entire split and the scion. Make sure the tape is snug.
It should hold the scion firmly against the rootstock. Overlap the tape as you wrap.
Wrap it tightly enough to prevent drying. But not so tight that it damages the plant. Cover the entire graft union.
Make sure no wood is exposed. This tape will help the graft heal. It also keeps moisture in.
Step 5: Seal the Graft (Optional but Recommended)
After wrapping with tape, you can apply grafting wax. Cover the wrapped area with wax. This adds an extra layer of protection.
It seals out air and moisture. It also helps prevent infections. Make sure you coat all the edges and any exposed cut surfaces.
This is especially important if you live in a very dry climate.
Step 6: Aftercare
Now you wait. Keep an eye on the graft. In a few weeks, you should see signs of healing.
Buds on the scion might start to swell. They might even start to grow. If the buds swell and grow, the graft is likely successful.
As the scion grows, you may need to loosen the tape. If it starts to cut into the new growth, carefully cut it away. Or loosen it.
This prevents girdling. Remove any shoots that grow from the rootstock below the graft. These are called rootstock suckers.
They will take energy away from the scion.
Continue to protect the graft. Avoid bumping it. Keep the area around the base of the plant clear.
The graft union needs time to mature. This can take a full growing season. Be patient.
Cleft Grafting Checklist
- Rootstock Cut: Clean, flat cut across the stem.
- Rootstock Split: Vertical split down the center, 1-1.5 inches deep.
- Scion Wedge: Shaped into a thin, pointed wedge.
- Cambium Alignment: Outer bark edges of scion touch rootstock bark.
- Secure Wrap: Grafting tape or parafilm wrapped snugly from below.
- Sealant: Grafting wax applied over the wrapped area.
- Sucker Removal: Any shoots from rootstock below graft removed.
Common Problems and Solutions
Even with the best effort, grafts can fail. Don’t get discouraged. Most failures have a reason.
Understanding these can help you succeed next time.
Problem: The scion dies or turns black.
Solution: This is the most common problem. It can be caused by several things. Poor cambium contact is a big one.
Make sure the bark edges line up. The scion might have dried out. Ensure your wrapping is tight and sealed.
Use grafting wax for extra protection. The scion wood might have been bad. Or it might have been stored improperly.
Ensure you are using healthy wood.
Problem: The graft union doesn’t heal.
Solution: This can happen if the timing was off. Or if the plants are not compatible. Ensure you are grafting compatible varieties.
Check that you grafted at the right time of year. The wrapping might be too loose. It needs to hold the parts tightly together.
This helps them fuse.
Problem: Rootstock suckers grow rapidly.
Solution: These suckers take energy away from the graft. You must remove them promptly. Cut them off as soon as you see them.
They come from the rootstock. They have its characteristics. The scion has the traits you want.
So, be vigilant about removing them.
Problem: The graft is weak or wobbly.
Solution: This means the union is not strong. The wrapping might have been too loose. Or the cambium contact was poor.
The scion needs to be firmly held. It needs time to fuse properly. Sometimes, you need to add extra support as the scion grows.
But this usually means the initial graft was not solid.
Problem: Disease or pest infestation.
Solution: Always use clean tools. Clean your knife and shears regularly. Use disinfectant.
If you suspect disease, remove the graft. And sterilize the area. Prevention is key.
Using healthy scion and rootstock is the first step.
Learning to graft is a journey. It takes practice. Don’t be afraid to try again.
Each attempt teaches you something new. Pay attention to the details. Observe the plant’s response.
You’ll get better with time. Many experienced grafters still have some failures. It’s part of the process.
The reward is worth the effort.
Contrast: Grafting Success vs. Failure
| Signs of Success | Signs of Failure |
|---|---|
| Scion buds swell and grow. | Scion turns black, shrivels, or falls off. |
| New green growth appears from the scion. | No new growth from the scion after several weeks. |
| The graft union looks solid and healed. | The graft union remains loose or shows rot. |
| Rootstock suckers are easily controlled or absent. | Rapid, unchecked growth from rootstock below the graft. |
Real-World Applications of Cleft Grafting
Cleft grafting isn’t just for hobbyists. It’s a vital technique in commercial horticulture. It’s used in orchards and nurseries worldwide.
Farmers use it to propagate desirable fruit varieties. Many apple trees, for example, are grafted. This ensures consistent fruit quality.
It also allows for specific rootstock benefits.
For instance, dwarf rootstocks are common. They keep fruit trees small. This makes harvesting easier.
It also saves space in orchards. These dwarf trees are not grown from seed. They are propagated by grafting.
The desirable fruit variety is grafted onto a dwarfing rootstock. This gives you the fruit you want. And the size you need.
Nurseries use cleft grafting to create ornamental trees. They might graft a weeping variety onto a standard upright trunk. This creates a dramatic weeping effect.
It’s a popular design element in landscaping. They can also graft multiple colors of flowers onto one bush. For example, different colored roses can be grafted onto a single hardy rootstock.
It’s also used to rejuvenate old fruit trees. If an old tree is producing poor fruit, you can graft new varieties onto it. This allows you to update the tree.
You get new, better fruit. Without having to plant a whole new tree. It saves time and space.
It’s a sustainable way to improve existing plants.
Another application is disease resistance. Some fruit varieties are prone to disease. By grafting them onto a rootstock that is resistant to local soil-borne diseases, you can overcome this weakness.
The resulting tree is healthier. It produces better fruit. It lasts longer.
In essence, cleft grafting allows us to combine the best traits of two plants. It’s a way to control growth. It’s a way to improve performance.
It’s a way to ensure quality. It’s a fundamental tool for anyone serious about growing plants. It’s a testament to our understanding of plant biology.
Applications in Horticulture
- Fruit Tree Propagation: Ensuring consistent fruit quality and specific growth habits (e.g., dwarf trees).
- Ornamental Landscaping: Creating unique tree forms and mixed-flower shrubs.
- Tree Rejuvenation: Updating old trees with new, desirable varieties.
- Disease Management: Combining desirable traits with disease-resistant rootstocks.
What This Means for You
Understanding cleft grafting means you have a new skill. You can improve your garden. You can grow specific varieties.
You can make your plants stronger. When is it normal to graft? Most gardeners graft in spring.
For woody plants like fruit trees. Or ornamental shrubs. It’s a proactive step.
You do it to achieve a goal.
When should you worry? If you try to graft incompatible plants. They just won’t join.
If you don’t have clean tools. Germs can kill your graft. If you don’t wrap it tightly.
It will dry out. Or it will be unstable. These are signs things are going wrong.
Your graft union will fail.
Simple checks you can do are important. Look for signs of green growth from the scion. This is a good sign.
Check the graft union. Does it look healed? Is it firm?
If you see shoots from the rootstock, remove them. This is an ongoing check. It ensures your scion gets all the energy.
If your graft doesn’t take, don’t despair. It’s a learning process. Most people have failures at first.
The key is to learn why. Was it the timing? The technique?
The plant material? Use your experience. Try again.
The reward is well worth the effort. You can unlock new possibilities for your plants. You can become a master gardener.
Quick Tips for Grafting Success
Here are some quick tips to help your cleft grafts succeed:
- Sharpness is King: Always use a razor-sharp grafting knife and clean pruning shears. Dull tools damage plant tissue.
- Cleanliness Matters: Sterilize your tools with rubbing alcohol between cuts, especially when grafting multiple plants.
- Cambium Contact is Crucial: Ensure the green layer just under the bark of the scion lines up with the same layer on the rootstock.
- Tight Wrap: Secure the graft tightly with grafting tape or parafilm to prevent drying and movement.
- Don’t Over-Wrap: While snug, avoid wrapping so tightly that it crushes the bark or restricts future growth too much.
- Timing is Everything: Graft in late winter or early spring when plants are dormant but sap is rising.
- Rootstock Suckers: Be diligent about removing any new shoots that grow from the rootstock below the graft.
- Patience is a Virtue: Graft healing takes time. Don’t expect immediate results. Give it several weeks to months to establish.
Frequently Asked Questions about Cleft Grafting
What is the best time of year for cleft grafting?
The best time for cleft grafting is late winter or very early spring. This is typically February or March in many regions. You want to graft when the rootstock is dormant, but the sap is beginning to rise.
Avoid periods with hard frost or extreme cold.
Can I graft any two plants together using cleft grafting?
No, you cannot graft just any two plants. They must be compatible. This usually means they are of the same species or from the same plant family (genus).
For example, you can graft different apple varieties onto an apple rootstock, but you cannot graft an apple onto a rose.
How do I know if my graft has been successful?
Success is typically indicated by the buds on the scion swelling and then growing into new shoots. You might also see the graft union looking healed and firm after several weeks. If the scion turns black or shrivels, the graft has likely failed.
What are rootstock suckers and why should I remove them?
Rootstock suckers are new shoots that grow from the base or trunk of the rootstock plant, below the graft union. They are undesirable because they take energy and resources away from the scion. Removing them ensures that the energy goes to the part of the plant you want to grow.
How deep should the split be in the rootstock for cleft grafting?
The vertical split in the rootstock should be about 1 to 1.5 inches deep. This depth is enough to securely hold the wedge-shaped scion. The depth should be consistent with the length of the wedge you create on the scion.
Can I use grafting wax instead of grafting tape?
Grafting tape or parafilm is generally used to hold the scion in place and provide initial sealing. Grafting wax is often used as an additional protective layer over the tape. It helps to further seal out air and moisture, especially in dry conditions.
While tape is essential, wax provides extra insurance for the graft.
What happens if the scion is much smaller or larger than the rootstock?
For cleft grafting, it’s ideal if the scion and rootstock are roughly the same size, usually around pencil-thick. If the rootstock is significantly larger, you can make two splits and insert two scions, one on each side. If the scion is much smaller, it can be difficult to get proper cambium contact.
Precision is key, and matching sizes helps greatly.
Conclusion
Cleft grafting is a powerful technique. It allows you to combine plant traits. It’s a skill that takes practice.
But the rewards are great. You can grow better fruit. You can create beautiful trees.
Don’t be afraid to try it. Follow the steps carefully. Use sharp, clean tools.
Be patient. With a little effort, you can master this skill. Happy grafting!