How to Prevent Root Rot in Potted Indoor Plants
Water indoor potted plants when the top 1 to 2 inches of mix are dry, the pot feels lighter, and no water remains in the saucer; use a pot with drainage holes and a fast-draining mix. Skip those checks, and roots lose oxygen, rot, and fail even while the leaves still look thirsty. This guide shows how to prevent root rot with watering diagnostics, drainage design, and winter risk control, plus how to tell rot from simple underwatering.
What root rot looks like


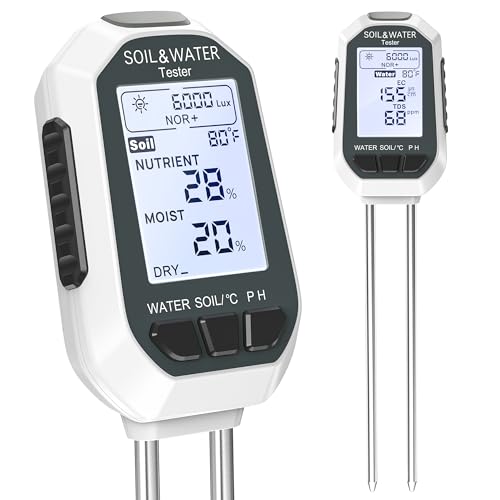
Root rot usually starts below the surface, where you cannot see it. By the time leaves yellow or wilt, roots may already be brown, black, soft, and soggy instead of green or white and firm. The problem can involve fungi, bacteria, or oomycetes, and it often follows overwatering, poor drainage, or both.
Above-ground warning signs
Watch for yellowing leaves, brown patches, dropping leaves, mushy stems, wilting, and stalled growth. Those signs can also appear with drought, so they are a warning, not a diagnosis. If a plant droops while the mix still feels wet, root rot moves higher on the list.
What healthy roots should look and feel like
Healthy roots are usually green or white and feel firm. Rotten roots turn brown or black and feel soft, mushy, or broken. If the root ball smells sour or swampy, that is another strong sign that oxygen has been pushed out by too much moisture.
When drooping means thirst instead of rot
A plant that perks up soon after watering, with dry mix and light-colored roots, is more likely thirsty than rotting. A plant that stays limp after watering, with wet soil and damaged roots, needs inspection. One symptom alone is not enough; soil condition decides the next move.
What you’ll need
- Moisture meter or your finger for a direct soil check
- Clean scissors or clippers
- Fresh potting mix matched to the plant type
- A clean pot with drainage holes
- A saucer or cachepot that can be emptied after watering
- Rubbing alcohol or a 10 percent bleach solution
- Disposable gloves or paper towels for cleanup
How do you tell thirst from root rot?
Check the mix at root depth before you water. If it is dry near the roots, the pot feels light, and the leaves are just limp, the plant may need water. If the mix is still damp, the pot is heavy, and the plant is yellowing or collapsing, inspect for rot before adding more water.
Check soil moisture at root depth
Use a moisture meter or insert a finger 1 to 2 inches into the mix, deeper for large pots. Surface dryness can fool you, especially in plastic pots where the top dries faster than the lower root zone. Fixed schedules fail because light, humidity, pot size, and season all change drying time.
Inspect drainage holes and standing water
Look under the pot after watering. If water is pooling in a saucer or cachepot, the roots can sit in oxygen-poor mix. Decorative pots should be emptied 30 minutes after watering, and saucers below houseplants should be emptied regularly. Standing water is a common hidden cause of repeat rot.
Look for yellowing, mushy stems, and a sour smell
Yellow leaves, mushy stems, and a sour smell point toward rot, especially when the mix is wet. A common first-time mistake is watering again because the plant looks thirsty. If a 6-inch plastic pot on a cool windowsill stays wet for about a week, that pattern calls for drainage and inspection rather than another drink.
How to water without causing rot
Water only when the mix is ready, not on a calendar. Then water thoroughly so the whole root ball is moistened, and let excess drain away. That approach works better than tiny, frequent sips because it avoids a permanently damp lower layer that starves roots of air.
Use plant type to set the trigger
Aroids usually prefer an evenly moist but airy mix; herbs often want more regular moisture; orchids need a very open medium; succulents need a longer dry-down between waterings. The right trigger depends on the plant’s moisture tolerance, not on a single rule for every pot indoors.
Top up only after rechecking
If the top dries but the lower mix still feels cool and damp, wait. If you do water, add enough to wet the root ball fully, then stop and let the pot drain. Recheck the saucer after 30 minutes. That short pause prevents standing water from feeding repeat rot.
Root rot prevention checklist by setup
| Plant type | Pot type | Drainage risk | Watering trigger | Rescue action |
|---|---|---|---|---|
| Succulent | Terracotta with drainage hole | Low if fully drained | Mix dry deep down and pot feels light | If leaves collapse while mix is wet, unpot and inspect |
| Aroid | Nursery pot inside cachepot | High if cachepot holds water | Top 1 to 2 inches dry, lower mix just barely moist | Empty cachepot after 30 minutes; inspect if soil stays wet 7 days |
| Herb | Plastic pot with saucer | Moderate to high | Surface dry and pot noticeably lighter | Dump standing water; repot if roots are brown and soggy |
| Orchid | Slotted pot or bark container | Low to moderate | Bark almost dry, roots silvery rather than green | Increase air flow; replace dense mix with fresh orchid mix |
| Winter windowsill plant | Terracotta | Moderate from slow drying | Meter reads dry below the surface | Water less often and move away from cold glass if possible |
| Grow-light plant | Plastic pot | Moderate from faster growth and uneven dry-down | Pot lightens and mix is dry at root depth | Use a moisture meter; inspect if foliage wilts while mix stays wet |
Use this as a yes-or-no rule: if the plant is wilting or yellowing and the mix is still wet, unpot and inspect roots now. If the plant is healthy and the mix is dry at the right depth, wait and water only after a recheck.
Does your pot setup drain properly?
A pot can look correct and still trap water. Nursery pots, cachepots, and saucers work only when excess water leaves the root zone quickly. Drainage holes are non-negotiable for most container plants. Without them, water pools at the bottom and keeps roots wet long after the surface dries.
Nursery pot inside cachepot
This setup is useful if the inner pot drains freely and the outer pot is emptied after watering. If the nursery pot sits in pooled water, the root ball can stay saturated even though the top looks dry. Lift the inner pot out after watering and empty the outer pot within 30 minutes.
Terracotta versus plastic
Terracotta dries faster because it sheds moisture through the sides, so it is often safer for plants that dislike wet feet. Plastic holds moisture longer, which can help thirsty plants but raises rot risk if you water on a schedule. Choose the pot based on drying speed, not appearance.
Saucers and standing water
Saucers should not hold standing water. Any runoff should be discarded after watering, because repeated contact with pooled water keeps the lower roots wet. A layer of rocks or broken pottery at the base does not replace drainage holes and can make wet pockets worse.
How does winter change the risk?
Winter raises root rot risk indoors because soil dries more slowly, light is weaker, and cool windowsills reduce root activity. Plants that look thirsty may actually be stalled by low light and cold roots, so the same watering rhythm that worked in summer can become too frequent.
Windowsill cooling and slower drying
Potting mix near cold glass can stay wet much longer than expected. Terracotta helps some, but even porous pots slow down in cool rooms. Move pots away from cold panes if possible, and expect longer dry-down times in winter than in brighter, warmer months.
Lower light and reduced uptake
Plants use less water when light drops. That means the top layer may dry while the root zone remains damp. For slower growers, check before watering every time instead of relying on a fixed weekly schedule. A moisture meter is especially useful when humidity and light keep changing.
Watering changes for dormant or slower plants
Reduce frequency, not necessarily volume, and only after the mix has actually dried. If a snake plant sits on a north-facing sill in January and the pot still feels heavy after about 10 days, that is a signal to wait rather than top off. Winter care is about slower timing, not neglect.
How do you treat root rot in plants?
Unpot the plant, trim away any rotten roots, and move the healthy portion into fresh mix in a clean pot with drainage holes. Use clean scissors or clippers, sterilized between cuts, and do not reuse infected soil. Treatment works best when enough firm, healthy roots remain to support new growth.
- Remove the plant from the pot and shake off loose mix.
- Rinse the roots enough to see damage clearly.
- Cut off black, soggy, or broken roots above the damaged area.
- Sterilize tools between cuts with rubbing alcohol or bleach solution.
- Discard infected mix; do not reuse it.
- Repot in fresh potting mix in a clean container with drainage holes.
- Keep the plant slightly drier for the first watering cycle and recheck before watering again.
If that didn’t work, try this next
If most roots are gone, salvage only the healthy stem or leaf sections by taking cuttings where the plant type allows it. If the base is soft all the way through, the stem collapses, or no firm roots remain, the plant is usually too far gone. At that point, disposal is safer than repeated repotting.
Common mistakes
Many repeat infections come from the setup, not the plant. Fix the system once, or the problem returns after repotting.
- Using garden soil indoors instead of a well-draining potting mix
- Leaving water in a cachepot or saucer after watering
- Choosing an oversized container that holds more moisture than the roots can use
- Reusing old mix from an infected pot
- Repotting into a blend that stays wet too long for the plant type
- Skipping tool sanitation between cuts or between plants
- Watering on a fixed schedule instead of checking the soil first
For sanitation, clean reused pots and tools with a 10 percent bleach solution, or wipe tools with rubbing alcohol. Keep sick plants separate from healthy ones, and isolate new plants for a week or two before putting them with the rest of the collection.
Frequently asked questions
What to do for root rot
Unpot the plant, inspect the root ball, and make a yes-or-no decision based on moisture plus symptoms. Wet soil with yellowing leaves means inspect now. Dry soil with firm roots means wait. After treatment, keep tools clean, use fresh mix, and isolate the plant until it stabilizes.