Yes, you can divide hostas without digging up the entire plant. While full excavation is common, there are simpler methods for smaller divisions or to minimize disruption. These techniques allow you to manage size, rejuvenate older plants, and get new hostas for other garden spots with less effort. It’s all about working smarter, not harder, in your garden.
Understanding Hosta Division
Hostas are perennial plants. This means they live for many years. As they grow, their clumps get larger. The center of an older hosta clump can sometimes get thin or even die out. This is normal. Dividing hostas helps them stay healthy. It also helps them grow better.
Dividing means cutting a big clump into smaller pieces. Each piece should have roots and some shoots or eyes. These pieces can then be planted elsewhere. They will grow into new, independent hosta plants. This is a great way to get more plants for free. It also keeps your current hostas from getting too big.
Most gardeners divide hostas in spring or fall. These are cooler times of the year. This helps the new divisions settle in without too much stress. Spring is when new growth starts. Fall is after the growing season ends. Both times are good for the plant.
My Own Hosta Overgrowth Story
I remember one summer so clearly. My favorite hosta, a big ‘Blue Angel,’ had exploded in size. It was magnificent, a true giant. But it was taking over half my shade garden. It shaded out some delicate ferns I loved. I knew I had to do something.
Digging up that entire mass of roots felt daunting. I pictured a huge, heavy ball of dirt. I was worried about damaging the plant. Or worse, I’d get it halfway out and decide I couldn’t manage it. My back wasn’t what it used to be. I spent days thinking about it. I’d stare at it, then look at my ferns, then sigh.
One Saturday, I decided to just try a small section. I grabbed my trowel and a sharp knife. I gently worked around the edge of the clump. I dug down a bit. I found a section that looked like it had its own roots. I carefully wiggled my trowel and knife. Then, with a gentle pull, a smaller section broke free. It had roots! I was so relieved. It wasn’t that hard after all. I planted it in a new spot. It did great. That experience taught me that sometimes, you don’t need to go big. Small steps work too.
Quick Guide: When to Divide Hostas
Best Times:
- Early Spring: Before leaves fully unfurl.
- Early Fall: About 4-6 weeks before your first hard frost.
Avoid:
- Hot Summer Days: Too stressful for new divisions.
- Late Fall/Winter: Plant won’t have time to root.
The ‘Edging’ Method: Less Digging, More Dividing
This is where you can divide hostas without lifting the whole plant. It’s perfect for large, established clumps. You focus on just one side. You don’t need to disturb the plant’s core.
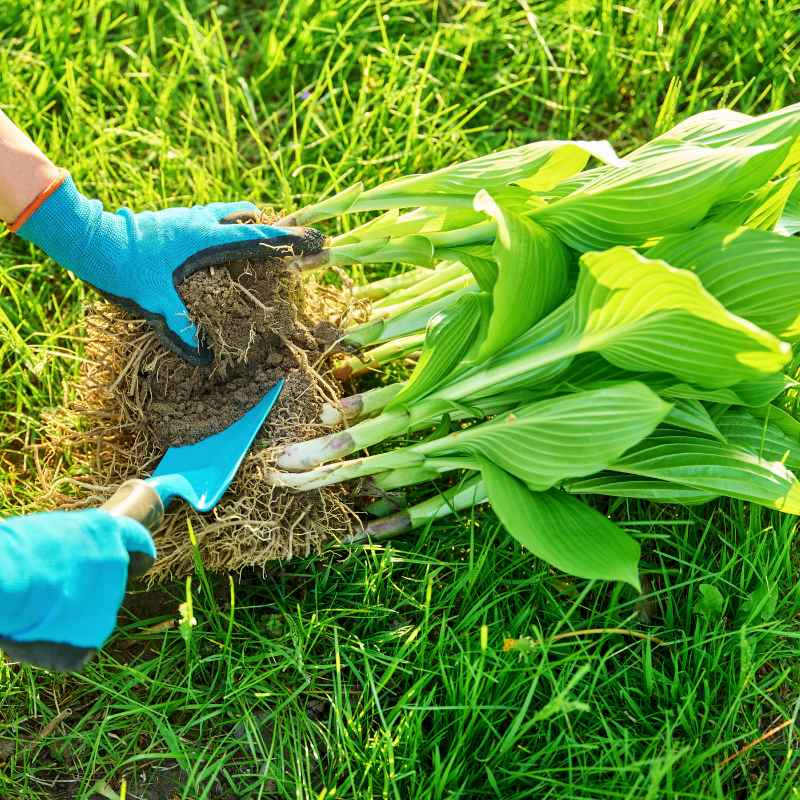
First, choose the side of the hosta you want to divide. Look for a spot where the leaves are healthy. You’ll need a sharp spade or a sturdy knife. Dig down along the outer edge of the clump. You want to cut into the root ball. Go deep enough to get good roots.
Work your way around about a quarter or a third of the clump. Make a clean cut. Then, carefully pry that section away from the main plant. You might need to use your spade as a lever. Sometimes, a sturdy fork can help loosen the roots.
This section should have its own roots and shoots. If it looks good, you can plant it right away. The main hosta plant is left mostly intact. It barely notices you took a piece. This method is much less disruptive. It’s a great way to start if you’re nervous about dividing.
Contrast: Full Dig vs. Edging
Full Dig:
- Pros: Allows for multiple divisions, easy to see all roots.
- Cons: Very disruptive, heavy lifting, can shock the plant.
Edging Method:
- Pros: Minimal disruption, no heavy lifting, quick.
- Cons: Only allows for one or two divisions at a time.
Using Tools for Precision: The Sharp Knife or Spade
The right tools make all the difference. For the edging method, a sharp spade is ideal. It cuts through tough roots easily. You can also use a garden knife, like a hori-hori tool. These are sturdy and have a sharp edge.
If your hosta clump is very tough, a reciprocating saw might be used. This is for very large plants. Many gardeners are hesitant about power tools. But it can cleanly slice through thick root masses. Always use safety precautions if you try this. Make sure the plant is dry.
For smaller hostas, or if you want to be extra gentle, a sharp hand trowel or a sturdy digging fork works well. The key is a sharp edge. A dull tool will tear roots. This can harm the plant more. A clean cut heals faster.
The ‘Split and Pull’ Technique for Smaller Clumps
This method is good for hostas that aren’t huge yet. Or if you want to divide a smaller part of a larger plant. It’s a bit more hands-on than edging.
You’ll still want to dig a bit. Get your spade or trowel under the edge of the hosta. Loosen a section. Once you have a piece that’s partially free, you can try to split it. Sometimes, you can pull the two halves apart with your hands.
If it’s still too firm, use your spade or knife to make the split. You’re aiming for a piece that’s maybe 3-4 inches across. It needs to have roots. And it needs to have at least one or two growing points, called eyes. These look like little buds on top of the roots.
This technique lets you get several smaller divisions from one clump. It’s faster than digging the whole thing. It’s less work than a full excavation.
Dividing with Just Water: A Gentler Approach
This is a less common method. It’s also more time-consuming. But it can be very gentle. You use water to help loosen the soil from the roots.
You might do this if you’re trying to save a plant that’s struggling. Or if you want to be extremely careful. You’d carefully wash away the soil from the root ball. Use a hose with a gentle spray. Or even a watering can.
As the soil washes away, you can see the roots more clearly. You can also see where the individual shoots emerge from the crown. Once the roots are clean, you can often gently pull apart sections. The water helps lubricate the roots. It makes them easier to separate.
This method takes patience. You need to be willing to get a little muddy. But it gives you a very clean division. You can see exactly what you’re doing.
Hosta Division: Step-by-Step (Edging Method)
1. Prepare: Choose a cool day (spring or fall). Have tools ready: spade, knife, watering can.
2. Select Area: Pick a side of the hosta clump.
3. Dig: Insert spade along the edge. Dig down to cut roots.
4. Pry: Gently lever the section away from the main plant.
5. Separate: If needed, use a knife to help split the section cleanly.
6. Plant: Immediately plant the new division in its new spot.
When the Whole Plant Must Come Out
Sometimes, you just have to dig it all up. This happens when:
The plant is very old and dense.
You want to divide it into many smaller pieces.
The center has completely died out.
You need to move the entire hosta to a new location.
Even then, you can make it easier. Get help if you need it. Use a sharp spade or a garden fork. Dig around the entire plant. Try to get as much of the root ball as possible. Sometimes, you need to work around obstacles like tree roots.
Once it’s out, you can place it on a tarp. Then, use your tools to cut it into sections. You can use a sharp knife, a spade, or even a small saw. Aim for pieces that are at least the size of your fist. Each needs roots and eyes.
What to Do With Your New Divisions
Once you have a divided section, don’t wait too long to plant it. The sooner it goes in the ground, the better it will establish.
Dig a hole in the new spot. It should be big enough for the roots. Place the division in the hole. The top of the root ball should be level with the soil surface. Or just slightly below. Don’t plant it too deep. This can cause rot.
Water it well after planting. Keep the new division watered. Especially in the first few weeks. This helps the roots start growing into the new soil. You can mulch around it to help keep moisture in.
If you can’t plant it right away, you can heel it in. This means digging a temporary trench. Place the division in the trench. Cover the roots with soil. Keep it watered. This keeps it alive until you have a permanent spot ready.
Planting Your New Hosta Divisions
Dig Hole: Make it twice as wide as the root ball.
Place Division: Ensure the crown is at soil level.
Backfill: Use good garden soil. Firm gently.
Water: Water deeply to settle soil and hydrate roots.
Mulch: Add a layer of mulch around the plant.
Common Mistakes to Avoid
Dividing at the wrong time: Trying to divide in hot, dry weather is a recipe for disaster. The plant will get too stressed.
Planting too deep: The crown of the hosta needs to be at or just above the soil line. Planting too deep leads to rot.
Not enough roots: Make sure your division has a decent root system. A piece with no roots is unlikely to survive.
Too many eyes, not enough roots: You need a good balance. If you have many shoots but very few roots, it’s a tough start.
Not watering enough: New divisions need consistent moisture. They can’t dry out.
What If My Hosta Has No Visible Eyes?
Sometimes, especially with very old or neglected hostas, you might struggle to find clear eyes. These are the small buds where new leaves emerge. Don’t panic.
If you have a good chunk of root ball, it might still grow. You can plant it. Keep it consistently watered. It might take a little longer to show signs of life. But sometimes, new shoots will appear from the root mass.
If you’re using the edging method, you’re likely to get sections with visible eyes. This is one reason it’s often easier. It’s more foolproof for beginners.
When to Worry About Your Hostas
While dividing is generally safe, sometimes hostas can have issues. If your hosta clump is mostly dead, with very little green growth, it might be too far gone. Or it could have a disease or pest problem.
If you see signs of slug or snail damage, that’s normal. Hostas are a favorite food for them. But if the damage is severe, it can weaken the plant. Make sure to manage pests.
If the roots look rotten or mushy, that’s a sign of overwatering or poor drainage. This needs to be fixed before dividing or replanting. You might need to amend the soil with compost to improve drainage.
Real-World Context: Different Hosta Types
The method you choose can depend on the type of hosta you have.
Small Hostas: Varieties like ‘Blue Mouse Ears’ are tiny. They don’t need much dividing. When they do, you can often just pull a small piece off by hand or with a trowel.
Medium Hostas: Most common garden hostas fall here. They benefit from division every 3-5 years. The edging or split-and-pull methods work well.
Large Hostas: Giants like ‘Sum and Substance’ or ‘Blue Angel’ can get massive. They might require the edging method for smaller divisions or a full excavation with a spade or even a saw for larger sections.
The soil type also matters. In sandy soil, roots might pull apart easier. In heavy clay soil, you’ll need more force and sharper tools.
What This Means for You
Knowing these methods can save you a lot of hard work. You don’t always need to dig up your entire hosta. You can manage their size and get new plants with less effort. This means more hostas for your garden, or to share with friends. It also means healthier, more vibrant plants.
You can tackle an overgrown hosta without feeling overwhelmed. Start with the edging method if you’re unsure. It’s a low-risk way to try dividing. You’ll gain confidence as you see how well it works.
Quick Fixes & Tips
Clean Your Tools: Always use clean, sharp tools. This prevents spreading disease.
Water Well: After dividing and replanting, water deeply.
Mulch: A layer of mulch helps retain moisture and suppress weeds.
Label: If you’re dividing multiple varieties, label them so you remember which is which.
Be Patient: Sometimes, divisions take a little time to show their full glory.
Frequently Asked Questions
Can I divide a hosta in the middle of summer?
It’s best to avoid dividing hostas in the middle of summer. The heat and sun can stress the plant and its new divisions. Spring and early fall are the ideal times for dividing.
If you must divide in summer, choose a cool, cloudy day and water very diligently.
How small can a hosta division be?
A hosta division needs to be at least 3-4 inches across. It must have some healthy roots and at least one or two visible eyes or growing points. Smaller divisions are riskier and may not establish as well.
What if my hosta division has no eyes?
If your division has a good amount of root material but no visible eyes, it might still grow. Plant it as usual and keep it well-watered. New shoots can sometimes emerge from the root crown.
However, divisions with eyes have a much higher success rate.
Can I divide a hosta that is newly planted?
It’s generally not recommended to divide a newly planted hosta. Let the plant establish itself for at least a year. Allow its root system to develop fully before attempting to divide it.
Rushing this process can harm the plant.
What causes the center of a hosta to die out?
As hostas age, the center often becomes less vigorous. This is a natural part of their growth cycle. It can also be caused by too much competition from surrounding plants, poor soil, or lack of water.
Dividing helps rejuvenate the plant and prevent this.
How often should I divide my hostas?
Most hostas benefit from dividing every 3 to 5 years. Smaller varieties might not need dividing as often. Larger, vigorous growers might need it sooner.
Observe your plants; if they are getting too large or the center is thinning, it’s time to divide.
Wrapping Up: Easier Ways to Divide
You absolutely can divide hostas without digging up the whole plant. Methods like edging or split-and-pull are great for managing large clumps. They reduce stress on the plant and on you. Remember to choose the right time of year. Use sharp tools. And give your new divisions plenty of water. Happy gardening!