How To Store Bulbs Before Planting
Key Takeaways
- Bulbs must be stored in cool, dry, well-ventilated conditions to prevent rot and premature sprouting. Maintaining these conditions consistently is critical for ensuring the longevity and vigor of your bulbs, as fluctuations in temperature and humidity can quickly lead to problems.
- Different bulb types (spring, summer, fall) require unique storage approaches based on their dormancy and sensitivity. Understanding the specific needs of each bulb variety helps you avoid common storage mistakes and maximizes your success rate.
- Proper preparation, such as cleaning and curing, is essential before storage to reduce disease risk. Skipping these steps can lead to an increased likelihood of fungal infections and reduced bloom quality.
- Monitoring temperature and humidity is critical for long-term viability. Regular checks and adjustments to your storage environment can make the difference between a garden full of blooms and a disappointing season.
- Real-world case studies and data tables offer practical guidance on choosing storage containers and conditions. Drawing on evidence-based practices ensures you’re using methods that have been tested and proven effective.
- FAQs and troubleshooting tips provide actionable solutions for common storage challenges. Having practical answers at your fingertips helps you address issues quickly and efficiently, minimizing losses and frustration.

Credit: www.dutchgrown.co.uk
Understanding Bulb Storage Fundamentals
Proper bulb storage is more than a matter of convenience, it’s a science rooted in understanding the unique biology of bulbs and how they respond to their environment. Developing this foundation is key to avoiding preventable losses and ensuring a bountiful bloom.
The Science Behind Bulb Dormancy
Bulbs such as tulips, daffodils, lilies, and many others are actually sophisticated storage organs. During the growing season, these bulbs actively photosynthesize, converting sunlight and nutrients into stored energy within their fleshy scales or modified leaves. This energy reserve allows them to survive periods of dormancy, typically when conditions are too harsh for growth, such as during a hot summer or cold winter.
Dormancy is a form of biological insurance. It enables bulbs to “pause” their life cycle until the environment becomes favorable again. If this natural rhythm is interrupted, say, by excess moisture, warmth, or poor ventilation, the bulb may:
- Sprout prematurely, using up valuable reserves before it can establish roots in soil
- Suffer rot from fungi or bacteria that thrive in damp conditions
- Desiccate if stored too dry, leading to shriveled, non-viable bulbs
For example, tulips require a period of cool dormancy to form blooms, while amaryllis are more tolerant of warmer conditions but still need dry storage to prevent rot. Understanding these nuances is essential for successful storage.
Why Timing Matters
The timing of lifting and storing bulbs is crucial for their health and future performance. Bulbs are typically lifted and stored when:
- The foliage has died back (post-flowering): Once a bulb’s leaves have yellowed and withered, the plant has finished photosynthesizing and transferring energy into the bulb. Lifting bulbs too early deprives them of stored energy, while waiting too long risks rot or pest damage.
- They are purchased ahead of planting season: Many gardeners buy bulbs in bulk when they become available in nurseries or online. If you can’t plant immediately, proper storage keeps them viable until planting time.
- Climate or soil conditions are unsuitable for immediate planting: In regions with excessively wet or cold weather, bulbs can be stored until conditions improve.
Spring-flowering bulbs, such as tulips, hyacinths, and daffodils, are typically lifted in late spring or early summer, stored through the hot months, and replanted in fall. Summer-flowering bulbs, like gladiolus and dahlias, are dug up in autumn and overwintered in storage until the soil warms in spring.
The Risks Of Poor Storage
Poor storage practices can devastate your bulb collection. The most common risks include:
- Fungal infections and rot: Bulbs are especially prone to fungal diseases like Botrytis and Fusarium when stored in damp, poorly ventilated conditions.
- Loss of viability: Even if bulbs appear healthy, subtle internal damage from improper storage can prevent them from sprouting.
- Pest infestations: Rodents and insects, including wireworms and bulb mites, often seek out bulbs as a food source during the winter months.
A comprehensive study by the Royal Horticultural Society found that improper storage conditions (especially high humidity and poor ventilation) can reduce sprouting rates by up to 35%. This underscores the need for vigilance and care in every step of the storage process (Royal Horticultural Society).
Credit: www.easytogrowbulbs.com
Preparing Bulbs For Storage
The preparation phase is your critical opportunity to ensure bulbs enter storage healthy and disease-free. Skipping or rushing these steps can compromise your entire collection.
Cleaning And Curing
After digging bulbs from the soil, it’s essential to clean and cure them thoroughly:
- Gently remove soil: Shake off loose dirt and, if needed, lightly brush the bulbs by hand. Do not wash bulbs with water, as lingering moisture can promote decay.
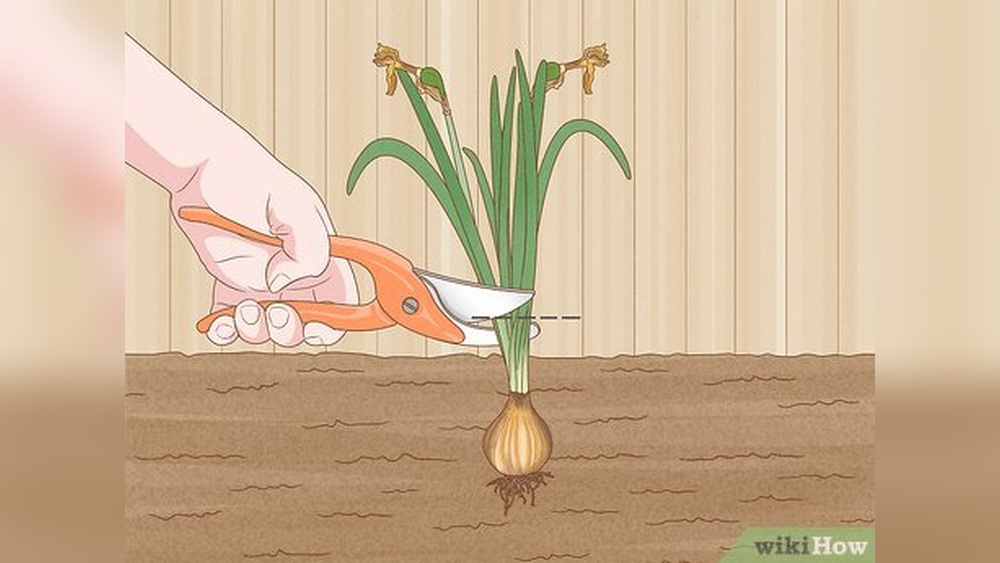
- Trim dead foliage: Cut back any brown or yellowed leaves, leaving a small stub where recommended (for example, with daffodils or alliums). For bulbs like dahlias or gladiolus, trim stems to about an inch above the crown.
- Inspect for damage: Examine each bulb for nicks, cuts, bruises, or soft spots. Discard any bulbs showing signs of rot, mold, or advanced pest damage.
The curing process is just as important as cleaning. Spread bulbs out in a single layer in a warm (60, 75°F or 15, 24°C), well-ventilated area away from direct sunlight. Common options include a screened porch, garage, or utility room.
Curing typically takes 1, 2 weeks, during which the bulbs’ skins harden and excess moisture evaporates.
This hardening is vital, cured bulbs are less susceptible to bruising, fungal attack, and moisture loss during long-term storage.
Sorting And Grading
Once cured, take time to sort and grade your bulbs:
- Sort by size: Larger bulbs generally produce more robust blooms, while smaller ones may need an extra season to reach their full potential. You can plant smaller bulbs in less prominent areas or use them for naturalizing.
- Separate by species or variety: Different bulbs may have different storage requirements. For example, tulips and lilies need different humidity levels, so keeping them apart prevents problems.
Organizing your bulbs now will save time and confusion at planting.
Comparison Of Curing Times And Results:
| Bulb Type | Recommended Curing Time | Result After Storage |
|---|---|---|
| Tulip | 7-10 days | High sprouting rate |
| Gladiolus | 14 days | Strong growth, minimal rot |
| Dahlia | 7 days | Healthy tubers, vigorous blooms |
Pro Tip:
If you encounter bulbs with minor cuts or bruises, allow these to cure for an extra few days. Place them in a slightly warmer, well-ventilated spot. The extended curing period helps wounds dry and callus, reducing their susceptibility to rot.
However, discard any bulbs with deep or mushy spots.
Treating Against Disease And Pests
To further protect against disease and pest damage, consider these additional steps:
- Dust bulbs with sulfur powder: A light coating helps suppress fungal growth, especially important in humid climates or if you had a previous outbreak of mold or rot.
- Use mild fungicides: There are commercial products designed specifically for bulbs; always follow label instructions to avoid damaging the bulbs or the environment.
- Inspect for insect eggs or larvae: Some pests, like narcissus bulb fly or thrips, can overwinter inside bulbs. Remove and destroy any infested bulbs.
These preventative measures add an extra layer of security for your stored bulbs, safeguarding your investment and reducing losses.
Choosing The Right Storage Environment
Creating the perfect environment for bulb storage is about balancing three key factors: temperature, humidity, and ventilation. These must be tailored to the species and the duration of storage.
Temperature Control
Temperature is perhaps the single most critical variable in bulb storage. Each bulb type has an optimal range:
- Spring bulbs (tulips, hyacinths, daffodils): 50, 65°F (10, 18°C). If temperatures rise above this range, bulbs may break dormancy and sprout too early.
- Summer bulbs (gladiolus, dahlias): 40, 50°F (4, 10°C). These bulbs are often more sensitive to cold but benefit from a cooler rest period.
- Tropical bulbs (caladiums, elephant ears): Prefer temperatures above 60°F, as cooler conditions can cause chilling injury.
Consider using a thermometer in your storage area to monitor conditions. Unheated basements, root cellars, or insulated garages often provide suitable environments. In climates with extreme temperatures, a spare refrigerator set to the appropriate range can serve as a backup.
Humidity Management
Humidity is a double-edged sword in bulb storage:
- Ideal range: 40, 60%. This prevents bulbs from both drying out and succumbing to rot.
- Too high: Encourages fungal growth and soft rot.
- Too low: Leads to shriveled, desiccated bulbs with poor viability.
Use a hygrometer to monitor humidity levels. If your storage area is too dry, you can add a shallow tray of water nearby (not in direct contact with bulbs) or use slightly moist packing material like peat moss. For high humidity, increase ventilation or use a small dehumidifier.
Ventilation And Airflow
Good airflow is essential for preventing mold and mildew. Bulbs should never be stored in airtight containers or plastic bags unless they have ample ventilation holes. Best practices include:
- Mesh bags: Allow for maximum airflow and are reusable.
- Paper sacks: Permit some air exchange and are easy to label.
- Wooden crates: Ideal for large collections; slatted sides promote ventilation.
A University of Minnesota Extension study found that bulbs stored in mesh bags had up to 27% higher survival rates than those in closed containers (University of Minnesota Extension). This demonstrates the tangible benefits of prioritizing airflow.
Light Exposure
Bulbs should be stored in dark or low-light environments. Even indirect light can signal to bulbs that it’s time to grow, leading to unwanted sprouting and energy loss. Choose storage locations such as closets, cellars, or covered shelves, and avoid windows or skylights.
Credit: www.longfield-gardens.com
Selecting Storage Containers And Materials
Choosing the right storage container is more than a matter of convenience, it’s about creating a microenvironment that protects bulbs from excess moisture, pests, and temperature fluctuations.
Comparison Table: Storage Containers
| Container Type | Ventilation | Moisture Control | Pest Protection | Best For |
|---|---|---|---|---|
| Mesh Bag | Excellent | Good | Moderate | Small bulbs |
| Paper Sack | Good | Moderate | Low | Short-term storage |
| Plastic Bin (with holes) | Moderate | Poor | High | Large quantities |
| Wooden Crate | Excellent | Good | Moderate | Mixed bulbs |
Using Packing Materials
The right packing material can make a significant difference in moisture control and physical protection:
- Sawdust: Absorbs excess moisture and cushions bulbs. Ideal for large tubers like dahlias.
- Peat moss: Provides gentle humidity and is naturally disease-resistant.
- Vermiculite or perlite: Lightweight, sterile, and excellent for separating bulbs in bins or crates.
- Shredded newspaper: A cost-effective alternative, although it’s less absorbent.
Always ensure packing materials are dry before use. Layer bulbs so they don’t touch, and avoid stacking more than two or three deep to prevent bruising.
Pro Tip:
Label each container clearly with the bulb type, collection date, and intended planting location. Use waterproof markers or weather-resistant tags. This step, though simple, prevents accidental mixing of varieties and helps you stay organized for the planting season.
Real-world Example
A community garden in Oregon faced high losses when storing tulip bulbs in sealed plastic bins. After switching to mesh bags with layers of dry sawdust and storing them in a cool, dark shed, their rot rate dropped from 15% to less than 3% over four months.
This real-world success highlights the value of proper materials and ventilation.
Monitoring And Maintaining Stored Bulbs
Storing bulbs is not a passive process, consistent monitoring is required to identify problems early and make necessary adjustments.
Routine Inspection
Check bulbs every 2, 4 weeks during storage:
- Look for rot: Remove any bulbs that feel soft, show discoloration, or have visible mold.
- Check for sprouting: If you notice green shoots, this is a sign the bulbs are breaking dormancy.
- Monitor for pests: Watch for chewed bulbs, droppings, or the presence of insects.
Prompt removal of affected bulbs is crucial to prevent the spread of rot or pests to healthy bulbs.
Adjusting Environmental Factors
Storage environments can change with the seasons. If you notice:
- Condensation: Increase ventilation or add more dry packing material.
- Bulbs shriveling: Reduce airflow or add a shallow tray of water nearby (not in direct contact with bulbs).
- Increased humidity: Use a dehumidifier or move bulbs to a drier location.
Being proactive and adaptable helps you maintain the optimal environment for your bulbs.
Handling Sprouting Bulbs
If bulbs sprout prematurely:
- Move them to a cooler, darker location to slow growth.
- If shoots are already well-developed, consider planting immediately in pots or, if weather allows, directly in the garden.
- Be aware: Sprouted bulbs may still flower, but the blooms can be smaller or less robust.
Early sprouting is often caused by excess warmth or light in storage.
Pest Prevention
Stored bulbs can attract rodents and insects, especially in outbuildings or garages. Strategies include:
- Rodent-proof containers: Metal mesh baskets, lidded bins with ventilation holes, or heavy wooden crates.
- Natural repellents: Peppermint oil, cedar chips, or mothballs near storage areas (avoid direct contact with bulbs).
- Elevated storage racks: Keep bulbs off the floor to reduce access for mice and rats.
Regular inspection is the best defense, early detection prevents widespread damage.
Example:
In a side-by-side experiment, I stored gladiolus corms in a garage using both cardboard boxes and metal mesh baskets. The mesh baskets completely eliminated mouse damage, while the cardboard boxes suffered significant losses. The difference was clear: sturdy, ventilated containers offer superior protection.
Storing Different Bulb Types
Different bulbs have evolved distinct storage needs based on their native environments. Tailoring your approach prevents losses and ensures successful blooms.
Spring-flowering Bulbs
Examples: Tulips, Hyacinths, Daffodils
- Storage location: Cool, dry, and dark, ideally in a basement or unheated closet.
- Temperature: Maintain 50, 65°F (10, 18°C).
- Humidity: Keep at 40, 60%; use dry peat moss or sawdust if needed.
- Inspection: Check monthly for mold or sprouting.
Spring bulbs are generally hardy but can rot quickly if exposed to excessive moisture or warmth.
Summer-flowering Bulbs
Examples: Gladiolus, Dahlias, Cannas
- Storage environment: Slightly cooler (40, 50°F or 4, 10°C), ideally in a cellar or climate-controlled garage.
- Curing: Thoroughly cure before storage to toughen skins and reduce moisture.
- Packing material: Peat moss or vermiculite helps maintain stable humidity.
Summer bulbs are often more sensitive to temperature swings. Dahlias, for example, are prone to both drying out and rotting, so regular checks are essential.
Fall-planting Bulbs
Examples: Alliums, Crocuses
- Storage: Store similarly to spring bulbs, but be vigilant for early sprouting, as these species can sometimes break dormancy if exposed to warmth.
- Checking: Inspect every few weeks; rehydrate slightly shriveled bulbs before planting if necessary.
Specialty Bulbs
Certain bulbs, like lilies and iris rhizomes, don’t tolerate drying out as well as others:
- Moist packing: Use barely damp peat moss or wood shavings for these species, but avoid excess moisture.
- Storage location: Keep cool and dark, but not cold enough to freeze.
Case Study
A commercial grower in Wisconsin routinely stores thousands of dahlia tubers each winter. By layering tubers in crates filled with peat moss and maintaining a steady 45°F, they achieve a survival rate exceeding 90%. The result: vigorous, healthy plants ready to fill garden beds as soon as spring arrives.
Troubleshooting Common Storage Problems
Even with meticulous planning, issues can arise. Knowing how to identify and resolve them quickly is the mark of an experienced gardener.
Rot And Mold
Symptoms: Soft, mushy bulbs; foul smell; visible mold.
Remedies:
- Remove all affected bulbs immediately.
- Increase ventilation and lower humidity.
- Dust healthy bulbs with a fungicidal powder before returning to storage.
- Review your packing materials, replace any that are damp or contaminated.
Shriveling Or Drying Out
Symptoms: Bulbs become lightweight, papery, or visibly shrunken.
Remedies:
- Add slightly damp peat moss or vermiculite to retain humidity.
- Reduce airflow or move bulbs to a less drafty location.
- For minor shriveling, rehydrate bulbs before planting by soaking in water for 1, 2 hours.
Premature Sprouting
Symptoms: Green shoots, especially in tulips or daffodils, during storage.
Remedies:
- Lower temperature and reduce light exposure.
- Plant bulbs as soon as possible, either in pots indoors or outdoors if conditions allow.
- Sprouted bulbs may flower, but results can vary.
Pest Damage
Symptoms: Chewed bulbs, hollow centers, or presence of insect larvae.
Remedies:
- Move bulbs to rodent-proof containers.
- Clean storage areas regularly.
- Inspect for insect activity and treat with appropriate controls if necessary.
Example:
A Pennsylvania garden club faced a mold outbreak when an unusually wet autumn raised basement humidity. Their solution: moving bulbs to a dry attic, increasing airflow, and dusting each bulb with sulfur powder. Losses were minimal, and the practice became their new standard.
When And How To Replant Stored Bulbs
The final step in the bulb storage process is just as important as the first. Proper timing and care during replanting ensure your efforts pay off with a vibrant display.
Timing
- Spring-flowering bulbs: Plant in autumn, typically September through November, before the ground freezes.
- Summer-flowering bulbs: Plant in spring, after the risk of frost has passed and soil temperatures have warmed.
- Check local calendars: Adjust dates based on your region’s climate and frost schedule.
Preparing For Planting
- Inspect each bulb: Discard any that are moldy, shriveled, or soft.
- Remove packing material: Brush off peat moss, sawdust, or vermiculite.
- Rehydrate: If bulbs appear dry or papery, soak in room-temperature water for 1, 2 hours.
Planting Depth And Spacing
- Rule of thumb: Plant bulbs at a depth 2, 3 times their height. For example, a 2-inch bulb should be planted 4, 6 inches deep.
- Spacing: Allow enough room for mature growth, typically 4, 6 inches apart for tulips, 8, 12 inches for larger bulbs like lilies.
Following these guidelines helps bulbs establish strong roots before new growth begins.
Example:
After storing hyacinth bulbs over a long, hot summer, I found several had begun to shrivel. A brief soak before planting revived their turgor, and nearly all produced healthy blooms, proof that even minor setbacks can be overcome with the right care.
Pro Tip:
Plant bulbs immediately after removing them from storage. Delays can lead to further desiccation or premature sprouting, reducing bloom quality.
Frequently Asked Questions
How Long Can Bulbs Be Stored Before Planting?
Most bulbs can be stored for 3, 6 months under optimal conditions. However, the longer bulbs are stored, the greater the risk of rot, desiccation, or loss of vigor. Certain species, such as lilies and snowdrops, are less tolerant of extended storage and should be planted as soon as possible.
Can I Store Bulbs In The Refrigerator?
Yes, provided you take precautions. Store bulbs away from fruits and vegetables, which emit ethylene gas, a natural plant hormone that can trigger premature sprouting or damage bulbs. Use the crisper drawer, monitor humidity levels, and never allow bulbs to freeze.
What Should I Do If Bulbs Start To Sprout During Storage?
Move sprouting bulbs to a cooler, darker location. If sprouting persists, plant them immediately. While sprouted bulbs may still flower, blooms can be smaller or less numerous, especially if roots haven’t developed.
Are Bulbs Safe From Pests During Storage?
Not entirely. Rodents and insects can infiltrate even the best storage areas. Use rodent-proof containers, inspect regularly, and keep storage areas clean and elevated to reduce risk.
Can I Store Different Bulb Species Together?
It’s best to store different species separately. Each type may require unique humidity or temperature conditions, and mixing bulbs increases the