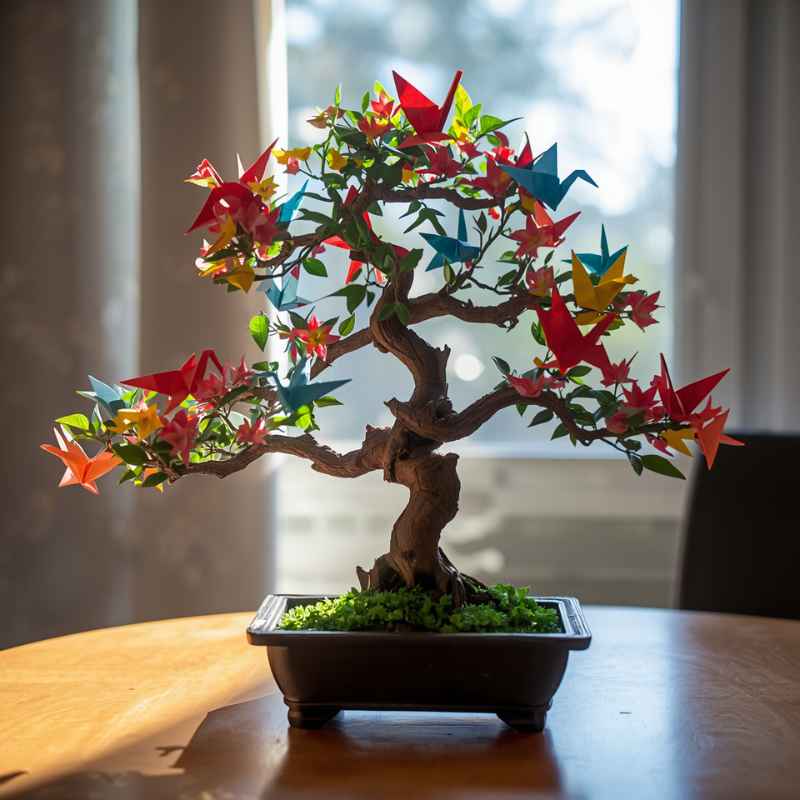
Creating an artificial bonsai tree with origami cranes offers a beautiful, lasting display. It combines the serenity of bonsai with the delicate art of paper folding. This project requires basic craft supplies and some patience.
The result is a unique, low-maintenance piece of decor that brings a tranquil, artistic touch to your home.
Understanding Your Artificial Bonsai Tree Project
Making an artificial bonsai tree with origami cranes is a craft project. It’s about building a sculpture. You’ll use different materials to make the tree trunk and branches.
Then, you’ll add origami cranes to give it a special look. This isn’t a real plant, so it won’t need water or sunlight. This makes it perfect for people who want beauty without the work.
Why choose this project? It’s deeply satisfying. You create something with your own hands.
It’s also a chance to practice skills like folding paper and arranging items. The crane is a symbol of good luck and peace. Having these symbols on your bonsai can bring a positive feeling to your room.
This project is also very adaptable. You can choose different colors for your cranes. You can change the size and shape of the tree.
You can add other small decorations too. It’s a way to express your personal style. Your finished tree will be one of a kind.
Think about the benefits. You get a beautiful decoration. It can be a conversation starter.
It’s a great way to relax and focus. Plus, it’s a thoughtful gift for someone special. The effort you put in shows you care.
Gathering Your Crafting Supplies
To make your origami crane bonsai tree, you need a few key items. Don’t worry, most of these are easy to find at craft stores or even around your house. Think of this as gathering your artist’s tools.
First, you’ll need something for the tree’s base and trunk. A sturdy pot is a good start. You can use a ceramic pot, a small terra cotta pot, or even a decorative bowl.
For the trunk and branches, sturdy wire is essential. Floral wire or craft wire works well. You’ll want different thicknesses.
Thicker wire makes the main trunk. Thinner wire forms the smaller branches.
You’ll also need material to cover the trunk and branches. This gives them a more natural look. Brown paper, twine, or even textured paint can work.
For the leaves, you’ll need paper. Green paper is traditional for leaves. But you can choose any color you like.
For the origami cranes, you’ll need square paper. Origami paper is best because it holds folds well. It comes in many colors and patterns.
You’ll need glue. A hot glue gun is very useful for attaching branches and covering the trunk. White craft glue can also work for attaching paper.
Scissors are a must for cutting paper and wire. You might also want pliers to help bend and cut the wire.
Other optional items can add detail. Small pebbles or moss for the pot base add realism. You might want a small brush for applying glue or paint.
Having a workspace that you can clean easily is also helpful. Everything should be ready before you start.
Essential Crafting Materials Checklist
For the Tree:
- Sturdy Pot or Base
- Craft Wire (various gauges)
- Brown Paper, Twine, or Textured Paint
- Hot Glue Gun and Glue Sticks
- Wire Cutters/Pliers
- Scissors
For the Origami Cranes:
- Square Origami Paper (various colors)
For Decoration:
- Green Paper (for leaves, optional)
- Small Pebbles or Moss (optional)
- Craft Glue
Folding the Delicate Origami Cranes
The heart of your bonsai tree will be the origami cranes. Folding them takes a little practice. But the process is very calming.
Think of each fold as a step towards beauty.
Start with a square piece of origami paper. Place it colored side down if it has one. Fold it in half diagonally to make a triangle.
Unfold. Then, fold it in half along the other diagonal. Unfold.
You should have an ‘X’ crease. Now, flip the paper over. Fold it in half horizontally, then unfold.
Fold it in half vertically, then unfold. You now have creases forming a grid.
Bring the left and right sides of the paper in towards the center. The top point will come down. This creates a smaller square.
This is called a preliminary base. Make sure your creases are sharp.
Now, take one of the open flaps. Fold its sides into the center line. This will create a kite shape on that flap.
Do this on both sides of the flap. Then, fold the top triangle down. Crease well.
Unfold these last three folds.
You’ll now lift the bottom point of the flap up. As you lift, use the creases you just made. The sides should fold inward.
This makes a long diamond shape. This is called a petal fold. Repeat this on the other side of the square.
You should now have a shape with two points at the bottom and two flaps on top.
These two bottom points will become the crane’s head and tail. Fold one point up. Then, fold it back down to create a crease.
This is an inside reverse fold. This forms the neck and head. Fold the other point up and do an inside reverse fold to create the tail.
Now, fold the wings down. You can fold them straight out. Or you can give them a slight angle.
Gently pull the wings apart to make the crane’s body puff out a bit.
Practice makes perfect. Your first few cranes might not be perfect. That’s okay.
Each one you fold will get better. The small imperfections can add charm to your finished piece. Aim for a variety of colors and sizes if you like.
Building the Bonsai Tree Structure
Creating the tree structure is where your bonsai starts to take shape. This part is like sculpting. You’re building the foundation for your art.
Take your thicker craft wire. This will be the main trunk. Bend it gently to give it a natural, slightly curved shape.
Bonsai trees are rarely perfectly straight. You can twist two wires together to make it stronger if needed.
Now, start adding branches. Use thinner wire for this. You can attach thinner wires to the main trunk by twisting them around.
Or, you can use hot glue. Plan where you want your branches to go. Think about how a real tree grows.
Branches usually get thinner as they extend outwards.
Vary the lengths and angles of your branches. Some can reach upwards, while others might droop slightly. You can create several layers of branches.
Don’t make them too uniform. The beauty of bonsai is its natural, imperfect form.
Once you have the basic wireframe for your trunk and branches, it’s time to cover it. This gives it texture and a wood-like appearance. You can wrap the wires tightly with brown paper strips.
Dip the strips in a thin glue mixture (water and white glue) to make them stiff. Use hot glue to secure the ends.
Alternatively, you can wrap the wire with brown twine. This gives a slightly different texture. For a smoother look, you could use a textured brown paint.
Apply it with a brush, dabbing it on to create a bark-like effect. Let everything dry completely before moving on.
The trunk and branches should feel solid. If any part feels wobbly, add more wire or glue for support. The wire frame is the skeleton of your bonsai.
It needs to be strong and well-formed.
Tree Structure Styling Tips
Trunk:
- Use thicker wire.
- Give it gentle curves.
- Consider twisting two wires together.
Branches:
- Use thinner wire.
- Attach by twisting or hot glue.
- Vary lengths and angles.
- Layer branches for depth.
Covering:
- Brown paper strips (glued).
- Brown twine wrapping.
- Textured brown paint.
Assembling the Pot and Trunk
Now, you’ll connect your tree structure to its pot. This is a crucial step for stability and presentation. A well-attached trunk makes the whole piece look cohesive.
Place your pot where you plan to display the bonsai. If you want to add pebbles or moss to the base of the pot for realism, do it now. You can use a bit of hot glue to secure them if needed.
This creates a natural-looking soil surface.
Take your prepared trunk and branch structure. Position it in the pot. You want it to look like it’s naturally growing from the base.
Consider the angle of the trunk. Should it lean slightly? Where will the cranes best be seen?
If you’re using a wire structure, you can bend the bottom of the trunk wire to create an anchor. it meets the pot.
This will hold it firmly in place.
If your pot has a drainage hole, you might want to fill it with something solid. Hot glue, a small piece of wood, or even some plaster of Paris works well. This gives the trunk something firm to attach to.
Ensure the trunk is centered or positioned artistically.
Allow the glue to cool and harden completely. Gently test the trunk to make sure it’s secure. It shouldn’t wobble or pull away from the pot.
This connection is key to the tree’s durability. A strong base makes the entire creation feel more professional.
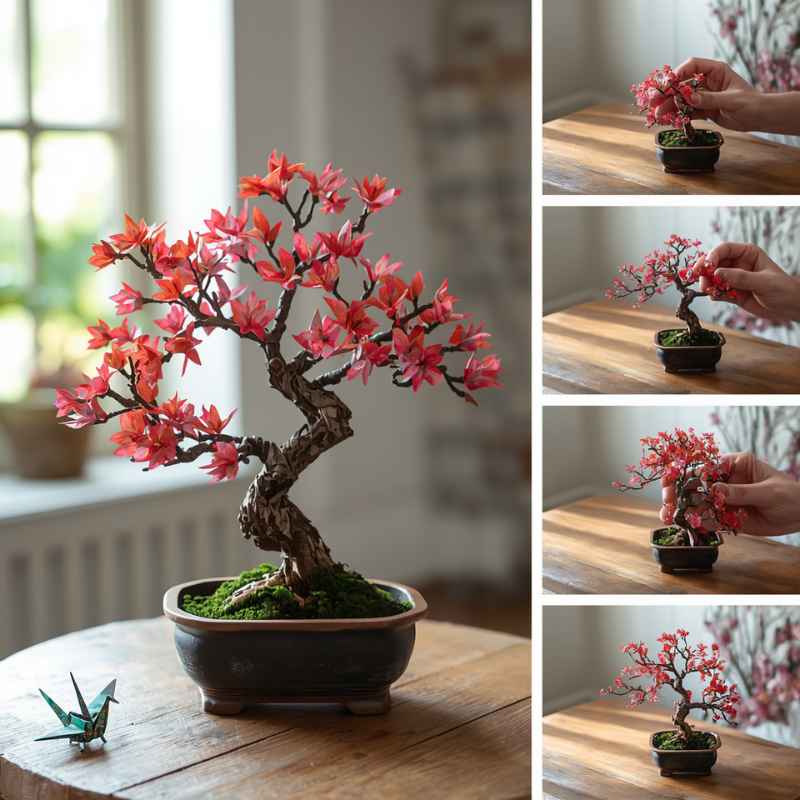
Attaching the Origami Cranes
This is the magical part! You’re bringing your beautiful origami cranes to life on the branches.
Start by selecting which branches will hold your cranes. Think about balance. You don’t want all the cranes clustered in one spot.
Spread them out naturally. Some can sit on larger branches, while others hang from thinner ones.
Use hot glue to attach the cranes. Apply a small dot of glue to the underside of the crane’s body. Gently press it onto the desired spot on a branch.
Hold it for a few seconds until the glue sets.
Consider the orientation of the cranes. Should they be flying? Perched?
You can angle them slightly. Some can face outwards, others inwards. This creates a sense of movement and life.
You can also vary the height at which you attach them.
Don’t feel you have to cover every branch with a crane. Sometimes, fewer cranes make a bigger impact. Let the branches themselves be visible.
The cranes are accents, not the entire tree.
If you’re adding paper leaves, you can attach them now. Use small dots of glue. You can layer them around the cranes or add them to branches that don’t have cranes.
This adds more greenery and fullness.
Step back and look at your arrangement. Are there any bare spots that need a crane? Are some areas too crowded?
Make small adjustments as needed. The goal is a balanced, visually pleasing display.
Crane Placement Strategy
Balance:
- Spread cranes evenly across branches.
- Avoid clustering in one area.
Orientation:
- Angle cranes for a sense of flight or perch.
- Vary their direction.
Density:
- Don’t overcrowd branches.
- Let the tree structure show.
Accents:
- Consider adding paper leaves.
- Use cranes as focal points.
Adding Finishing Touches and Details
Your origami crane bonsai tree is almost complete! Now, it’s time for the little things that make a big difference.
Look at the base of the trunk inside the pot. Does it look natural? You can add a bit more moss or small pebbles.
You could even mix a little brown paint with glue and dab it on to create a more textured ground cover.
Check all the glued points. Are there any stray glue strings? Gently remove them.
Are any cranes slightly askew? Carefully adjust them before the glue fully cures.
Consider adding very small embellishments. Tiny fake flowers, beads that look like dew drops, or even miniature decorative elements can add charm. But be careful not to overdo it.
The cranes and the tree shape should remain the stars.
If you used paper for leaves, make sure they are securely attached. You can gently shape them a little to look more realistic. If you have any bare spots that feel too empty, a few well-placed leaves can fill them in nicely.
Think about the overall silhouette of your tree. Does it have a pleasing shape from all angles? You can gently bend the wire branches a little more to refine the form.
The best bonsai trees have a sense of movement and grace.
Once you’re happy with everything, let the entire piece dry completely. This might take a few hours, especially if you used a lot of glue. Place it in a safe spot where it won’t be disturbed.
Your creation is ready to be displayed!
Caring for Your Origami Bonsai Tree
One of the greatest joys of an artificial bonsai tree with origami cranes is its lack of demanding care. This is not a living plant that needs water, light, or pruning. Its upkeep is much simpler, focusing on maintaining its appearance.
The primary care task is dusting. Over time, dust can settle on the paper cranes and the tree structure. To clean it, use a soft brush, like a makeup brush or a small paintbrush.
Gently brush away the dust from the cranes and branches. You can also use a can of compressed air, holding it at a distance, to blow dust away.
Avoid getting the paper parts wet. Water can cause the paper to warp, discolor, or even tear. Therefore, do not place your bonsai in humid areas like bathrooms.
Keep it away from kitchens where steam might be present.
Direct sunlight can cause the colors of the origami paper to fade over time. While you want to display your beautiful creation, try to place it in a spot that gets indirect light. This will help preserve the vibrancy of your cranes for longer.
If any part of the tree becomes loose – a crane, a branch, or the trunk itself – it’s usually an easy fix. A small dab of hot glue or craft glue can reattach it. Keep your glue gun handy for these minor touch-ups.
It’s rare, but sometimes a paper crane might get slightly creased. You can try to gently smooth it out with your fingers.
Think of its care as an extension of the creative process. It’s about maintaining the beauty you’ve created. This gentle maintenance ensures your origami bonsai tree remains a lovely focal point for years to come.
Troubleshooting Common Issues
Even with the best intentions, you might run into a few snags. Most problems with this kind of craft are easy to fix. Don’t get discouraged if something doesn’t go perfectly at first.
Problem: Cranes won’t stay attached.
Solution: The most common reason is not enough glue or the glue not making good contact. Try using a bit more hot glue. Make sure the branch surface is clean and dry.
For a stronger bond, you can gently score the branch surface where you’ll glue the crane with a craft knife. This gives the glue more to grip.
Problem: The tree structure feels wobbly.
Solution: This usually means the wire frame isn’t strong enough, or it’s not secured well in the pot. Reinforce the main trunk with thicker wire or by twisting two wires together. Add more hot glue around the base where the trunk meets the pot.
If the pot itself is too light, you might need to add some weight to the bottom, like small stones, before adding the trunk.
Problem: Paper is creasing or tearing.
Solution: This often happens with origami. Be gentle when folding. Use a bone folder or the edge of a ruler to make crisp creases without tearing.
If a crane gets a small tear, you can sometimes repair it with a tiny bit of clear tape on the inside, or just embrace the imperfection as part of its handmade charm.
Problem: Glue strings are everywhere.
Solution: This is a common issue with hot glue guns. After gluing, wait a moment for it to cool slightly, then gently pull away any strings. A craft knife or tweezers can help remove stubborn strings.
You can also use a hairdryer on a low setting to lightly warm and then pull away excess glue strings.
Problem: The overall look isn’t quite right.
Solution: This is where stepping back and looking critically comes in. Are the cranes balanced? Is the trunk too straight?
You can often make small adjustments. Gently bend branches. Add or rearrange a few cranes.
Sometimes, adding a few more paper leaves can fill a sparse area. Don’t be afraid to tweak it until you love it.
Quick Fixes for Crafting Woes
Wobbly Tree:
- Reinforce trunk wire.
- Add more glue at base.
- Weight the pot.
Crane Attachment:
- Use more hot glue.
- Clean/score branch.
- Secure from inside if possible.
Paper Issues:
- Fold gently.
- Use tools for creasing.
- Minor tears can be charming.
Glue Strings:
- Pull gently after cooling.
- Use tweezers or craft knife.
- Briefly warm to remove.
Exploring Variations and Personalization
Your origami crane bonsai tree doesn’t have to look like anyone else’s. This is your chance to make it uniquely yours. Think about how you can adapt the basic steps.
Crane Colors: Instead of just green paper for leaves, why not use a rainbow of colors for your cranes? A single color of crane can create a dramatic statement. Or, a mix of colors can add vibrancy.
You could even use patterned origami paper. Metallic papers can add a touch of elegance.
Tree Style: You can create different tree shapes. Try a more windswept style. Or a cascade style where branches droop downwards.
The wire bending is key here. You can also change the thickness and texture of the trunk covering. Experiment with different wrapping techniques.
Foliage: While green paper leaves are classic, they aren’t your only option. What about tiny cutouts of different colored paper? Or you could use small beads or even bits of felt to represent leaves.
For a more abstract look, you could skip leaves altogether and let the cranes be the main feature.
Pot Choice: The pot is a significant part of the overall look. A rustic terra cotta pot gives a different feel than a sleek, modern ceramic pot. You could paint a plain pot to match your decor.
Consider the size of the pot in relation to the tree size.
Themed Displays: Want to create a mini-scene? You could add tiny figurines to the pot base. A miniature pagoda, a tiny stone lantern, or even a small animal figurine can add a narrative element.
This turns your bonsai into a small diorama.
Seasonal Touches: You could even make multiple sets of cranes for different seasons. Red and gold cranes for autumn. White or blue cranes for winter.
Pink cranes for spring. This allows you to update your display throughout the year.
Personalization makes the craft more meaningful. It transforms a project into a reflection of your own taste and creativity. Don’t be afraid to experiment and try new ideas.
Real-World Scenarios for Your Origami Bonsai
Where would a beautiful origami crane bonsai tree fit perfectly? The possibilities are quite extensive. It adds a touch of art and tranquility wherever it’s placed.
Living Room Accent: Imagine it on a side table in your living room. It’s a peaceful focal point that draws the eye. Its delicate nature complements a calm decor.
It’s more artistic than a typical houseplant and requires none of the fuss.
Office Desk Serenity: For those who spend hours at a desk, this bonsai can be a breath of fresh air. It brings a sense of calm and beauty to a workspace. The cranes can serve as gentle reminders to take a moment to breathe and appreciate the smaller things.
Bedroom Retreat: In a bedroom, it can enhance the feeling of peace and relaxation. Its quiet beauty contributes to a tranquil atmosphere, perfect for unwinding after a long day. It’s a decorative piece that doesn’t demand attention but enhances the room’s mood.
Gift of Good Fortune: This is an ideal gift for someone who appreciates unique art, needs a bit of luck, or enjoys handmade items. It’s thoughtful and symbolic. Giving a handmade item shows extra care and effort.
The crane is a symbol of longevity and good fortune, making it a positive present.
Small Apartment Solution: For those living in smaller spaces, a real bonsai tree might be impractical. This artificial version offers the aesthetic appeal without taking up much room or requiring special care. It brings a touch of nature and art to limited living areas.
Creative Studio Decor: If you’re an artist or crafter, your studio is the perfect place for this. It’s a testament to the beauty of paper art and a reminder of the creative possibilities within simple materials.
No matter where you choose to display it, your origami crane bonsai tree adds a unique artistic touch. It’s a piece that sparks conversation and brings a sense of calm and beauty.
When is it Normal, and When to Worry?
Since this is an artificial craft, the concept of “normal” versus “worry” is different than with a living plant. With your origami bonsai, it’s about the integrity and appearance of the craft itself.
It’s Normal If:
- A few paper cranes have slight variations in their folds. Handmade items are never perfectly uniform.
- You see tiny specks of glue here and there. Especially on the underside or where parts join.
- The wire structure has visible bends. This is part of how you create the tree’s shape.
- Dust settles on it over time. This is expected and easily cleaned.
- You decide to change the arrangement or add more cranes. It’s your creation!
When to Potentially Worry (and Fix):
- If the main trunk is very wobbly or loose in the pot. This means the base isn’t secure.
- If a significant number of cranes are falling off. This indicates a glue issue.
- If the paper colors are noticeably fading from direct sun. Consider moving it.
- If the wire structure is starting to rust (unlikely with good quality wire).
- If the pot itself is cracked or damaged.
For the most part, any “worry” points are simply opportunities for minor repairs. A bit of glue, a gentle dusting, or rearranging an element can fix most things. The beauty of this project is its resilience and the ease with which you can maintain it.
Frequently Asked Questions
What kind of paper is best for origami cranes?
Origami paper is the best choice for folding cranes. It’s thin, strong, and holds creases well. It also comes in a wide variety of colors and patterns.
Standard copy paper can be too thick and stiff for intricate folds.
How many cranes should I make for my bonsai tree?
The number of cranes depends on the size of your tree and your personal preference. A small tree might look best with 5-10 cranes. A larger, more elaborate tree could have 20-30 or even more.
It’s best to start with a few and add more as you go, checking for balance.
Can I use real twigs for the bonsai tree trunk?
While you could use real twigs, it adds complexity. You would need to treat them to prevent pests and ensure they are sturdy. Using craft wire is generally much easier and more reliable for creating a consistent and bendable structure for your origami bonsai.
How do I make the tree trunk look more realistic?
To make the trunk look realistic, wrap it with thin strips of brown paper dipped in a water-glue mixture. Twine or yarn also works well for wrapping. You can also add texture by dabbing on brown paint with a sponge or dry brush to mimic bark.
What if I don’t have a hot glue gun?
If you don’t have a hot glue gun, you can use strong craft glue like Tacky Glue or E6000. However, these glues take longer to dry. You may need to hold the pieces together for several minutes until the glue sets.
Floral wire can also be used to secure some parts while the glue dries.
Can I add other elements besides cranes to my bonsai?
Absolutely! You can add paper leaves, small beads that look like dew drops, or even tiny decorative figures to your bonsai. The key is to keep the additions in scale with the cranes and the tree itself so they don’t overpower the main design.
Putting It All Together
You’ve learned how to fold delicate cranes, build a sturdy tree structure, and assemble it all into a beautiful piece of art. Your origami crane bonsai tree is more than just a decoration; it’s a symbol of patience, peace, and creativity. It’s a wonderful way to bring a touch of nature’s serenity into your home, without any of the watering or sunlight worries.
Enjoy the process, and enjoy the stunning result!