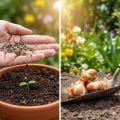
Comparing seeds and bulbs for KS1 children is simple: a seed is like a tiny, sleeping baby plant needing soil, water, and sun to wake up and grow. A bulb is like a bigger baby plant that already has its own packed lunch (food store) inside, giving it a head start on growing.
Hello, fellow garden enthusiasts! It’s Md Saiful Islam here, your friendly guide to all things green. Have you ever wanted to show a little one the magic of growing a plant? It’s one of life’s simple joys. But it can feel tricky. Where do you start? With a tiny seed or a funny-looking bulb?
It’s a common question, and the answer can unlock a wonderful learning adventure. Many parents and teachers worry about making it too complicated. But I promise you, it’s not. We are going to explore a super simple, fun, and genius plan for comparing seeds and bulbs with young children. This guide will give you everything you need to spark a lifelong love for gardening. Let’s dig in together!
What Exactly Is a Seed? A Plant’s Tiny Beginning
Think of a seed as a tiny promise. Inside its hard coat is a baby plant, just waiting for the right moment to grow. It’s completely asleep, holding all the instructions it needs to become a flower, a vegetable, or even a giant tree. To wake up, it needs three things: warmth from the sun, a drink of water, and a cozy bed of soil.
A great way to explain this to a child is to compare a seed to an egg. An egg has a protective shell on the outside and everything a baby chick needs to grow on the inside. A seed is very similar! It has a seed coat to protect the baby plant (called an embryo) and a packed lunch (called the endosperm) to give it energy when it first starts to grow.
Common Plants That Grow from Seeds
You see plants grown from seeds every day! They are all around us. Here are a few easy and fun examples perfect for a KS1 project:
- Sunflowers: These are amazing to grow with kids. The seeds are big enough for little hands to hold, and the plant grows tall and strong with a giant, happy flower.
- Cress: If you want super-fast results, cress is your best friend. You can grow it on a damp paper towel, and you’ll see sprouts in just a few days!
- Runner Beans: These are fantastic for a hands-on project. The seeds are large, and you can even grow them in a clear jar to watch the roots and shoots appear.
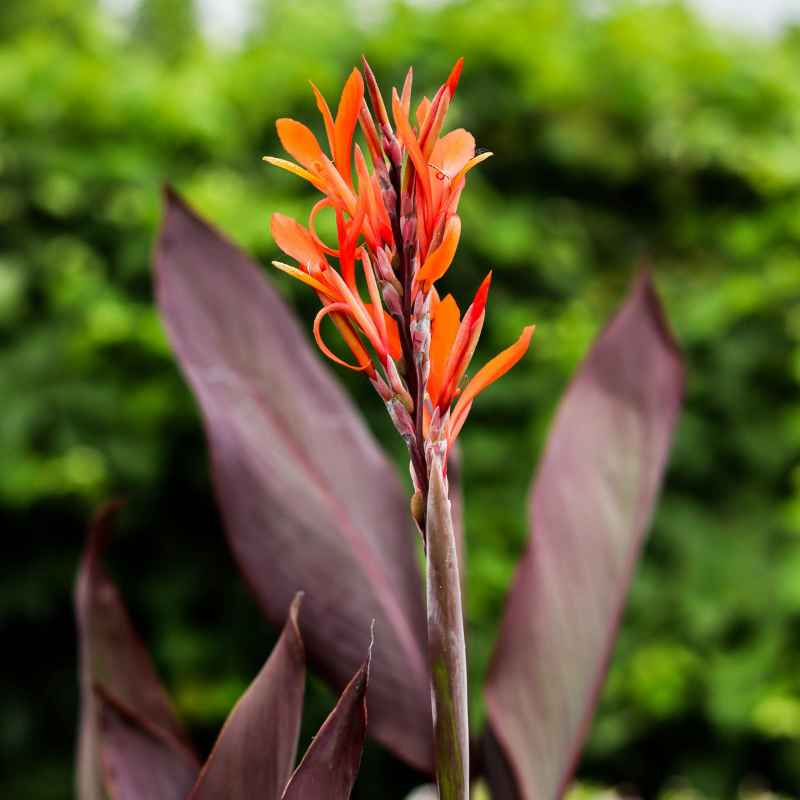
- Marigolds: These flowers are bright, cheerful, and very easy to grow from seed, adding a splash of orange and yellow to any garden space.

What Exactly Is a Bulb? A Plant’s Secret Lunchbox
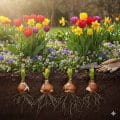
Now, let’s talk about bulbs. A bulb is different from a seed. It’s not a sleeping baby; it’s more like a clever plant that has packed its own lunchbox! A bulb is an underground storage unit for a plant. Inside its layers, it holds a complete, tiny flower or plant bud and all the food it needs to start growing quickly when spring arrives.
Think of an onion. When you cut it open, you can see all the layers. Those layers are actually special leaves packed with food. Right in the very center is the tiny bud that will grow into a new plant. This is why plants from bulbs often pop up so fast—they already have their energy reserves ready to go!
Common Plants That Grow from Bulbs
Bulbs are famous for giving us some of the first beautiful flowers of spring. They are a wonderful sign that winter is over.
- Daffodils: The classic sunny-yellow trumpet flower that tells us spring is here. Their bulbs are easy to plant and very reliable.
- Tulips: Available in almost every color you can imagine, tulips are a stunning addition to any garden. Their bulbs are smooth and teardrop-shaped.
- Onions and Garlic: Yes, these kitchen staples grow from bulbs! Growing them is a great way to show children where their food comes from.
- Hyacinths: Known for their powerful, sweet smell, hyacinths can be grown indoors in a special glass, allowing kids to see the roots growing down into the water.
The Big Comparison: Seeds vs. Bulbs for KS1
So, what are the main differences that a young child can see and understand? It’s all about looking, feeling, and watching them grow. This is the heart of our comparing seeds and bulbs KS1 activity. Let’s break it down in a simple table to make it crystal clear.
| Feature | Seeds | Bulbs |
|---|---|---|
| What do they look like? | Very small, often hard and dry. They can be many different shapes and colors (round, oval, black, brown, speckled). | Much bigger and heavier. Often round or teardrop-shaped with a papery skin on the outside. They might have tiny roots at the bottom. |
| What’s inside? | A tiny, sleeping baby plant (embryo) with a small packed lunch. | A small, ready-made flower or plant bud with a huge packed lunch (food stored in layers). |
| How do we plant them? | Usually planted just under the surface of the soil. | Planted deeper in the soil, often with the pointy end facing up. |
| How fast do they grow? | They can take longer to sprout because the baby plant has to “wake up” and grow from scratch. | They often grow much faster once they start because they use their stored food for a quick energy boost. |
| Fun Examples | Cress, sunflowers, beans, pumpkins. | Daffodils, tulips, onions, garlic. |
Your Genius Plan: A Step-by-Step KS1 Growing Activity
Ready to get your hands dirty? This simple plan is designed to be fun, engaging, and full of learning. Follow these steps, and you’ll have a fantastic science project that kids will remember for years.
Getting Ready: What You’ll Need
First, let’s gather our tools. You don’t need anything fancy, just the basics. Keeping it simple is the key to success!
- A few small pots or containers: Yogurt pots with holes poked in the bottom work perfectly.
- Soil: A small bag of multi-purpose compost is ideal.
- Seeds: Choose something fast and easy, like cress or runner bean seeds.
- Bulbs: Daffodil or onion bulbs are great choices.
- Plant labels: You can make your own from lollipop sticks.
- A small watering can or spray bottle: To give your plants a gentle drink.
- A sunny spot: A windowsill is perfect for this experiment.
Step 1: Let’s Look Closely (The Observation Challenge)
Before any planting happens, the first step is to be a scientist! Encourage the children to use their senses to explore the seeds and bulbs. This is the “comparing” part of comparing seeds and bulbs KS1.
- Set up an investigation station. Place some seeds on one plate and a few bulbs on another.
- Ask guiding questions. “What do you see?”, “How does it feel?”, “Is it heavy or light?”, “What does it smell like?”.
- Draw what you see. Give the children paper and crayons to draw the seed and the bulb. This helps them notice the details.
- Use a simple chart. You can fill out a chart together to record your findings.
| Observation | Our Seed (e.g., Bean) | Our Bulb (e.g., Daffodil) |
|---|---|---|
| What color is it? | White and brown | Brown and papery |
| What shape is it? | Oval, like a kidney | Like a teardrop or a little onion |
| How does it feel? | Smooth and hard | Dry and light, a bit squishy |
Step 2: Time to Plant! (The Fun Part)
Now for the main event! Show the children how to give their seed and bulb a new home. Explain that you are giving them the soil, water, and warmth they need to grow.
Planting the Seed:
- Fill a pot with soil, leaving a little space at the top.
- Gently press the seed into the soil. A good rule is to plant it about twice as deep as it is wide. For a bean seed, this is only about a centimeter down.
- Cover the seed with a little more soil.
- Give it a small drink of water.
- Write “Seed” on a plant label and stick it in the pot.
Planting the Bulb:
- Fill a different pot with soil.
- Show the children the bulb and point out the flat bottom (where the roots will grow) and the pointy top (where the shoot will grow). The pointy end goes up!
- Make a hole in the soil that is deep enough for the bulb. Usually, about two or three times the height of the bulb.
- Place the bulb in the hole, pointy end up.
- Cover it completely with soil.
- Give it a good drink of water.
- Write “Bulb” on a plant label and stick it in the pot.
Step 3: Watch Them Grow (The Waiting Game)
This is where patience and observation come in. Place both pots on a sunny windowsill where the children can see them every day. Now, you watch and wait for the magic to happen.
- Daily Checks: Encourage the children to check their pots each day. Is the soil dry? If so, it’s time for a little water.
- Create a Growth Diary: This is a brilliant way to track progress. Each day or every few days, the children can draw a picture of their pots and note any changes. “Today I see a tiny green shoot!”
- Measure the Growth: Once the shoots appear, you can use a ruler to measure how tall they are getting. Which one is growing faster? The seed or the bulb?
For more fantastic school gardening ideas and resources, the Royal Horticultural Society (RHS) Campaign for School Gardening is an excellent place to find inspiration and support for your growing projects.
Why This Simple Activity is So Brilliant for Kids
This hands-on experiment is more than just a fun way to spend an afternoon. It’s packed with powerful learning opportunities that are perfect for the KS1 curriculum. It’s science, but it feels like play.
Patience and Responsibility
Plants don’t grow overnight. This activity teaches children the valuable lesson of patience. They also learn about responsibility as they take on the important job of watering their plant and making sure it gets enough light. Seeing their care pay off when a shoot appears is incredibly rewarding.
Understanding Life Cycles
This is a child’s first, tangible look at a life cycle. They see something that looks lifeless (a seed or a bulb) spring into action and grow into a living plant. It’s a foundational concept in biology, presented in the most magical way possible.
Hands-On Science Skills
Children are practicing key scientific skills without even realizing it. They are:
- Observing: Looking closely at details.
- Comparing: Noting similarities and differences.
- Predicting: Guessing what might happen next.
- Recording: Drawing or writing down what they see.
Troubleshooting Common Hiccups
Gardening is a journey, and sometimes things don’t go exactly to plan. That’s okay! It’s all part of the learning process. Here’s how to handle a few common bumps in the road with a calm, reassuring smile.
“Nothing is growing!”
This is the most common worry. First, check the basics. Is the soil too dry or too wet? It should feel damp, like a wrung-out sponge. Does it have enough sunlight? Most importantly, remind the children (and yourself!) that growing takes time. Some seeds and bulbs are just a little sleepier than others.
“My plant looks floppy and sad.”
A floppy plant is often a sign of a watering issue. If the leaves are yellow and the stem is weak, it might be getting too much water. If the leaves are crispy and drooping, it probably needs a drink. Try to adjust the watering schedule and see if it perks up in a day or two.
“My bulb grew a green shoot but no flower.”
Sometimes, a bulb will put all its energy into growing leaves, especially in its first year or if it’s grown indoors. This is perfectly normal! Celebrate the green growth. Explain that the bulb is storing up energy in its leaves so it can try to make a flower next year.

Frequently Asked Questions (FAQ)
What’s the biggest difference between a seed and a bulb for a child to understand?
The simplest difference is size and starting speed. A seed is a tiny, slow starter that has to build its whole plant from scratch. A bulb is a big, fast starter that already has a flower and a packed lunch inside, ready for a quick getaway.
When is the best time to plant seeds and bulbs with kids?
For this indoor experiment, you can do it almost any time of year! For outdoor planting, spring-flowering bulbs like daffodils and tulips are best planted in the autumn. Most seeds, like sunflowers and beans, are best planted in the spring after the last frost.
How deep should we plant a bulb?
A great, easy-to-remember rule is to plant a bulb two to three times as deep as the bulb is tall. So, if your bulb is 2 inches tall, you should plant it 4 to 6 inches deep. And always remember: pointy end up!
Can we do this activity entirely indoors?
Absolutely! A sunny windowsill is the perfect laboratory for this project. Using pots means you have complete control over the environment, which often leads to better success rates and makes daily observation much easier for kids.
Which grows faster, a seed or a bulb?
Generally, a bulb will send up a shoot faster than a seed will. This is because the bulb has a massive store of food ready to fuel its growth. This makes for a great “race” in your experiment—which one will pop up first?
What happens to the bulb after the flower dies?
This is a great question. After the flower fades, you should leave the green leaves on the plant. The leaves will soak up sunlight and make food to recharge the bulb for next year. Once the leaves turn yellow and die back, the bulb is dormant again, resting until it’s time to grow once more.
Your Journey into Growing Begins Now
There you have it—a simple, foolproof plan for exploring the wonderful world of seeds and bulbs with the young gardeners in your life. This isn’t just about planting something in a pot; it’s about planting a seed of curiosity and a love for the natural world. By comparing these two amazing plant starters, you’re not just teaching science; you’re creating memories and building confidence.
Remember, the goal is not to grow the perfect flower or the biggest beanstalk. The goal is to have fun, to wonder, and to learn together. Every little sprout is a success. Every question is a sign of a curious mind at work. So gather your pots, your soil, and your little explorers, and get ready to watch the magic unfold. Happy growing!