
When indoor plant leaves turn yellow, it’s usually a sign of a watering issue—either too much or too little. Check the soil first. If it’s soggy, you’re overwatering. If it’s bone-dry, you’re underwatering. Adjust your watering schedule, ensure your pot has drainage, and remove the yellow leaves to help your plant recover.
Hello, fellow plant lovers! It’s Md Saiful Islam here, your friendly gardening mentor. Seeing a bright green leaf on your favorite houseplant slowly turn a sad shade of yellow can be worrying. You might think you’ve done something terribly wrong. But I’m here to tell you that it’s one of the most common issues plant parents face. It’s not a sign of failure; it’s just your plant trying to talk to you.
Yellowing leaves, a condition called chlorosis, are a symptom, not a disease. It’s your plant’s way of saying, “Hey, something isn’t quite right here!” The good news is that you can almost always fix it. Together, we’ll learn to decode your plant’s signals and give it exactly what it needs to thrive again. In this guide, I’ll walk you through the simple steps to diagnose the problem and bring that vibrant green back into your home. Let’s get started!
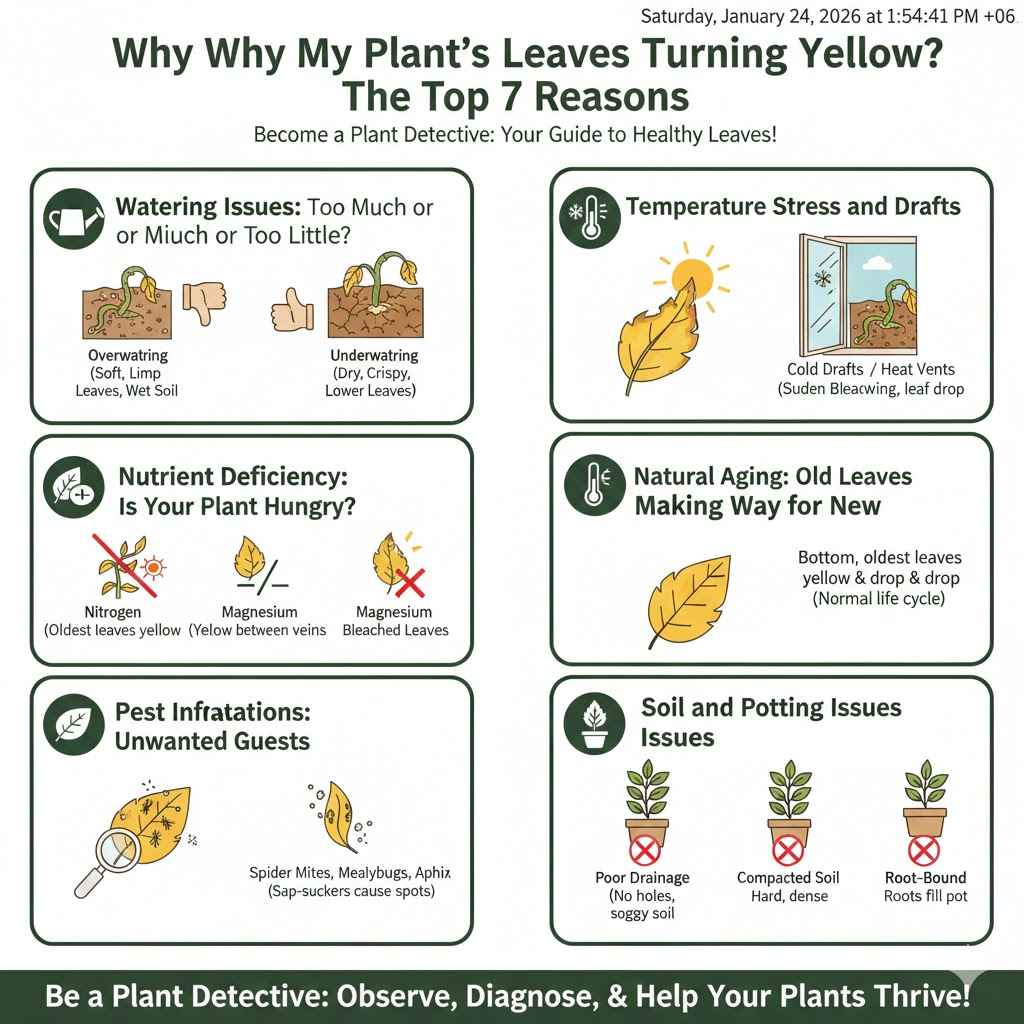
Why Are My Plant’s Leaves Turning Yellow? The Top 7 Reasons
Before we can find a fix, we need to become plant detectives. Yellow leaves are a clue. By looking at the pattern of yellowing and checking a few other things, we can pinpoint the cause. Let’s explore the most common culprits behind those yellowing leaves.
1. Watering Issues: Too Much or Too Little?
This is, by far, the number one reason for yellow leaves in indoor plants. It can be tricky, but understanding the difference is key.
- Overwatering: This is the most frequent mistake beginners make. When you give a plant too much water, its roots can’t breathe. They sit in soggy soil and begin to rot. Without healthy roots, the plant can’t absorb nutrients, and its leaves turn yellow. The yellow leaves often feel soft and limp. The soil will be wet to the touch, even days after you watered.
- Underwatering: On the flip side, not enough water also causes stress. When a plant is thirsty, it can’t support all of its leaves. To conserve energy, it will start to drop its older, lower leaves first. These leaves will typically turn yellow or brown and become dry and crispy before falling off. The soil will be completely dry and may even pull away from the sides of the pot.
2. Light Problems: Not Enough Sun or Too Much?
Every plant has its own preference for light. What’s perfect for a cactus will be too much for a fern.
- Too Little Light: If your plant isn’t getting enough light, it can’t perform photosynthesis properly. Photosynthesis is how plants make their food, and it’s what gives them their green color. Without enough light, leaves will start to look pale green and then turn yellow. You’ll often see this on the leaves furthest from the light source. The plant might also look “leggy,” meaning it has long, spindly stems as it stretches toward the light.
- Too Much Light: Direct, intense sunlight can be just as harmful. It can scorch the leaves, causing them to look bleached, yellow, or even brown and crispy. This usually affects the leaves that are getting the most direct sun exposure.
3. Nutrient Deficiency: Is Your Plant Hungry?
Your plant gets its food from the soil. Over time, the nutrients in the potting mix get used up. If your plant is hungry, it will show you with yellow leaves. Different nutrient deficiencies create different yellowing patterns.
- Nitrogen Deficiency: Nitrogen is vital for leaf growth. A lack of it usually causes the oldest leaves at the bottom of the plant to turn yellow first, while new growth might look pale.
- Magnesium Deficiency: You might see yellowing between the green veins of the older leaves, sometimes creating a V-shape or marbled pattern.
- Iron Deficiency: This typically affects the newest leaves at the top of the plant. The leaves turn yellow, but the veins remain dark green.
4. Pest Infestations: Unwanted Guests
Tiny pests can cause big problems. Insects like spider mites, mealybugs, aphids, and scale feed on the sap from your plant’s leaves. This feeding process damages the leaf cells, leading to yellow spots, stippling, or overall yellowing. You often need to look closely at the undersides of leaves or where the leaf meets the stem to spot these little invaders.
5. Temperature Stress and Drafts
Most houseplants are tropical in origin and prefer stable, warm temperatures. A sudden blast of cold air from an open window or an air conditioning vent can shock a plant, causing its leaves to turn yellow and drop. Similarly, placing a plant too close to a heater or radiator can dry it out and cause stress. Consistency is key!
6. Natural Aging: Old Leaves Making Way for New
Sometimes, a yellow leaf is no cause for alarm at all! Just like we get older, so do plant leaves. It’s a natural part of a plant’s life cycle to shed its oldest leaves—usually the ones at the very bottom—to direct its energy toward new growth. If you only see an occasional yellow leaf at the base of a healthy, growing plant, you likely have nothing to worry about.
7. Soil and Potting Issues
The home your plant lives in—its pot and soil—is crucial for its health.
- Poor Drainage: If your pot doesn’t have drainage holes at the bottom, water will collect there, leading to the same problems as overwatering.
- Compacted Soil: Over time, soil can become hard and compacted. This prevents water and air from reaching the roots properly.
- Root-Bound Plant: If a plant has been in the same pot for too long, its roots can fill the entire pot, leaving no room for soil. This makes it hard for the plant to get the water and nutrients it needs, leading to—you guessed it—yellow leaves.
Your 5-Step Action Plan to Fix Yellow Plant Leaves
Okay, detective, you’ve reviewed the list of suspects. Now it’s time for action. Don’t feel overwhelmed! Follow these simple steps, and you’ll be on your way to a solution.
Step 1: Play Detective – Diagnose the Problem
Before you do anything, take a close look at your plant and its environment. Ask yourself these questions to narrow down the cause. Use the table below to help you connect the clues!
| Symptom | Likely Cause | Simple Fix |
|---|---|---|
| Lower leaves are yellow and soft; soil is damp. | Overwatering | Let soil dry out. Water less often. Ensure good drainage. |
| Lower leaves are yellow, dry, and crispy; soil is bone-dry. | Underwatering | Give the plant a thorough watering. Check soil more frequently. |
| Pale yellow leaves all over; slow or “leggy” growth. | Too Little Light | Move the plant to a brighter location (but avoid direct sun). |
| Yellow or white scorched spots on top leaves. | Too Much Light | Move the plant away from direct sun. Use a sheer curtain to filter light. |
| Yellowing starts at the bottom and moves up; older leaves affected first. | Nitrogen Deficiency / Natural Aging | If just one or two leaves, it’s likely aging. If more, fertilize with a balanced plant food. |
| New leaves at the top are yellow with green veins. | Iron Deficiency | Use a fertilizer that contains micronutrients like iron. |
| Yellow spots, webbing, or sticky residue on leaves. | Pest Infestation | Inspect closely. Wipe away pests and treat with neem oil or insecticidal soap. |
Step 2: Trim the Yellow Leaves
Once a leaf has turned fully yellow, it won’t turn green again. It’s best to remove it. This does two things: it makes your plant look better, and more importantly, it allows your plant to focus its energy on new, healthy growth instead of trying to support a dying leaf. Use a clean, sharp pair of scissors or pruning shears and snip the yellow leaf off at the base of its stem.
Step 3: Correct the Watering Routine
Since watering is the most common issue, let’s master it. Forget a strict schedule like “water every Saturday.” Instead, check your plant’s needs. The best way is the “finger test.” Stick your finger about an inch or two into the soil. If it feels dry, it’s time to water. If it feels moist, wait a few more days and check again. When you do water, water thoroughly until it runs out of the drainage holes, then let the excess drain away. Never let your plant sit in a saucer full of water.
Step 4: Adjust Light and Location
Based on your diagnosis, your plant might need a new home. If it’s not getting enough light, move it closer to a window. An east-facing window with gentle morning sun is perfect for many houseplants. If it’s getting scorched, move it further away from a south or west-facing window, or hang a thin curtain to diffuse the light. Remember to rotate your plant every week or so to ensure all sides get some light.
Step 5: Feed Your Plant (If Needed)
If you suspect a nutrient deficiency and it’s the growing season (usually spring and summer), it might be time to fertilize. For beginners, a balanced, all-purpose liquid fertilizer is a great choice. Always dilute it according to the package instructions—or even dilute it to half-strength to be safe. It’s better to under-fertilize than to over-fertilize, which can burn the roots. Don’t fertilize dormant plants in the winter.
A Closer Look at Common Culprits and Their Fixes
Let’s dive a little deeper into the three most common problems and make sure you feel confident tackling them.
Fixing Overwatering: The #1 Plant Killer
If you’ve determined that soggy soil is your problem, here’s what to do:
- Stop Watering: First and foremost, give the plant a break from watering. Let the top few inches of soil dry out completely.
- Improve Airflow: Gently poke a few holes in the soil with a chopstick or pencil. This helps aerate the soil and allows it to dry faster.
- Check for Root Rot: If the soil is very waterlogged and has a foul smell, you may need to check the roots. Gently slide the plant out of its pot. Healthy roots are firm and white or light-colored. Rotted roots will be brown, mushy, and may fall apart when you touch them.
- Repot if Necessary: If you find root rot, you’ll need to act fast. Trim away all the mushy, brown roots with clean scissors. Repot the plant in a clean pot with fresh, well-draining potting mix. Water it very lightly and give it time to recover.
Solving Nutrient Deficiencies
Feeding your plant isn’t as complicated as it sounds. The key is knowing what to look for and providing a balanced diet. A great resource for understanding plant nutrients is the University of Maryland Extension’s guide on plant nutrients.
| Nutrient | Sign of Deficiency | How to Fix |
|---|---|---|
| Nitrogen (N) | General yellowing of older, lower leaves. Stunted growth. | Use a balanced fertilizer with a higher first number (e.g., 10-5-5). |
| Magnesium (Mg) | Yellowing between the veins on older leaves, creating a marbled or arrow pattern. | Water with a solution of one teaspoon of Epsom salts per gallon of water, or use a fertilizer with micronutrients. |
| Iron (Fe) | Yellowing of new, young leaves, while the veins stay green. | Use a fertilizer containing chelated iron or other micronutrients. Check soil pH, as high pH can block iron uptake. |
For most beginner plant owners, a simple, balanced liquid fertilizer applied once a month during the growing season is all you need to prevent these issues.
Dealing with Common Houseplant Pests
Found some tiny bugs? Don’t panic! You can usually handle them with simple, gentle methods.
- Identify the Pest: Look for tiny specks (spider mites, which also create fine webs), fuzzy white spots (mealybugs), or small green or black dots (aphids).
- Isolate the Plant: Move the infected plant away from your other plants to prevent the pests from spreading.
- Clean the Leaves: Take a damp cloth and gently wipe down every leaf, top and bottom, to physically remove as many pests as you can. For heavy infestations, you can even give the plant a shower in your sink or tub.
- Treat with a Solution: A simple solution of mild dish soap and water or a store-bought insecticidal soap can be very effective. Another great organic option is neem oil. Mix as directed and spray the entire plant, making sure to get the undersides of the leaves. You may need to repeat the treatment every week for a few weeks to fully get rid of them.
Prevention is Better Than Cure: How to Keep Your Plants Green
Once you’ve saved your yellowing plant, you’ll want to keep it healthy for the long run. The best way to deal with yellow leaves is to prevent them from happening in the first place. Here are my top tips for happy, green plants:
- Choose the Right Plant: Start with success by choosing a plant that fits the light conditions in your home. Don’t try to grow a sun-loving succulent in a dark corner.
- Use Good Quality Potting Mix: Start your plants off right with a fresh, well-draining potting mix designed for houseplants. Avoid using garden soil, which is too heavy.
- Ensure Proper Drainage: Always, always, always use pots with drainage holes at the bottom. No exceptions!
- Create a Routine: Not a watering schedule, but a “checking” schedule. Once a week, make a habit of looking over your plants. Check the soil moisture, look for pests, and see how they are doing. This helps you catch problems early.
- Know Your Plant: Take a few minutes to learn about your specific plant’s needs. A quick search online will tell you its preferred light, water, and humidity levels.
- Don’t Be Afraid to Repot: Every year or two, check if your plant is root-bound. If you see more roots than soil, it’s time for a slightly larger pot.

Frequently Asked Questions (FAQ)
Can yellow leaves turn green again?
Unfortunately, no. Once a leaf has fully turned yellow, the plant has already started to reclaim the nutrients from it. The leaf will not regain its green color. It’s best to prune it off so the plant can direct its energy to healthy growth.
Should I cut off yellow leaves?
Yes, in most cases. Removing yellow leaves helps the plant conserve energy for new growth and improves its overall appearance. It also increases air circulation around the plant, which can help prevent pests and diseases. Use clean, sharp scissors for the job.
How often should I fertilize my indoor plants?
It depends on the plant and the time of year. A general rule for most common houseplants is to fertilize with a balanced liquid fertilizer every 4-6 weeks during the growing season (spring and summer). Reduce or stop fertilizing completely in the fall and winter when the plant’s growth slows down.
What’s the best way to water my plants to avoid yellow leaves?
The best way is to check the soil first. Use the “finger test”—if the top inch or two of soil is dry, it’s time to water. Water thoroughly until it flows out of the drainage holes. This ensures all the roots get a drink. Then, discard any excess water from the saucer so the plant isn’t sitting in a puddle.
Why are the new leaves on my plant yellow?
If new leaves are coming in yellow, it often points to a nutrient deficiency, specifically iron. It can also be a sign of overwatering that has led to root rot, preventing the plant from absorbing nutrients. Check your soil moisture and consider using a fertilizer that contains micronutrients.
Do plants need special water?
For most houseplants, regular tap water is fine. However, some sensitive plants (like Calatheas or Dracaenas) can be fussy about the chlorine and minerals in tap water, which can cause brown, crispy leaf tips. If you have “hard” water or sensitive plants, letting your water sit out overnight before using it can help. Using filtered or distilled water is also a great option.
A Final Word of Encouragement
Seeing yellow leaves on your beloved plant can be disheartening, but please remember that every plant parent has been there. Gardening is a journey of learning and observation. Your plants are living things, and they communicate their needs in their own unique ways. Those yellow leaves aren’t a sign of failure; they are a lesson.
By following these steps, you’ve learned how to listen to your plants, diagnose their problems, and give them the care they need to flourish. Be patient, be consistent, and don’t be afraid to make adjustments. With a little attention, you can turn that yellow back to a lush, beautiful green. Happy growing!