Creating an azalea bonsai involves selecting a healthy plant, repotting it into a shallow container with acidic soil, and carefully pruning its roots and branches. Shape the tree using wiring techniques after the blooms fade. Provide bright, indirect light and consistent moisture to help your miniature masterpiece thrive. It’s a rewarding project for any beginner!
Hello, fellow garden lovers! I’m Md Saiful Islam, and today I want to share something truly special with you. Have you ever seen a stunning azalea bonsai, bursting with color in a tiny pot, and thought, “I could never do that”? It’s a common feeling. These little trees look so perfect and artistic that they can seem intimidating.
But I’m here to let you in on a secret: you absolutely can create one. Growing an azalea bonsai is less about being an expert and more about following a few simple, gentle steps. It’s a journey of patience and connection with nature. In this guide, I will walk you through everything you need to know, from picking the perfect plant to watching it bloom. Let’s get started and turn that “I can’t” into “I did!”
Why Azaleas Make Wonderful Bonsai
Before we roll up our sleeves, let’s talk about why azaleas are such a fantastic choice for bonsai, especially for beginners. It’s not just about their breathtaking flowers! Understanding their strengths will give you confidence as you begin your bonsai journey.
- Spectacular Flowers: This is the most obvious reason! Azaleas produce an incredible display of flowers in shades of pink, red, white, and purple. Having this explosion of color on a miniature tree is truly a magical sight.
- Small Leaves: For a tree to look like a miniature version of its full-sized self, it needs small leaves. Many azalea varieties naturally have small leaves that are perfectly in scale with a small bonsai pot.
- Responsive to Pruning: Azaleas heal well from pruning and respond by growing back with even denser foliage. This allows you to shape the tree and create lush, full pads of leaves.
- Fibrous Root System: They have a fine, fibrous root system rather than a single deep taproot. This makes them much easier to manage in a shallow bonsai pot and simplifies the repotting process.
- Interesting Trunks: With a little age, azaleas can develop beautiful, gnarled-looking trunks that give your bonsai a sense of character and maturity.

Choosing the Right Azalea Variety
Not all azaleas are created equal when it comes to bonsai. Some varieties are simply better suited for container life and styling. The most popular group by far is the Satsuki azalea, originally cultivated in Japan specifically for bonsai.
Here’s a quick look at some great choices for beginners:
| Azalea Type | Key Features | Why It’s Good for Bonsai |
|---|---|---|
| Satsuki Azaleas | Late-blooming (May-June). Huge variety of flower colors, shapes, and patterns, sometimes on the same plant! | The classic bonsai choice. They are hardy, develop great trunks, and their late bloom time is a highlight of the bonsai season. |
| Kurume Azaleas | Early-blooming, very hardy. Covered in tons of small, single-colored flowers. | A great, tough option for beginners. They are vigorous growers and very forgiving. Their small flowers are perfectly in scale. |
| Indica Azaleas | Often found at florists, with large, vibrant flowers. Typically less cold-hardy. | Good for warmer climates. They can be styled into beautiful bonsai, but may need winter protection in colder areas. |
For your first project, a Satsuki or Kurume azalea from a local nursery is a perfect and affordable starting point.
Gathering Your Tools and Materials
Having the right tools makes any job easier and more enjoyable. You don’t need a lot of expensive equipment to start, but a few key items are essential for success. Think of these as your artist’s toolkit for sculpting a living masterpiece.
- Your Azalea Plant: Look for one with a thick base and lots of low branches. This is your raw material!
- Bonsai Pot: Choose a pot that is about two-thirds the height of your tree. It must have large drainage holes.
- Bonsai Soil: Azaleas need acidic, well-draining soil. Pure Kanuma soil is the traditional choice and works wonderfully. You can also use a mix of akadama, pumice, and lava rock.
- Mesh Screens: Small plastic screens to cover the drainage holes so your soil doesn’t wash out.
- Concave Cutters: This special tool makes clean, hollowed-out cuts that heal better than flat cuts from regular pruners.
- Wire Cutters: For cutting bonsai wire cleanly without damaging the branch.
- Root Rake or Chopstick: A simple but vital tool for gently untangling the roots during repotting.
- Anodized Aluminum Bonsai Wire: It’s soft, flexible, and easy for beginners to use. Get a few different sizes (1.5mm, 2.5mm, 4mm).
- Watering Can with a Fine Rose: This provides a gentle shower that won’t disturb the soil.
Azalea Bonsai: Your Step-by-Step Guide
Alright, it’s time for the fun part! We’re going to take your nursery plant and begin its transformation. Remember to be patient and enjoy the process. This is a slow and rewarding art form. The best time to do this initial work is in early spring or right after the plant has finished flowering.
Step 1: Selecting Your Azalea Plant at the Nursery
Your journey begins with choosing the right canvas. When you’re at the nursery, don’t just grab the first plant you see. Spend some time looking for one with potential. Kneel down and look at the base of the plants.
- Look for a Thick Trunk: The trunk is the hardest thing to change in bonsai. Look for a plant with the thickest trunk base (this is called the “nebari”) you can find. A tapering trunk that is wide at the bottom and thinner at the top is ideal.
- Check for Low Branches: A plant with plenty of low branches gives you more options for styling. You can always remove branches, but you can’t easily add them.
- Assess the Health: Look for a plant with vibrant green leaves and no signs of pests or disease. Avoid plants with yellowing leaves or weak, leggy growth.
- Ignore the Top: Don’t worry too much about the top of the plant. It’s likely to be pruned away anyway. Focus on the potential in the bottom two-thirds of the plant.
Step 2: Preparing the Pot and Soil
Before you take the plant out of its nursery container, get its new home ready. This makes the transition smooth and reduces stress on the plant.
- Prepare the Pot: Take your bonsai pot and cover the large drainage holes with your plastic mesh screens. You can secure them in place by running a piece of wire through the mesh and the smaller anchor holes next to the main drainage hole.
- Add a Drainage Layer: Place a thin layer of larger soil particles (like pumice or lava rock) at the bottom of the pot. This improves drainage and aeration.
- Create a Base Mound: Add a small mound of your bonsai soil mix in the center of the pot. This is where the base of the tree will sit.
Step 3: Repotting and Root Pruning
This is one of the most important steps. We are moving the tree from a deep nursery pot to a shallow bonsai pot, which requires careful work on the roots.
- Remove the Plant: Gently slide the azalea out of its nursery pot. You may need to tap the sides of the pot to loosen it.
- Rake Out the Old Soil: Using your root rake or chopstick, start gently combing the soil away from the roots. Work from the outside in. Be patient and try not to tear the fine roots. Your goal is to remove about two-thirds of the old soil.
- Wash the Roots (Optional): Some people like to gently wash the remaining soil away with a hose to get a clear look at the root structure. This can help you see what you’re doing.
- Prune the Roots: Once the roots are exposed, trim any thick, downward-growing roots. The goal is to create a flat, radial pad of fine feeder roots that will fit into the shallow pot. Use clean, sharp pruners for this. Don’t remove more than one-third of the total root mass.
- Place the Tree in the Pot: Set the tree on the mound of soil in your bonsai pot. Position it slightly off-center for a more dynamic look. Make sure the nebari (the surface roots at the base of the trunk) is slightly exposed.
- Add Soil and Work It In: Add your bonsai soil mix around the roots. Use your chopstick to gently work the soil into all the air pockets around the roots. This is crucial for ensuring good contact between the roots and the new soil.
Step 4: The First Structural Pruning
With the tree securely in its new pot, it’s time to make the first big decisions about its shape. The goal here is not to create a finished bonsai, but to establish its basic structure. Remember to do this major pruning after the azalea has finished flowering to ensure you get blooms next year. For more information on general azalea care, the Clemson Cooperative Extension provides an excellent guide.
- Find the Front: Rotate the tree and look at it from all angles. Decide which side will be the “front”—the side from which it looks best.
- Identify the Trunk Line: Trace the path of the trunk from the base to the top. This is the main line of your design.
- Select Primary Branches: Choose the first branch (lowest), a second branch on the opposite side and slightly higher up, and a back branch to give the tree depth. These will form the main framework.
- Remove Unwanted Branches: Use your concave cutters to remove branches that are growing straight up or down, branches that cross the trunk, or branches that are too thick high up on the tree. Make your cuts clean and flush with the trunk.
- Shorten Remaining Branches: Trim the primary branches you selected to create a triangular outline. The lowest branches should be the longest, with branches getting shorter as they go up the tree.
Don’t be afraid to remove a lot of growth. This initial pruning is about setting a strong foundation for the future.
Step 5: Wiring for Shape and Movement
Wiring is how we give the branches shape and guide their growth. It’s a gentle art. Azalea branches are brittle, so you must be very careful.
- Choose the Right Wire: The wire should be about one-third the thickness of the branch you are wiring.
- Anchor the Wire: For wiring two branches, anchor the wire by wrapping it once around the trunk between them. For a single branch, anchor it by wrapping it around a sturdier branch or the trunk.
- Wrap at a 45-Degree Angle: Wrap the wire around the branch in even coils at a 45-degree angle. This gives you the best combination of holding power and flexibility.
- Bend Gently: Once the wire is on, gently bend the branch into its desired position. Support the branch with your thumbs at the point of the bend to prevent it from snapping.
- Wire the Tree: Work your way from the thickest branches to the thinnest. Don’t wire every single twig, just the main branches you want to position.
The wire should stay on for a few months, but you must watch it carefully. Remove it with your wire cutters before it starts to cut into the bark as the branch thickens. For in-depth tutorials on wiring, the American Bonsai Society website is a fantastic resource.
Step 6: Watering and Aftercare
The first few weeks after repotting and styling are a critical recovery period. Your care during this time is vital.
- Water Thoroughly: Immediately after potting, water your tree thoroughly until water runs freely from the drainage holes. This settles the soil and removes any remaining air pockets.
- Provide Shade: Place the tree in a shady, protected spot for 2-4 weeks. This allows it to recover from the root pruning without the stress of direct sun.
- Keep the Soil Moist: Azaleas must never be allowed to dry out completely. Check the soil daily by touching it. If the top half-inch feels dry, it’s time to water again.
- No Fertilizer Yet: Do not fertilize your tree for at least a month after repotting. The roots are healing, and fertilizer can burn them.
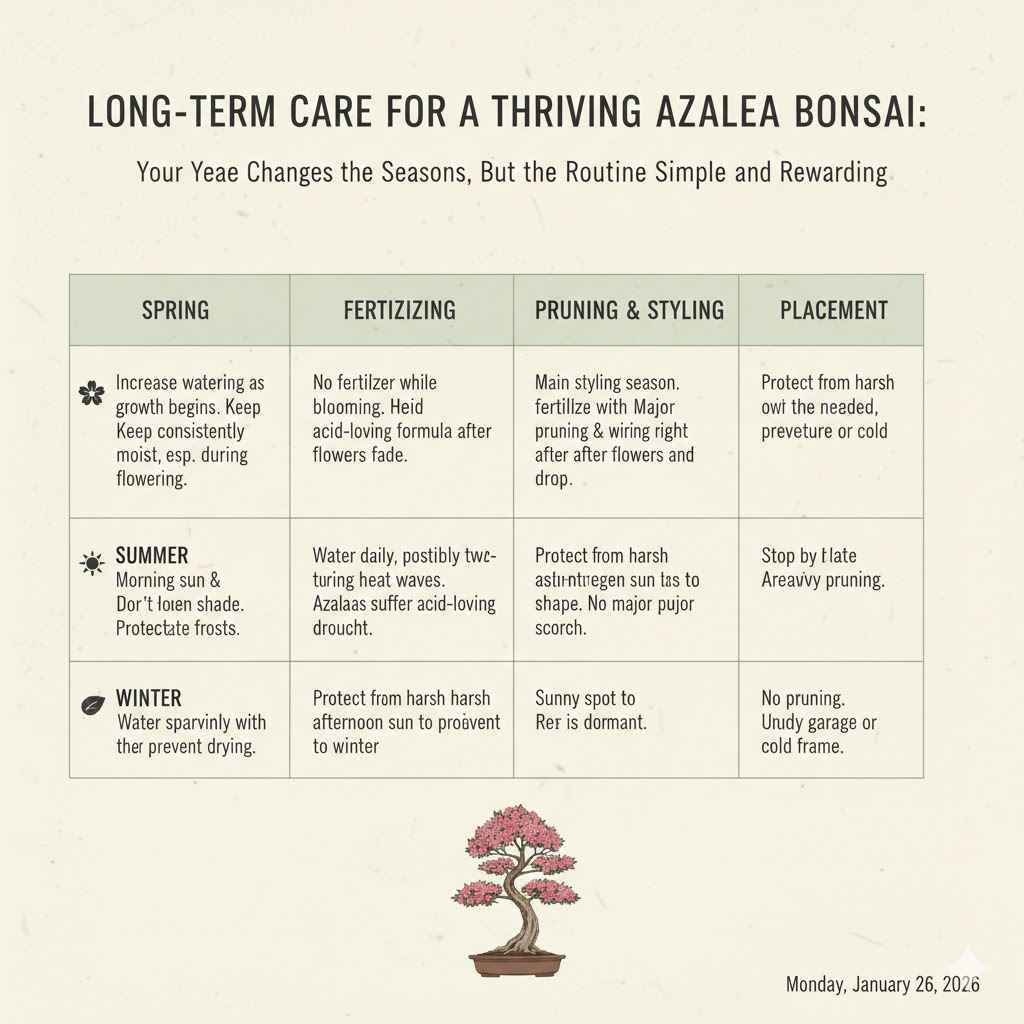
Long-Term Care for a Thriving Azalea Bonsai
Your azalea bonsai is a long-term companion. Its care changes with the seasons, but the routine is simple and rewarding. This calendar will help you keep track of its needs throughout the year.
| Season | Watering | Fertilizing | Pruning & Styling | Placement |
|---|---|---|---|---|
| Spring | Increase watering as growth begins. Keep consistently moist, especially during flowering. | Do not fertilize while it is in bloom. Begin fertilizing with an acid-loving formula after flowers fade. | This is the main styling season. Perform major pruning and wiring right after the flowers drop. | Move to a spot with morning sun and afternoon shade. Protect from late frosts. |
| Summer | Water daily, possibly twice a day during heat waves. Azaleas suffer quickly from drought. | Fertilize every two weeks with a balanced, acid-loving fertilizer. | Pinch back new shoots to maintain shape and encourage dense growth. No major pruning. | Protect from the harsh afternoon sun, which can scorch the leaves. |
| Autumn | Reduce watering as temperatures cool and growth slows. Still, do not let it dry out completely. | Switch to a low-nitrogen or no-nitrogen fertilizer to promote root health and next year’s flower buds. Stop fertilizing by late autumn. | Minor trimming to maintain shape is fine. Avoid heavy pruning. | Keep in a sunny spot to help it prepare for winter. |
| Winter | Water sparingly, only when needed to prevent the soil from completely drying out. | No fertilizer. The tree is dormant. | No pruning. This is a time for rest. You can study the tree’s structure and plan for spring. | Protect from freezing temperatures. An unheated garage, cold frame, or mulching the pot into the ground are good options. |
Frequently Asked Questions (FAQ)
When is the best time to start an azalea bonsai?
The ideal time is in early spring, just as the buds begin to swell, or immediately after the plant has finished flowering. This timing minimizes stress on the plant and aligns with its natural growth cycles.
How often should I water my azalea bonsai?
Check the soil every day. A good rule is to water thoroughly when the top half-inch of soil feels dry to the touch. In hot summer months, this might be daily, while in winter it could be only once a week. Azaleas should be kept consistently moist, but not waterlogged.
Can I keep my azalea bonsai indoors?
Azaleas are fundamentally outdoor plants. They require a period of cold dormancy in the winter to set buds for the following year. You can bring them indoors for a week or two to enjoy their flowers, but they must live outside for the majority of the year to stay healthy.
Why are my azalea’s leaves turning yellow?
Yellow leaves can be a sign of several issues. The most common cause is a soil pH that is not acidic enough, which prevents the plant from absorbing iron (a condition called chlorosis). Other causes include overwatering, underwatering, or too much direct sunlight.
What is the best soil for an azalea bonsai?
The best soil is one that is acidic and drains very well. Pure Kanuma, a volcanic soil from Japan, is the gold standard for azaleas. A good alternative is a mix of akadama, pumice, and a small amount of pine bark to lower the pH.
How long does it take to create a beautiful azalea bonsai?
You can create a tree with a basic, pleasing shape in the very first year. However, developing a refined, mature-looking bonsai is a long and rewarding journey that takes many years of patient pruning, wiring, and care. Enjoy the process and celebrate the small changes each season.
What kind of fertilizer should I use?
Always use a fertilizer formulated for acid-loving plants like azaleas, rhododendrons, or camellias. A balanced liquid fertilizer applied at half-strength every two weeks after flowering until fall is a good routine.
Your Journey Begins Now
Creating an azalea bonsai is a beautiful way to connect with the seasons and practice a living, breathing art form. We’ve walked through every step, from choosing your plant at the nursery to setting it up for a long and healthy life. You now have the knowledge and the roadmap to begin.
Don’t strive for perfection on your first try. Your goal is to learn and enjoy the process. Every time you water, prune, or simply admire your tree, you are building a relationship with it. Your azalea will teach you patience and reward you with stunning beauty. So take a deep breath, gather your tools, and start your bonsai adventure. I know you can do it!