Drawing a flower pot can be a fun and relaxing activity. It’s a great way to improve your art skills and create beautiful illustrations.
In this blog post, you’ll learn how to draw a flower pot, step by step. Whether you are a beginner or have some experience, following these simple instructions will help you create a lovely flower pot drawing. You don’t need any special tools, just some paper and a pencil.
Drawing can be a peaceful hobby that lets you express your creativity. By the end of this guide, you’ll have a charming flower pot sketch to display or share with friends. So, grab your materials and let’s get started on this artistic journey!
Materials Needed
You need a few supplies to draw a flower pot. First, get a sketchbook or drawing paper. Next, you need pencils. Use HB for light lines and 2B for dark lines. An eraser is also important for corrections. Colored pencils or markers will add color to your drawing. Make sure you have a sharpener to keep your pencils sharp. Finally, a ruler will help with straight lines.
Optional tools can make drawing easier. A blending stump can help blend pencil lines. Graphite sticks are good for shading large areas. Drawing gloves keep the paper clean. Light boxes can help trace drawings. Fixative spray keeps your drawing from smudging. A drawing board gives a firm surface to work on.
Setting Up Workspace
Create a calm space with good light. Gather paper, pencils, erasers, and a ruler. Follow step-by-step to draw a flower pot.
Choosing A Location
Pick a quiet spot. Make sure there’s good light. Natural light is best. Use a desk or table. It should be flat and clean. Avoid places with a lot of movement. Stay away from noise and distractions.
Organizing Materials
Gather all your drawing tools. Get pencils, erasers, and paper. Keep them within reach. Use a pencil sharpener. Have a ruler for straight lines. Get a clean cloth. It helps keep your hands and workspace clean. Use a clipboard to hold your paper. Be sure to have extra paper ready. Keep everything organized. This helps you draw better.
Basic Shapes
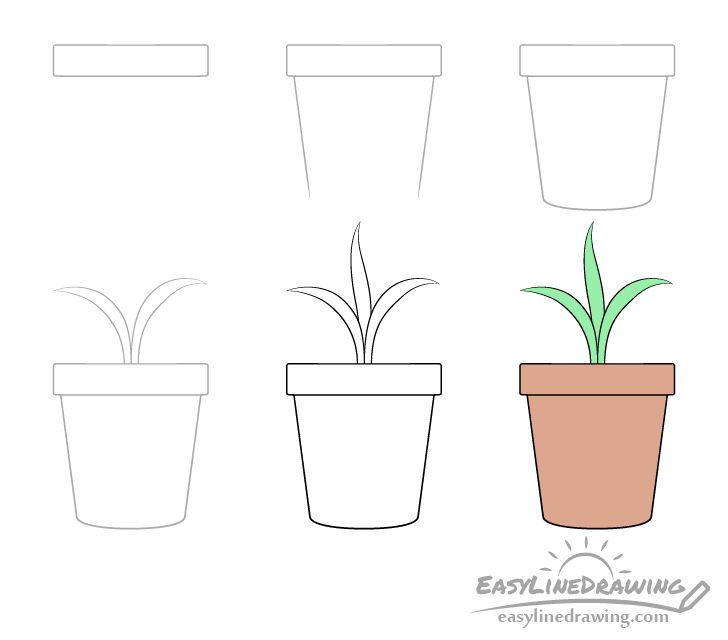
Start with a simple oval shape for the pot base. Make sure it’s not too wide. Draw a straight line down from each side of the oval. Connect these lines with a curved line at the bottom. This forms the basic pot shape.
Draw another oval shape above the pot base. This oval should be slightly wider. Connect the sides of this oval to the base using short, curved lines. This creates the rim of the pot. Make sure the lines are smooth.
Credit: www.youtube.com
Adding Details
The pot’s shape is important. Start with a simple oval for the base. Draw two lines going up from the sides. Connect them with a curved line at the top. This makes the pot look 3D. Make sure the top is wider than the bottom. This gives a natural look.
Adding texture makes the pot look real. Draw small lines on the pot. These lines show where the clay is rough. Add some dots and small circles. This adds detail. Don’t make the lines too dark. Light lines work best. This keeps the drawing soft.
Drawing The Flowers
Create a beautiful flower pot drawing with easy steps. Follow simple instructions to sketch petals, leaves, and the pot. Perfect for beginners and fun for all ages.
Sketching Stems
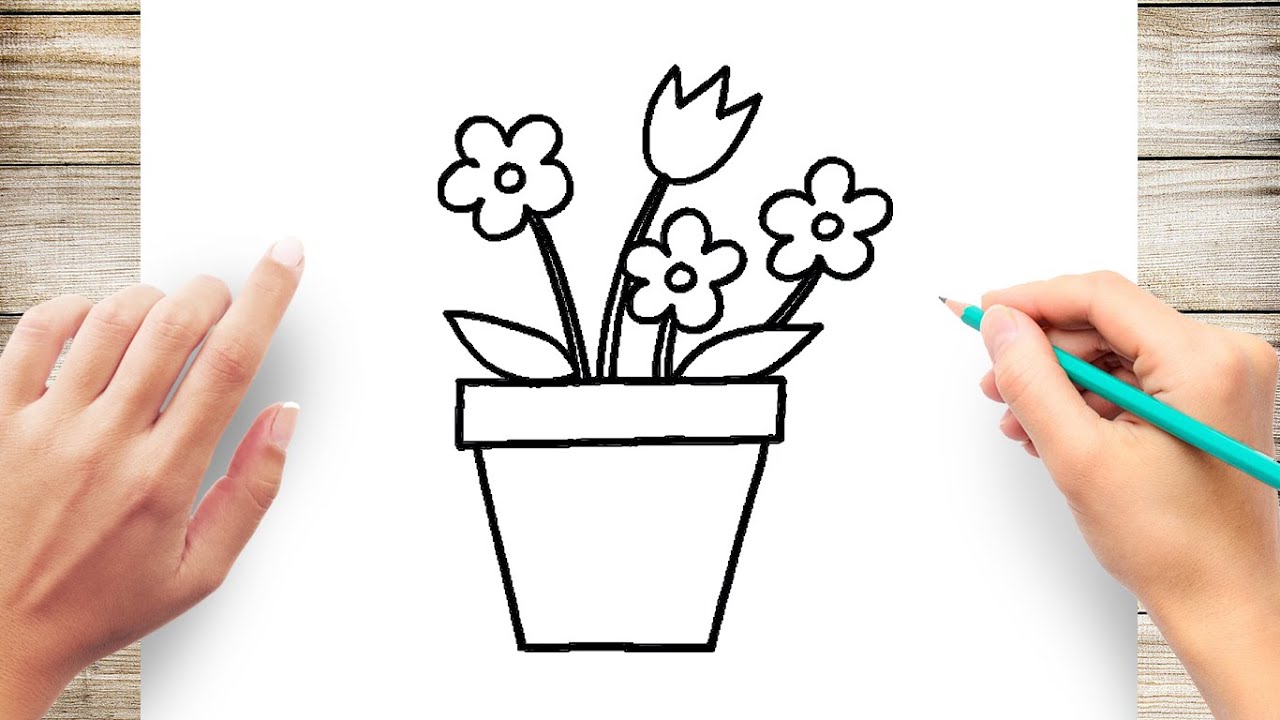
Begin by drawing straight lines for the stems. Use a light pencil for this step. Make the stems slightly curved to look natural. Draw each stem from the pot to the flower. Make sure the stems are different lengths. This makes the drawing more interesting. Add small lines for leaves on the stems. The leaves should be simple and not too big. Keep the lines light so you can erase if needed. Sketch slowly to avoid mistakes.
Creating Petals
Start at the top of each stem. Draw small circles or ovals for the flower centers. These should be in the middle of the flower. Next, draw the petals around the centers. Make the petals big and round. Each petal should touch the next one. The petals can be different shapes. Some can be round, others pointed. This adds variety to your drawing. Make sure to draw lightly. You can darken the lines later. Add detail to the petals with short lines. This makes the petals look real.
Shading Techniques
Shading adds depth to your drawing. Light and shadow make objects look real. Think about where the light is coming from. The side facing the light is bright. The opposite side is dark. This creates a shadow. The shadow is darkest close to the object. It gets lighter as it moves away. Practice shading to make drawings more lively.
Blending makes shading smooth. You can use your finger or a blending tool. Start with light strokes. Then, blend the edges gently. This removes harsh lines. Soft shading looks more natural. Try different tools for different effects. Some use tissues. Others like blending stumps. Find what works best for you. Keep practicing to improve your skills.
Final Touches
Finish your flower pot drawing with final touches. Add details like shading, texture, and highlights. This makes your drawing stand out.
Enhancing Details
Make the flower pot look real by adding small details. Draw lines to show the edges. Use light and dark shades to give depth. Add tiny patterns or textures on the pot. This will make it more interesting.
Erasing Guidelines
Remove the extra lines drawn earlier. Clean up the sketch. Make sure the main lines are clear. Use a soft eraser to avoid smudging. Now, the flower pot drawing is neat and tidy.

Credit: www.pinterest.com
Displaying Your Art
Create beautiful art with a flower pot step-by-step drawing guide. Learn easy techniques for stunning results. Perfect for beginners and art lovers.
Choosing A Frame
A frame can make your drawing look even better. Pick a frame that matches your art style. A wooden frame can give a natural look. A metal frame offers a modern touch. The size of the frame should fit your drawing well. Make sure the colors do not clash. Use a mat board for added depth. This can highlight your flower pot drawing.
Finding A Spot
Place your framed drawing where it can be seen. A living room wall is a good spot. It can also go in a hallway or bedroom. Good lighting can make a big difference. Avoid direct sunlight to prevent fading. Try different spots until you find the best one. Your drawing should bring joy to your space.

Credit: www.facebook.com
Frequently Asked Questions
How To Start Drawing A Flower Pot?
Begin by sketching a simple oval shape for the pot’s rim. Next, draw two vertical lines from the edges to form the sides. Finally, connect the bottom with a curved line to complete the pot shape.
What Materials Are Needed For Drawing?
You’ll need paper, a pencil, an eraser, and colored pencils or markers. Optional items include a ruler for straight lines and a blending tool for shading.
How To Add Details To A Flower Pot Drawing?
Add details like the pot’s texture, cracks, or patterns. Draw flowers by sketching stems, leaves, and petals. Enhance with shading and coloring for a realistic look.
How Long Does It Take To Draw A Flower Pot?
It typically takes around 30 minutes to an hour. The time varies depending on the complexity and detail you want to add.
Conclusion
Creating a flower pot drawing is both fun and rewarding. Follow the steps carefully. Practice makes perfect. Each stroke improves your skills. Enjoy the process. Share your work with friends. Inspire others to draw too. Drawing can be a relaxing hobby.
So, grab your pencils. Start your flower pot drawing today. Happy drawing!

My mission is to help you bring the beauty of nature indoors with expert advice, detailed plant care guides, and creative design ideas.


Leave a Reply